How to Make Kielbasa at Home: The Complete Polish Sausage Guide
If there’s one sausage that deserves a permanent place in every home charcutier’s repertoire, it’s kielbasa. This Polish smoked sausage — garlicky, juicy, with a snap of natural casing and a whisper of smoke — is one of the most satisfying things you can make at home. And once you’ve tasted kielbasa made from scratch with real pork shoulder and actual wood smoke, you’ll never go back to the shrink-wrapped supermarket versions.
The word “kielbasa” simply means “sausage” in Polish. In Poland, there are dozens of regional varieties — from the thin, dried kabanosy to the coarse-ground kielbasa wiejska (country sausage). What Americans know as kielbasa is closest to kielbasa zwyczajna (ordinary sausage) or kielbasa wœdzona (smoked sausage) — a medium-grind pork sausage seasoned with garlic and marjoram, stuffed into natural hog casings, and hot-smoked until cooked through.
Making kielbasa at home is straightforward if you have a meat grinder, a sausage stuffer, and a way to smoke. The ingredient list is short, the technique is forgiving, and you’ll produce sausage that’s dramatically better than anything commercially available. Here’s how to do it right.
What Makes Kielbasa Special
What sets kielbasa apart from other sausages is its simplicity and balance. Unlike Italian sausage with its bold fennel and chili flakes, or French saucisson with its wine and peppercorns, kielbasa relies on just a few aromatics — garlic and marjoram — to create a flavor profile that’s unmistakably Polish. The smoke does the rest.
Traditional kielbasa has a few key characteristics:
- Pork-forward flavor: The meat is the star. Good kielbasa tastes like pork first, smoke second, and garlic third.
- Medium grind: Coarser than a hot dog, finer than Italian sausage. The texture should be visible but cohesive — you can see distinct pieces of meat and fat, but they bind together when bitten.
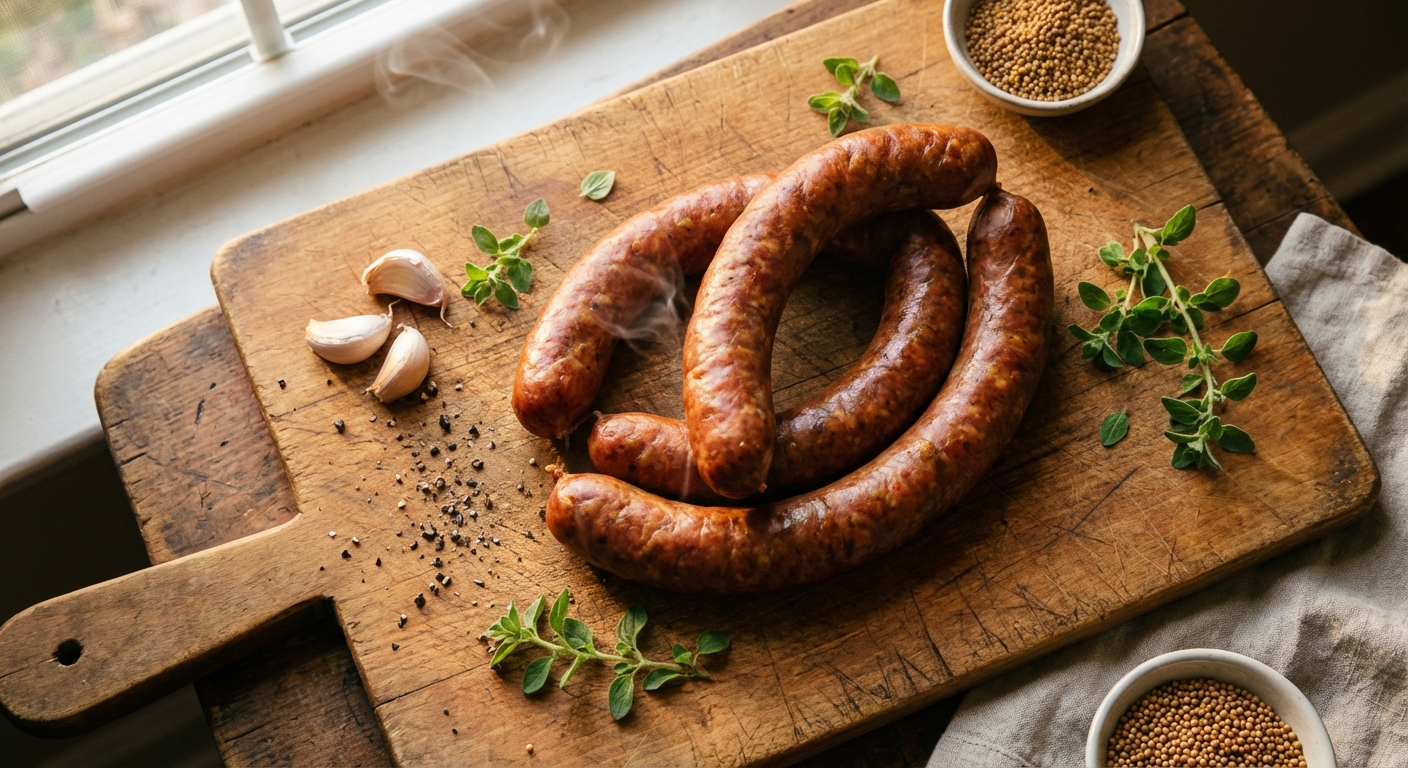
- Natural casing snap: When you bite through the casing, there should be an audible snap followed by a rush of juice. This requires natural hog casings and proper smoking technique.
- Balanced smoke: Not overwhelming — just enough to add depth and create that distinctive mahogany exterior.
- Garlic and marjoram: The signature seasoning combination. Marjoram is the herb that says “Polish sausage” more than anything else.
In Polish households, kielbasa-making is a communal activity, often done before Easter (kielbasa is a centerpiece of the Świœconka Easter basket) or before winter when families would process a whole hog. The recipes pass through generations — my mentor’s grandmother’s recipe is the foundation for what I’m sharing here, adapted for the home kitchen.
Ingredients for a 10-Pound Batch
Kielbasa requires few ingredients, but the quality of each matters enormously. Here’s what you need for a full 10-pound batch, which yields roughly 15-18 links depending on size:
Meat
- 7 lbs (3.2 kg) pork shoulder (Boston butt) — bone removed, cut into 1-inch cubes. Shoulder has the ideal fat-to-lean ratio (about 70/30) for kielbasa. Don’t go leaner — fat is what makes kielbasa juicy.
- 3 lbs (1.4 kg) pork back fat — cut into 1-inch cubes. If your shoulder is particularly fatty, reduce back fat to 2 lbs. The total fat content should be about 25-30% of the batch.
Seasonings
- 50g kosher salt (about 3 tablespoons) — approximately 2.2% of total meat weight. This is the correct ratio for flavor and preservation.
- 15g fresh garlic, minced (about 5-6 large cloves) — garlic is the soul of kielbasa. Use fresh, never powder, for the best flavor.
- 8g dried marjoram (about 1.5 tablespoons) — the defining herb. Rub it between your palms before adding to release the oils.
- 6g coarsely ground black pepper (about 1 tablespoon)
- 3g sugar (about 1/2 teaspoon) — balances the salt and helps with browning during smoking
- 6g Cure #1 (Prague Powder #1) (about 1 teaspoon) — 0.13% of total weight. Required for the characteristic pink color and as a safety measure during the smoking process. See our curing salts guide for details.
- 1 cup ice-cold water — helps bind the forcemeat and keeps the temperature low during mixing
Casings
- Hog casings, 32-35mm — Natural hog casings are essential for the snap. You’ll need about 15-20 feet for a 10-pound batch. Soak in warm water for 30 minutes before use, then flush water through the interior to check for holes.
Equipment
- Meat grinder with coarse plate (3/8-inch or 10mm) and medium plate (1/4-inch or 6mm)
- Sausage stuffer — a dedicated vertical stuffer works best. Grinder attachments work but stuff unevenly.
- Smoker — any type works. Offset, kettle, electric — you just need the ability to hold 160-180°F and produce smoke. See our smoking wood guide for wood selection.
- Meat thermometer — instant-read for checking internal temperature
- Large mixing bowl and sheet pans
- Butcher’s twine for tying links
Step 1: Prepare the Meat
Temperature control starts here. Cold meat grinds cleanly; warm meat smears and creates a greasy, mealy texture. This is the single most important technical point in sausage making.
- Cut the pork shoulder and back fat into 1-inch cubes. Keep them separate if they’re at different temperatures.
- Spread the cubes on sheet pans in a single layer and freeze for 30-45 minutes. You want the meat to be very cold — partially frozen on the edges, about 28-32°F. Not frozen solid.
- Chill your grinder parts — put the blade, plates, and housing in the freezer alongside the meat. Cold metal grinds better.
While the meat chills, prepare your seasonings. Mince the garlic finely (or press it — we want it distributed evenly, not in chunks that create garlic pockets). Measure out all dry seasonings and combine them in a small bowl. Dissolve the cure #1 in the ice water.
Step 2: Grind
Traditional kielbasa uses a medium grind — coarser than a frankfurter, finer than a coarse Italian sausage. I do a double grind for the best texture:
- First pass: Coarse plate (3/8-inch). Feed the partially frozen pork and fat through the coarse plate. Work quickly — if the meat starts to warm up and smear, stop and re-chill for 15 minutes.
- Mix in the seasonings. Add the dry seasoning blend, minced garlic, and cure water to the coarse-ground meat. Mix thoroughly with your hands (wear gloves) for 2-3 minutes until the mixture becomes sticky and cohesive. This develops the myosin protein extraction that binds the sausage — you’ll feel the texture change from loose to tacky.
- Second pass: Medium plate (1/4-inch). Feed the seasoned, coarse-ground mixture through the medium plate. This creates the classic kielbasa texture — visible meat and fat pieces within a cohesive bind.
Alternative single-grind method: If you prefer a slightly coarser texture, grind once through the medium plate (skipping the coarse grind), then mix in seasonings by hand. Many Polish home sausage makers use this simpler approach.
Step 3: Test the Seasoning
Before you stuff 10 pounds of sausage, make sure the seasoning is right. Take a small patty of the mixture (about 2 tablespoons), flatten it, and cook it in a skillet until done. Taste it.
The cooked patty should taste well-seasoned but not salty, with clear garlic flavor and the herbal warmth of marjoram. Remember that smoking will intensify flavors, so the raw mixture should taste slightly under-seasoned — the smoke and curing process will amplify everything.
Adjust salt, garlic, or marjoram as needed before proceeding. This test fry step saves you from discovering a seasoning problem after you’ve stuffed and smoked the entire batch.
Step 4: Stuff the Casings
Prepare your hog casings by soaking in warm water for at least 30 minutes, then flushing water through the interior. Slide the entire length of casing onto the stuffer tube, leaving a 3-inch tail hanging off the end (don’t tie it yet — you’ll let air escape first).
- Load the stuffer with the seasoned meat mixture, pressing out any air pockets.
- Start stuffing slowly. Apply steady, even pressure. The casing should fill firmly but not so tight that it splits. Imagine the casing is about 80% full — you need room for the sausage to expand slightly during smoking without bursting.
- Keep it even. If you see air bubbles, prick them with a pin or sausage pricker. Air pockets create voids where fat can pool and flavor is lost.
- Coil or link. Traditional kielbasa is often stuffed as one long rope and coiled into a U-shape or spiral. For individual links, twist the filled casing every 6-8 inches, alternating the direction of the twist (clockwise, then counter-clockwise) to keep them from unraveling. Tie the ends with butcher’s twine.
Pro tip: Don’t overstuff. It’s the most common beginner mistake, and it results in burst casings during smoking. If the casing feels drum-tight, you’ve gone too far. Slightly under-stuffed sausage looks and tastes better than a casing that’s split open.
Step 5: Rest Before Smoking
After stuffing, place the kielbasa on a rack set over a sheet pan and refrigerate uncovered for at least 4 hours, preferably overnight. This rest period accomplishes several things:
- The cure distributes evenly throughout the meat
- The casing dries slightly, which helps it develop a better color and snap during smoking
- Flavors meld — the garlic and marjoram permeate the entire mixture
- The pellicle forms — a tacky surface protein layer that smoke adheres to. Without a pellicle, smoke slides right off and you get uneven color.
When you take the kielbasa out of the fridge, the surface should feel slightly tacky to the touch — not wet, not slippery. That tackiness is the pellicle, and it’s your best friend for smoke adhesion.
Step 6: Smoke the Kielbasa
This is where kielbasa gets its soul. The smoking process cooks the sausage, develops the color, and adds the smoky depth that defines this sausage.
Wood Selection
Traditional Polish kielbasa is smoked with hardwood — apple wood, cherry wood, or oak are classic choices. Apple and cherry give a milder, sweeter smoke that complements pork beautifully. Oak is stronger and more traditional for kielbasa from certain regions. Avoid mesquite — too aggressive for sausage.
Hickory works well if you prefer a more American-style smoke flavor. My personal favorite for kielbasa is a blend of 60% apple and 40% hickory — sweet and smoky in perfect balance.
Temperature Protocol
The key to great smoked sausage is a gradual temperature ramp. You don’t blast kielbasa at 250°F like a brisket — the casing will split, the fat will render out, and you’ll end up with dry, shriveled links.
- Phase 1 (1 hour): 130°F with smoke. Low heat to dry the casing further and start building color. The smoke adhesion is best when the surface is cool.
- Phase 2 (1 hour): 150°F with smoke. Increase heat slightly. The casing is developing its mahogany color and the interior is slowly warming.
- Phase 3 (1-2 hours): 170-180°F with smoke. The final push. Continue until the internal temperature of the sausage reaches 155°F. Some recipes say 160°F, but 155°F is sufficient with the cure, and the sausage will be juicier.
Total smoking time is typically 3-4 hours depending on the diameter of your links and your smoker’s characteristics. The internal temperature is what matters, not the clock.
The Ice Bath
When the kielbasa reaches 155°F internal, immediately plunge it into an ice water bath. This stops the cooking instantly, prevents carryover from drying out the sausage, and tightens the casing for maximum snap.
Leave the sausage in the ice bath for 10-15 minutes, until the internal temperature drops below 100°F. Then hang or place on a rack to drip dry at room temperature for 30 minutes before refrigerating.
This ice bath step is what separates good kielbasa from great kielbasa. Skip it, and the residual heat will continue cooking the sausage, making it drier and softer. The thermal shock locks in the juices and sets the casing.
Storage and Serving
Smoked kielbasa is a fully cooked product. It can be eaten cold (sliced thin, it’s excellent on a charcuterie board) or reheated by grilling, pan-frying, or simmering.
Storage
- Refrigerator: Up to 2 weeks, tightly wrapped
- Vacuum-sealed in fridge: Up to 4 weeks
- Freezer: Up to 6 months vacuum-sealed. Thaw overnight in the refrigerator.
Best Ways to Serve
- Grilled: Score the casing diagonally, grill over medium heat until charred and heated through. The char on the casing is incredible.
- Pan-fried: Slice into rounds and cook in a skillet until crispy on both sides. Perfect with eggs for breakfast.
- In soup: Slice and add to żurek (Polish sour rye soup), bigos (hunter’s stew), or white bean soup.
- Boiled then grilled: Simmer whole links in beer and onions for 20 minutes, then finish on a hot grill. Classic Polish-American cookout technique.
- On a board: Slice thin at an angle and include on your next charcuterie board alongside mustard and cornichons.
Variations
Once you’ve mastered the basic recipe, experiment with these traditional Polish variations:
Kielbasa Wiejska (Country Sausage)
A coarser grind with visible fat pieces. Use only the coarse plate (no second grind) and increase the fat ratio to 35%. More rustic, more textured — the farmhouse version.
Kielbasa Krakowska (Kraków Sausage)
Large chunks of lean pork (hand-cut, 1/2-inch cubes) bound by a small amount of finely ground forcemeat. Heavily smoked. The pieces of pork are visible when sliced — almost like a head cheese crossed with a smoked sausage.
Kielbasa Myśliwska (Hunter’s Sausage)
A drier, firmer kielbasa meant for travel and long storage. Add juniper berries and additional black pepper to the spice mix, and cold-smoke before hot-smoking. The result is closer to a dry sausage — sliceable, intense, and shelf-stable for weeks. Check our cold vs. hot smoking guide for technique.
Troubleshooting
- Casings burst during smoking: You overstuffed, or the temperature jumped too fast. Next time, stuff to 80% capacity and ramp the smoker temperature gradually.
- Dry, crumbly texture: Not enough fat in the mixture, or the meat got too warm during grinding. Maintain 25-30% fat and keep everything near freezing temperature during processing.
- No casing snap: Casing was too thin, or you skipped the ice bath. Use 32-35mm hog casings and always shock in ice water after smoking.
- Gray color inside: You forgot the curing salt, or it wasn’t mixed in evenly. Cure #1 is what gives kielbasa its characteristic pink interior.
- Weak smoke flavor: The pellicle didn’t form properly, or you didn’t produce enough smoke. Rest uncovered overnight before smoking and ensure consistent smoke output during the first 2 hours.
- Fat pockets or air holes: Inadequate mixing before stuffing, or air trapped during the stuffing process. Mix until the forcemeat is tacky (2-3 minutes), and prick any visible air bubbles during stuffing.
- Uneven color: Sausages were too close together in the smoker, blocking smoke circulation. Leave at least 2 inches between links and rotate midway through smoking.
Kielbasa is one of the most rewarding sausages you can make at home. The ingredient list is short, the process is straightforward, and the results are extraordinary. Once you nail your first batch, you’ll find yourself making it again and again — tweaking the garlic, adjusting the smoke, developing your own family recipe that you’ll pass down just like the Polish grandmothers who perfected this craft centuries ago.
For the best results, start with quality pork shoulder — the fat content and freshness of the meat make an enormous difference in the finished sausage. Pair your kielbasa with a proper wine pairing or include it on your next board alongside other cured meats.
Frequently Asked Questions
What cut of pork is best for kielbasa?
Pork shoulder (Boston butt) is the ideal cut for kielbasa. It has the right fat-to-lean ratio (about 70/30) for juicy, flavorful sausage. Supplement with additional pork back fat to reach 25-30% total fat content. Avoid lean cuts like loin — kielbasa needs fat for texture and moisture.
Do I need curing salt for kielbasa?
Yes, Cure #1 (Prague Powder #1) is essential for smoked kielbasa. It provides the characteristic pink interior color, prevents dangerous bacteria during the smoking process, and contributes to the cured flavor profile. Use at 0.13% of total meat weight — about 1 teaspoon per 10 pounds.
What temperature do you smoke kielbasa to?
Smoke kielbasa to an internal temperature of 155°F using a gradual temperature ramp: start at 130°F for 1 hour, increase to 150°F for 1 hour, then finish at 170-180°F until the internal temp is reached. Total smoking time is typically 3-4 hours. Always ice-bath immediately after smoking.
Why is the ice bath important after smoking kielbasa?
The ice bath stops carryover cooking instantly, preventing the sausage from drying out. It also thermally shocks the casing, tightening it for that signature snap when you bite into the sausage. Submerge for 10-15 minutes until the internal temp drops below 100°F.
How long does homemade kielbasa last?
Refrigerated and tightly wrapped, smoked kielbasa keeps for up to 2 weeks. Vacuum-sealed, it lasts 4 weeks in the fridge or up to 6 months in the freezer. Since kielbasa is fully cooked during smoking, it's ready to eat cold or reheated.
More Charcuterie Guides
What Is Pink Curing Salt? Sodium Nitrite Explained for Home Charcuterie
Pink curing salt is the most essential — and most misunderstood — ingredient in meat curing. This guide explains what it is, why it's pink, how sodium nitrite prevents botulism, proper usage rates, and whether you can cure meat without it.
10 min readHow Long Does Charcuterie Last? Storage Guide for Cured Meats & Cheese
Understanding proper charcuterie storage ensures you enjoy it at peak quality while avoiding food safety risks.
10 min read