How to Make Biltong at Home: The Complete Guide
How to Make Biltong at Home: The Complete Guide
Biltong is one of those foods that, once you've tasted the real thing, ruins every gas station jerky for you permanently. This South African dried meat tradition goes back centuries — Dutch settlers in the 1600s adapted indigenous meat-drying techniques using vinegar and spices to preserve beef during long treks across the African interior. The result was something fundamentally different from jerky: thicker cuts, a vinegar-forward cure, heavy coriander spicing, and air-drying instead of heat dehydration.
The difference matters. Where jerky is thin, smoky, and often sweet, biltong is thick, savory, and deeply meaty. The vinegar cure creates a tangy depth that pairs with toasted coriander in a way that's almost addictive. And because biltong is air-dried rather than cooked or smoked, you get a texture that ranges from soft and moist (wet biltong) to firm and chewy (dry biltong) — both are excellent, and the choice is entirely yours.
Making biltong at home is straightforward. You don't need specialized equipment, fermentation expertise, or a curing chamber. A simple drying box, good beef, vinegar, and the right spice blend are all it takes. I'll walk you through everything.
What Is Biltong?
Biltong is a form of dried, cured meat that originated in Southern Africa. The word comes from Dutch — bil (buttock or rump) and tong (strip or tongue) — literally "strip of rump." While the name references rump, biltong can be made from virtually any cut of beef, as well as game meats like kudu, springbok, ostrich, and eland.
The core process is simple: strips of meat are marinated in vinegar, coated in a spice mixture heavy on coriander and black pepper, and hung to dry in circulating air for 3-7 days. No smoke, no heat, no nitrates. The vinegar acts as both a flavor agent and an antimicrobial, lowering the surface pH to inhibit bacterial growth during the critical early drying phase.
Biltong vs. Jerky: Key Differences
People conflate these constantly, but they're fundamentally different products:
- Cut thickness: Biltong is cut in thick strips (1-2 inches wide, often thicker). Jerky is sliced thin (1/8 to 1/4 inch).
- Curing method: Biltong uses vinegar as the primary cure. Jerky typically uses soy sauce, Worcestershire, or a salt-sugar dry cure.
- Drying method: Biltong is air-dried at room temperature with airflow. Jerky is dehydrated with heat (145-165°F).
- Spice profile: Biltong revolves around coriander and black pepper. Jerky leans on garlic, soy, and sometimes liquid smoke.
- Texture: Biltong ranges from moist and tender to firm and chewy depending on drying time. Jerky is uniformly dry and chewy.
- Fat content: Biltong often retains fat (which adds flavor). Jerky typically uses very lean cuts to prevent rancidity from heat dehydration.
Neither is better — they're different traditions solving the same problem (meat preservation) in completely different ways. But if you've only ever had jerky, biltong will be a revelation.
Choosing the Right Meat
Beef is the traditional and best choice for your first biltong. The cut matters more than people realize — you want something with a consistent grain, moderate fat, and enough thickness to cut proper strips.
Best Cuts for Biltong
- Silverside (bottom round): The classic biltong cut in South Africa. Lean, consistent grain, easy to slice against the grain into uniform strips. This is what I recommend for beginners.
- Topside (top round): Very similar to silverside, slightly more tender. Excellent choice.
- Eye of round: Extremely lean with a tight, uniform grain. Makes beautiful, consistent biltong. The leanness means it dries quickly and stores well.
- Sirloin: More expensive but more flavorful. The fat marbling adds richness. Best for "wet" biltong that's eaten within a week.
- Rump: Good flavor, decent marbling. The original cut referenced in the name. Works well but can be irregular in shape.
What to Avoid
Skip anything with heavy connective tissue, silverskin, or irregular marbling. Chuck, brisket, and shank are poor choices — the connective tissue doesn't break down during air-drying the way it does with cooking. You'll end up chewing on tough sinew. Also avoid pre-sliced stew meat or anything that's been mechanically tenderized.
How Much to Buy
Plan for approximately 50% weight loss during drying. A 5-pound piece of silverside will yield roughly 2.5 pounds of finished biltong. For your first batch, start with 3-5 pounds — enough to learn the process and have plenty to eat.
The Spice Blend
The traditional biltong spice blend is beautifully simple. Coriander is the star — it's non-negotiable and should make up the bulk of your spice mix. Everything else is supporting cast.
Classic Biltong Spice Mix
This recipe makes enough for about 5 pounds of meat:
- 1/2 cup whole coriander seeds — toast in a dry pan until fragrant, then coarsely crush (not powder). You want texture.
- 2 tablespoons coarsely ground black pepper
- 1 tablespoon coarse salt (non-iodized — iodized salt can create off-flavors)
- 1 teaspoon brown sugar (optional — some purists skip this)
- 1/2 teaspoon ground cloves (optional — traditional in some regions)
- 1/4 teaspoon ground allspice (optional)
Toasting the Coriander
This step is critical. Raw coriander seeds taste grassy and mildly soapy. Toasted coriander is warm, citrusy, and slightly nutty — it's an entirely different ingredient. Heat a dry skillet over medium heat, add the coriander seeds, and shake the pan frequently for 2-3 minutes until they darken slightly and become very fragrant. Transfer immediately to a plate to stop the cooking.
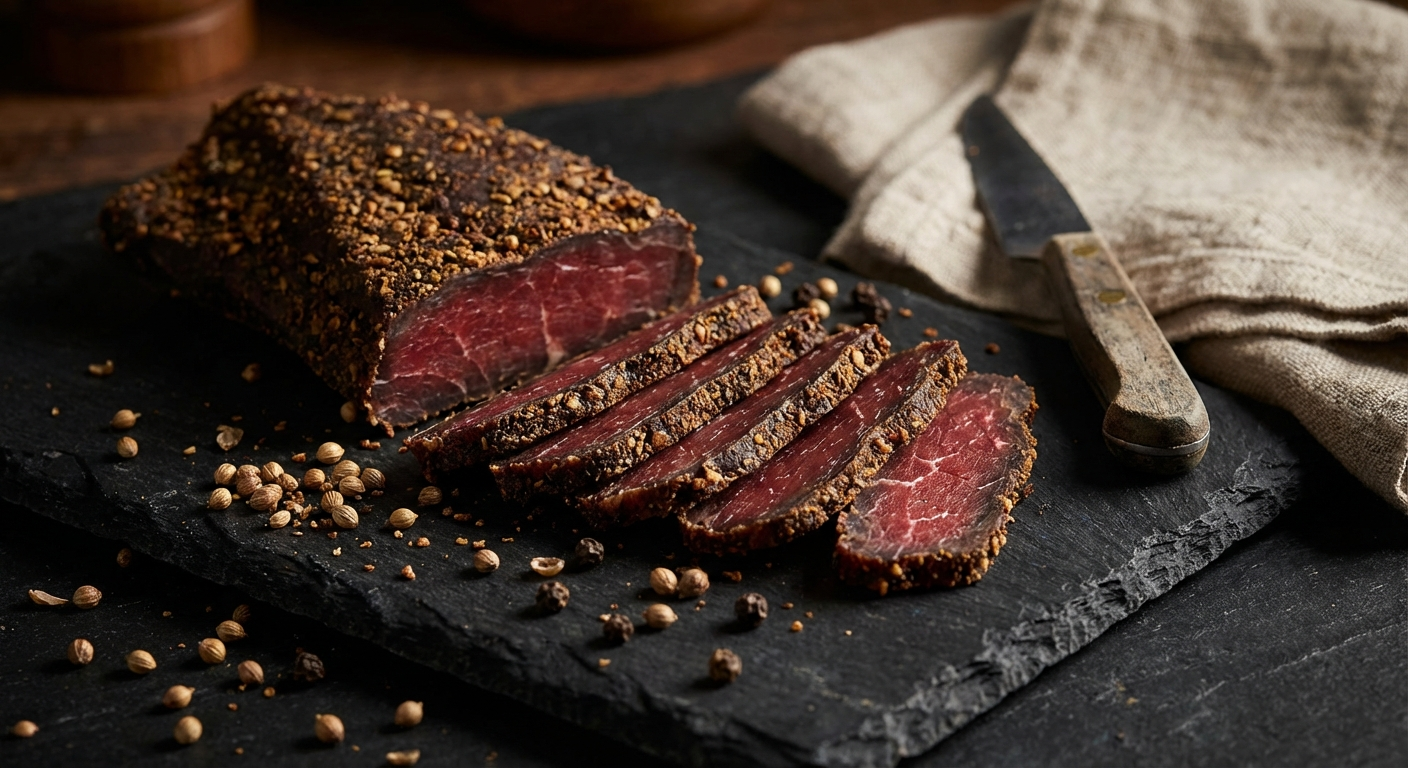
Crush the toasted seeds with a mortar and pestle or the bottom of a heavy pan. You want coarse pieces, not powder. The chunks of coriander clinging to the outside of the biltong are part of the experience.
The Vinegar Cure
Vinegar is what separates biltong from every other dried meat tradition. It serves three purposes: flavor, preservation, and surface preparation. The acetic acid lowers the meat's surface pH, creating an inhospitable environment for harmful bacteria during the early hours of drying when the meat is most vulnerable.
Which Vinegar to Use
- Brown malt vinegar: The traditional South African choice. Robust flavor that pairs beautifully with coriander. This is my top recommendation.
- Apple cider vinegar: Widely available, slightly fruity, works very well. The most popular substitute outside South Africa.
- Red wine vinegar: Adds a subtle wine note. Good for a more refined biltong.
- White vinegar: Works but tastes harsh. Use only if nothing else is available.
You'll need about 1-2 cups of vinegar for a 5-pound batch. The meat gets a thorough vinegar bath before spicing — not a light sprinkle.
Step-by-Step: Making Biltong
Step 1: Prepare the Meat
Start with a whole piece of silverside or topside, ideally 3-5 pounds. Trim any silverskin or tough membrane from the surface — a sharp boning knife works best. Leave some fat if present (fat adds flavor and moisture), but remove any large external fat caps thicker than 1/4 inch.
Cut the meat into strips following the grain of the muscle. Each strip should be approximately 1 inch thick and 1-2 inches wide. The length doesn't matter much — work with whatever your piece gives you. Cutting with the grain is important because you'll slice the finished biltong against the grain for eating, giving you tender bites.
Step 2: Vinegar Bath
Place the meat strips in a non-reactive container (glass, ceramic, or food-grade plastic). Pour enough vinegar over the meat to coat all surfaces generously. Toss the strips to ensure complete coverage. Let them sit for 15-30 minutes — no longer. Extended vinegar soaking can make the exterior too acidic and create a gray, mushy surface texture.
After soaking, remove the strips and shake off excess vinegar. Don't pat them dry — you want the surfaces damp so the spice mix adheres properly.
Step 3: Apply the Spice Blend
Spread your spice mix on a large plate or tray. Roll each vinegar-damp strip through the spices, pressing gently to ensure good adhesion on all sides. Be generous — the spice crust is a defining feature of good biltong, not just a light seasoning.
Layer the spiced strips in a clean container, sprinkling any remaining spice mix between layers. Cover and refrigerate for 12-24 hours. This resting period allows the salt to begin drawing moisture from the meat and the spices to penetrate the surface. I typically do this step the night before and hang the meat the following morning.
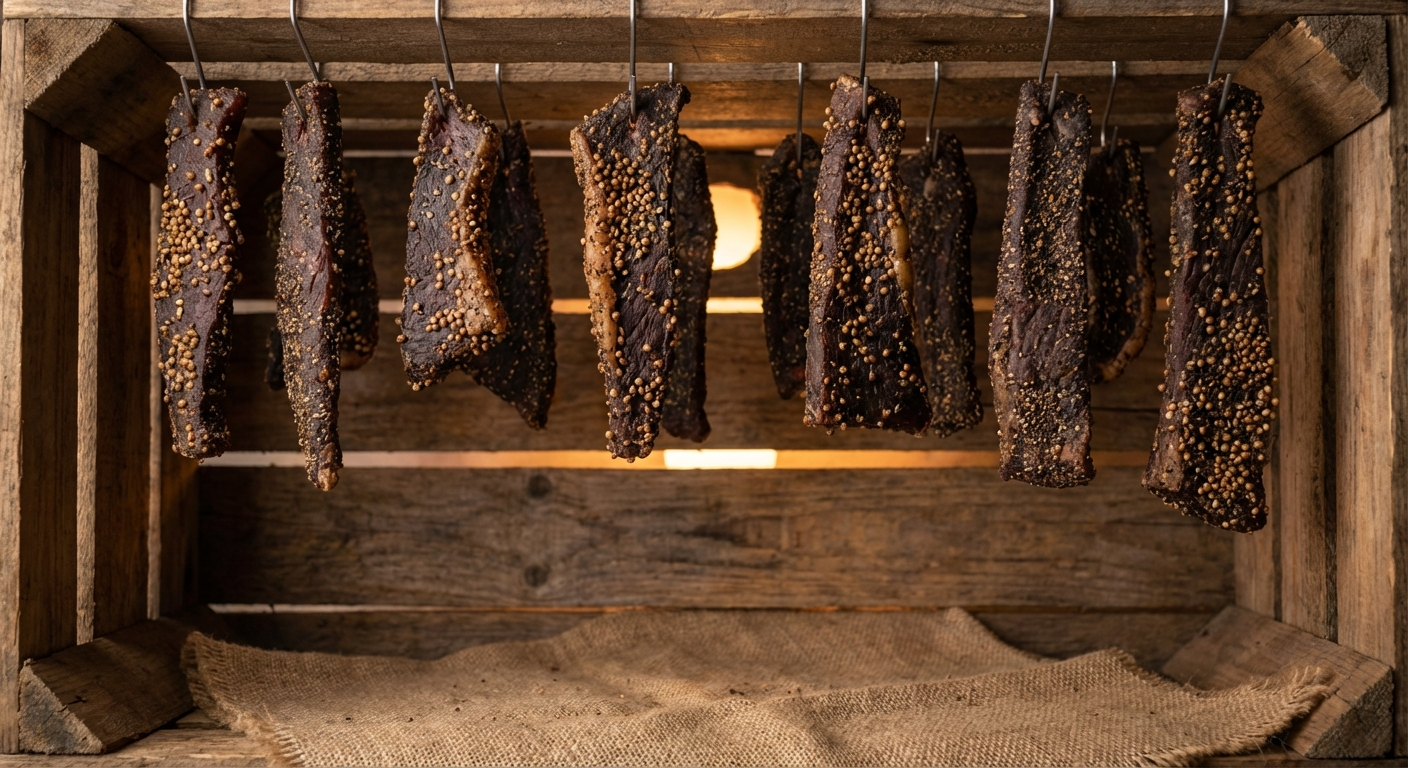
Step 4: Hang to Dry
This is where the magic happens. You need three things for successful drying: airflow, moderate humidity, and protection from insects.
Attach hooks to the top of each strip. S-hooks, paper clips bent into hooks, or even bent wire all work fine. Hang the strips so they don't touch each other — air needs to circulate around all surfaces.
The ideal drying environment is:
- Temperature: 68-77°F (20-25°C). Room temperature is usually fine.
- Humidity: 40-60% relative humidity. Too humid and the meat won't dry (or worse, it molds). Too dry and the outside forms a hard crust (case hardening) while the inside stays wet.
- Airflow: Constant, gentle air movement. A small fan on low speed is ideal.
Step 5: Monitor and Test
Drying time varies based on thickness, humidity, and your preference:
- Wet biltong (3-4 days): Soft, moist, and tender. Deep red throughout. Best eaten within a week.
- Medium biltong (4-5 days): Firm exterior, slightly moist center. The sweet spot for most people. Keeps 2-3 weeks refrigerated.
- Dry biltong (6-7+ days): Firm throughout, chewy texture. Keeps for months at room temperature in a breathable container.
Test by squeezing a strip between your fingers. Wet biltong gives easily, like a medium-rare steak. Medium biltong has firm edges but gives in the center. Dry biltong is firm throughout with minimal give.
Building a Biltong Drying Box
While you can hang biltong in any room with decent airflow, a dedicated drying box gives you consistent results and keeps insects away. Here's a simple, effective design:
Materials
- Large plastic storage container (50-70 quart) or a cardboard box
- Small computer fan (60mm or 80mm USB fan) or a desk fan
- A 40-60 watt incandescent light bulb and fixture (provides gentle warmth and reduces humidity — optional in dry climates)
- Dowel rod or curtain rod to span the top of the box
- S-hooks for hanging
- Drill or soldering iron for ventilation holes
Assembly
Cut a hole in one end of the container and mount the fan so it blows air into the box. Drill or melt 15-20 small ventilation holes (1/4 inch) in the opposite end and along the bottom for air to exit. Mount the dowel rod across the top interior of the box — this is where your hooks will hang. If using a light bulb, mount it in the bottom of the box below the hanging meat, covered with a small shield to prevent dripping fat from hitting it.
The fan runs continuously on low speed. The bulb, if used, provides just enough warmth (75-80°F inside the box) to keep humidity down. This simple setup produces consistent, excellent biltong every time.
Troubleshooting Common Problems
Case Hardening
The outside dries rock-hard while the inside stays wet. This happens when humidity is too low or airflow is too strong. The surface dries so fast it forms an impenetrable shell that traps moisture inside. Prevention: moderate your fan speed, cut strips no thicker than 1 inch, and if your climate is very dry, reduce airflow or add a small dish of water inside the drying box.
White Mold
A light dusting of white mold on the surface is actually harmless and common — similar to the white mold you see on aged salami. Wipe it off with a cloth dampened in vinegar. If you see green, black, or fuzzy mold, discard the affected pieces. Prevention: ensure good airflow and avoid humidity above 60%.
Sour or Off Taste
Usually caused by too-long vinegar soaking (over 30 minutes) or insufficient drying in the early hours. The meat should start losing surface moisture within the first 6-8 hours of hanging. If it still looks wet after 12 hours, increase airflow immediately.
Meat Is Too Salty
Reduce salt in your spice mix next time. For biltong, you need far less salt than for traditional curing — the vinegar does much of the preservation work. Some makers use as little as 1 teaspoon of salt per pound of meat.
Storage and Shelf Life
Biltong storage depends entirely on how dry you've made it:
- Wet biltong: Refrigerate in a paper bag (not plastic — it needs to breathe). Consume within 5-7 days.
- Medium biltong: Refrigerate in a paper bag. Keeps 2-3 weeks.
- Dry biltong: Store at room temperature in a paper bag or cloth bag. Keeps 1-2 months in moderate climates. Refrigerate in humid environments.
Never store biltong in sealed plastic bags or airtight containers — trapped moisture leads to mold growth. Biltong needs to breathe. Paper bags, cloth bags, or perforated containers are ideal.
For long-term storage (3+ months), vacuum-seal dry biltong and freeze. It defrosts beautifully and tastes just as good as fresh.
Slicing and Serving
Always slice biltong against the grain for the most tender eating experience. A sharp chef's knife works, but a dedicated biltong slicer or mandoline gives you those thin, even slices that are ideal for snacking.
Slice thickness is personal preference — paper-thin for delicate snacking, 1/4 inch for a chewier experience. Many South Africans prefer thick chunks rather than thin slices, especially for wet biltong.
Serving Suggestions
- Straight up: The classic. Just slice and eat. Cold beer optional but recommended.
- On a charcuterie board: Biltong adds a unique element to any charcuterie board. Pair it with sharp cheddar, gouda, or blue cheese.
- In salads: Shaved biltong over arugula with parmesan and olive oil is outstanding.
- With eggs: Crumbled biltong in scrambled eggs or on top of avocado toast.
- As a topping: Shaved over pasta, pizza, or baked potatoes.
Variations and Flavor Experiments
Once you've mastered the classic recipe, experiment with these variations:
- Chili biltong: Add 1-2 tablespoons of crushed red pepper flakes or ground cayenne to the spice mix. Popular in South Africa as "chili bites."
- Garlic biltong: Add 2 tablespoons of granulated garlic to the spice blend.
- Worcestershire biltong: Brush strips with Worcestershire sauce before the vinegar bath. Adds an umami layer.
- Game biltong: Venison, elk, or bison all make excellent biltong. Game meats are very lean, so expect faster drying times and a firmer finished texture.
- Smoked biltong: Not traditional, but cold-smoking strips for 2-3 hours before hanging adds a subtle smoke layer. See our cold smoking guide for technique.
Is Biltong Safe?
When made properly, absolutely. The combination of vinegar (acidification), salt (osmotic stress), and controlled drying (water activity reduction) creates an environment where pathogenic bacteria cannot thrive. Biltong has been made safely for over 400 years using these principles.
Key safety practices:
- Start with fresh, high-quality meat from a reputable source
- Don't skip the vinegar — it's not just for flavor
- Ensure adequate airflow from hour one — stagnant air is the biggest risk factor
- Keep drying temperature below 86°F (30°C) — higher temperatures create a danger zone for bacterial growth before adequate drying occurs
- If anything smells off, sour (beyond normal vinegar tanginess), or looks wrong, discard it
For additional food safety peace of mind, you can use curing salt #1 (Prague Powder #1) at 1 teaspoon per 5 pounds of meat. This is not traditional but adds an extra layer of protection against botulism. Many commercial biltong producers use it.
Final Thoughts
Biltong is one of the most rewarding preserved meat projects you can tackle at home. The ingredient list is short, the technique is forgiving, and the results are genuinely better than anything you can buy commercially. Your first batch will teach you everything — how your climate affects drying time, whether you prefer wet or dry, how much spice you like.
Start with a good piece of silverside, toast your coriander properly, don't skip the vinegar, and give it adequate airflow. That's really all there is to it. Three to seven days later, you'll have something special.
If you're new to meat preservation, check out our complete guide to curing meat at home for foundational techniques, or explore our guides to homemade beef jerky and bresaola for other dried meat traditions worth mastering.
More Charcuterie Guides
What Is Pink Curing Salt? Sodium Nitrite Explained for Home Charcuterie
Pink curing salt is the most essential — and most misunderstood — ingredient in meat curing. This guide explains what it is, why it's pink, how sodium nitrite prevents botulism, proper usage rates, and whether you can cure meat without it.
10 min readHow Long Does Charcuterie Last? Storage Guide for Cured Meats & Cheese
Understanding proper charcuterie storage ensures you enjoy it at peak quality while avoiding food safety risks.
10 min read