How to Make Pepperoni at Home: A Complete Step-by-Step Guide
Pepperoni is America’s favorite pizza topping, but the stuff you buy in plastic packages at the grocery store is a pale imitation of real, artisan-made pepperoni. Authentic pepperoni is a dry-cured sausage with deep, complex flavor—smoky, spicy, tangy, and rich. Making it at home gives you control over every variable: the quality of the meat, the heat level, the smoke, and the cure.
The process isn’t difficult, but it does require patience. From start to finish, you’re looking at 3–6 weeks of curing time after stuffing. The hands-on work takes maybe two hours. The rest is waiting while biology and physics do their thing.
This guide covers everything: ingredients, equipment, technique, troubleshooting. By the end, you’ll have pepperoni that makes the commercial stuff taste like cardboard.
What Makes Pepperoni Different from Other Cured Sausages
Pepperoni is an American invention, despite its Italian-sounding name. It evolved from southern Italian salami traditions—particularly the spicy, smoky salamis from Calabria and Campania—but it’s its own thing entirely. What sets it apart:
- Beef and pork blend: Most Italian salami uses pork exclusively. Pepperoni traditionally combines beef and pork, giving it a distinctive flavor profile that’s beefier and more assertive.
- Paprika-forward spice profile: Pepperoni gets its signature red color and sweet-spicy flavor from generous amounts of paprika. Cayenne or red pepper flakes add heat.
- Smoke: Many pepperoni recipes include a smoking step, which isn’t typical for most Italian dry-cured salamis.
- Fine grind: Pepperoni uses a finer grind than most salami, giving it that characteristic dense, tight texture when sliced thin.
Understanding these distinctions matters because they dictate your ingredient choices and technique. You’re not making salami with different spices—you’re making a fundamentally different sausage.
Essential Equipment
You don’t need a commercial setup, but you do need a few key tools. If you’ve made any other homemade salami, you likely already own everything.
Required
- Meat grinder: Standalone or stand mixer attachment. You need a fine plate (3/16” or 4.5mm). Pepperoni’s texture demands a tighter grind than most salami.
- Sausage stuffer: A vertical stuffer gives the best results. Grinder-attachment stuffers tend to smear the meat.
- Digital scale: Accurate to 0.1g. Curing salt measurements are not approximations—they’re safety-critical.
- Curing chamber: 55–65°F (13–18°C) at 70–80% humidity. A converted mini-fridge with a temperature controller and humidifier is the standard DIY solution. See our curing chamber build guide.
- Natural casings: Hog casings (32–35mm) for standard pepperoni. Beef middles if you want the larger diameter sticks.
- Butcher’s twine: For tying links and making hanging loops.
Optional but Helpful
- pH meter: Confirms fermentation is progressing. Target pH of 5.3 or below within 72 hours.
- Smoker: If you want traditional smoked pepperoni. Cold smoking at below 90°F (32°C) is ideal. Hot smoking cooks the meat, which changes the product entirely.
- Vacuum sealer: For long-term storage of finished pepperoni.
Ingredients: The Pepperoni Formula
This recipe makes approximately 5 pounds (2.3 kg) of pepperoni. All percentages are calculated against total meat weight, which is the standard in sausage-making.
The Meat
The classic ratio is 70% lean pork, 30% lean beef. Some recipes go 50/50. The more beef you use, the more assertive and “pepperoni-like” the final flavor. For the pork, use shoulder (Boston butt). For beef, use chuck.
You want the overall fat content around 25–30%. Pork shoulder usually runs about 70/30 lean-to-fat. Beef chuck is leaner, around 80/20. Combined at a 70/30 pork-to-beef ratio, you end up right in the sweet spot.
Temperature matters: Partially freeze your meat to 28–32°F (−2 to 0°C) before grinding. Cold meat cuts cleanly. Warm meat smears into a paste, trapping air and creating fat pockets that ruin the texture.
The Spice Blend (per 5 lbs / 2.3 kg meat)
- Fine sea salt: 3% of meat weight (68g / 2.4 oz). This is the primary preservation agent.
- Cure #2 (Prague Powder #2): 0.25% of meat weight (5.7g). This provides the nitrate/nitrite needed for long-term dry curing. Read our curing salts guide if you’re unfamiliar with how these work.
- Sweet paprika: 2 tablespoons (14g). This is the backbone of pepperoni’s flavor and color.
- Hot paprika or cayenne: 1–2 teaspoons (adjust to your heat preference).
- Crushed red pepper flakes: 1 teaspoon (for heat with visible fleck).
- Garlic powder: 1 tablespoon (9g). Use powder, not fresh—fresh garlic can introduce unwanted bacteria in raw-cured products.
- Fennel seed: 1 teaspoon, lightly toasted and crushed. Optional but traditional in many recipes.
- Black pepper: 1 teaspoon, coarsely ground.
- Dextrose: 0.5% of meat weight (11.4g). This is food for the starter culture during fermentation. Regular sugar works in a pinch but dextrose is preferred.
- Starter culture: Bactoferm F-RM-52 or T-SPX. Follow the manufacturer’s dosage for 5 lbs of meat. The culture drops the pH rapidly, creating an acidic environment that inhibits harmful bacteria.
Step-by-Step: Making Pepperoni
Read the entire process before starting. Mise en place matters here—once you start grinding, you need to move efficiently to keep everything cold.
Step 1: Prep and Grind
- Cut pork and beef into 1–2 inch cubes. Spread on sheet pans and place in the freezer for 30–45 minutes until firm but not frozen solid (28–32°F).
- While the meat chills, prepare your spice blend. Weigh everything precisely. Dissolve the starter culture in a small amount of distilled water per the manufacturer’s instructions.
- Grind the meat through the fine plate (3/16”). If you want an even finer texture, grind twice. Keep the grinder and all components cold—store them in the freezer for 30 minutes before use.
- Place the ground meat in a large mixing bowl set over ice.
Step 2: Season and Mix
- Add all dry spices, salt, Cure #2, and dextrose to the ground meat.
- Add the dissolved starter culture.
- Mix thoroughly with your hands (wear gloves) for 3–5 minutes. You’re looking for the meat to become sticky and cohesive—this is called the “primary bind.” It should stick to your hand when you turn it upside down.
- Do not overmix. Once the spices are evenly distributed and the meat is tacky, stop. Overworking generates heat and smears fat.
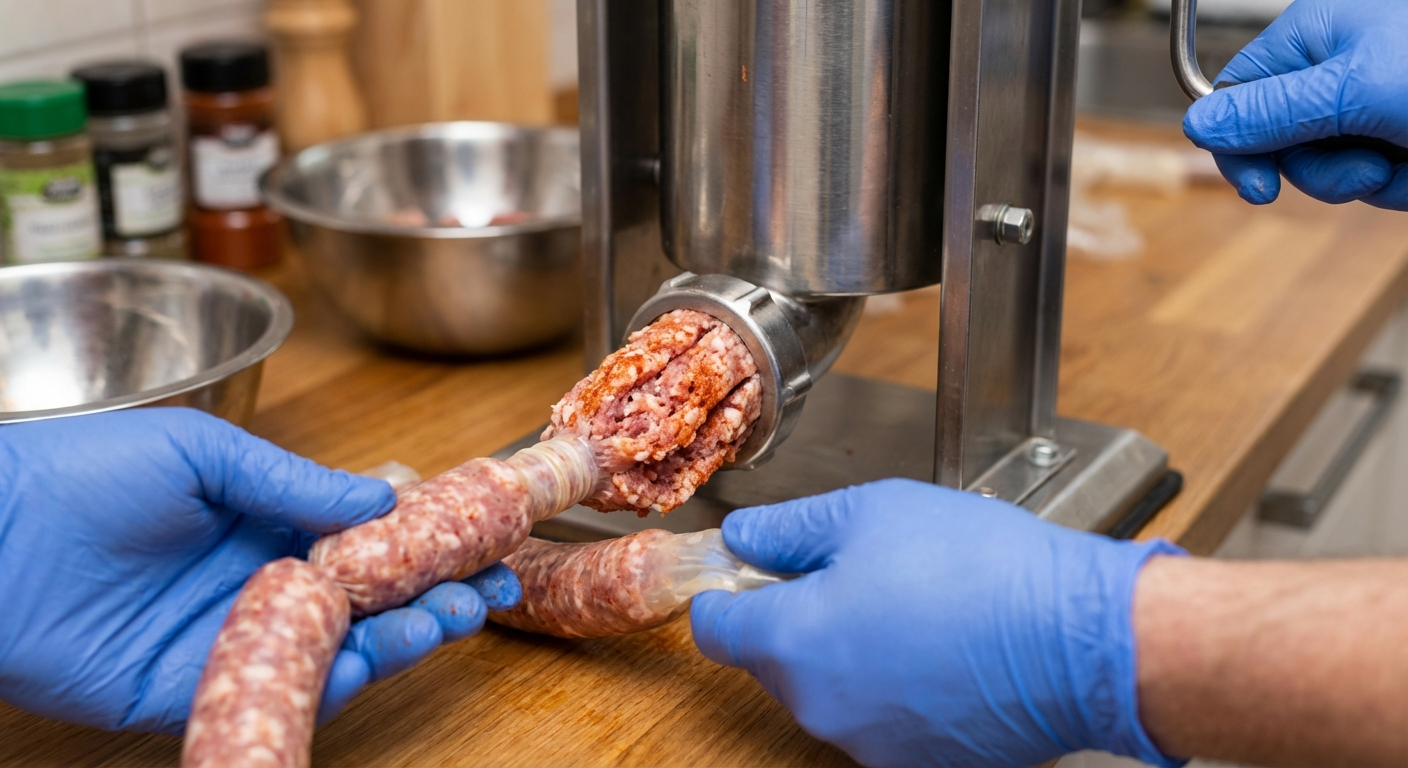
Step 3: Stuff the Casings
- Soak hog casings in warm water for 30 minutes. Rinse the insides by running water through them.
- Load the meat mixture into your stuffer. Remove any large air pockets.
- Slide the casing onto the stuffing tube. Tie a knot at the end or use a hog ring.
- Stuff firmly but not too tight—you need room for the casing to contract during drying. If the casing is drum-tight, it’ll burst or develop air pockets as it shrinks.
- Twist or tie into links at your desired length. Standard pepperoni sticks are 10–12 inches. Pizza-style is often shorter, 6–8 inches.
- Prick any visible air bubbles with a sterile pin. Trapped air creates voids where harmful bacteria can grow.
Step 4: Ferment
This is the most critical food-safety step. During fermentation, the starter culture produces lactic acid, dropping the pH to levels that inhibit pathogenic bacteria.
- Hang the pepperoni in a warm environment: 72–80°F (22–27°C) at 80–90% humidity for 48–72 hours.
- If you have a pH meter, check at 48 hours. You want pH at or below 5.3. If it’s not there yet, give it another 12–24 hours.
- The pepperoni will darken slightly and develop a tangy aroma. This is normal—it’s the lactic acid at work.
Do not skip fermentation or rush it. This step is what makes dry-cured sausage safe to eat without cooking. If your environment is too cold, the culture won’t activate properly.
Step 5: Cold Smoke (Optional)
Traditional pepperoni gets a light cold smoke that adds complexity without cooking the meat.
- Cold smoke at below 90°F (32°C) for 4–12 hours. Hickory and cherry are classic wood choices.
- If you don’t have a smoker, you can add 1–2 teaspoons of smoked paprika to the spice blend instead. It’s not the same, but it gets you in the neighborhood.
- For more on the differences between smoking methods, see our cold smoking vs hot smoking guide.
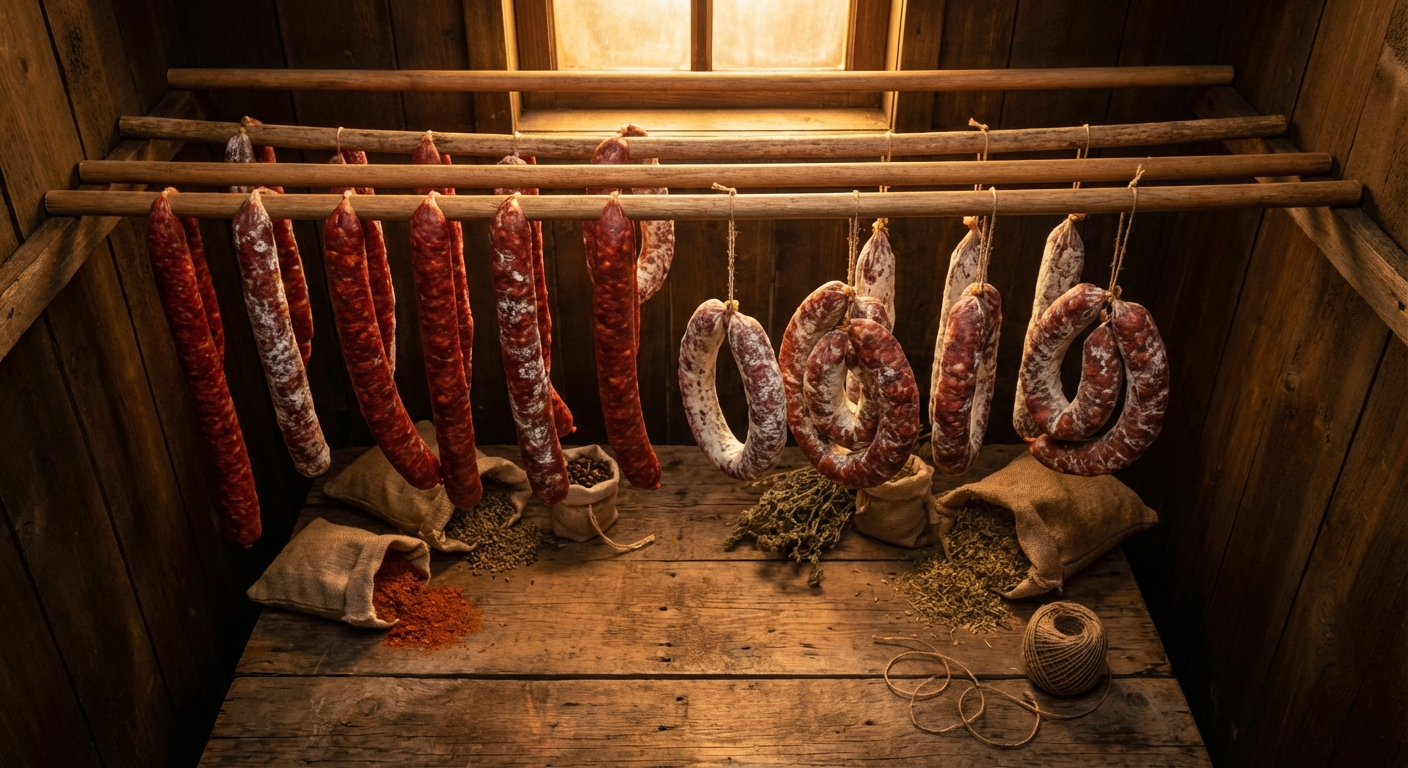
Step 6: Dry Cure
- Transfer the pepperoni to your curing chamber: 55–60°F (13–16°C) at 70–80% humidity.
- Hang with adequate airflow between links. They shouldn’t touch each other or the chamber walls.
- Cure for 3–6 weeks. Thinner casings (32mm hog) will be ready closer to 3 weeks. Thicker beef middles can take 6+ weeks.
- The pepperoni is done when it has lost 30–35% of its original weight. Weigh a few links before hanging and check periodically. If you have a water activity meter, target aw of 0.85–0.90.
During curing, you’ll likely see white mold develop on the casings. This is Penicillium nalgiovense—the same beneficial mold you see on quality Italian salami. It’s desirable: it protects the sausage and contributes to flavor development. If you see green, black, or fuzzy patches of other colors, wipe them off with a cloth dampened in vinegar.
Troubleshooting Common Issues
Even experienced sausage-makers run into problems. Here are the most common issues and what to do about them.
Case Hardening
The outer layer dries into a hard shell while the interior stays wet. This happens when humidity is too low or airflow is too strong. The moisture can’t migrate from the center to the surface fast enough.
Fix: Raise humidity to 80–85% and reduce direct airflow. If already hardened, you can try wrapping the sausage in a damp towel inside a plastic bag in the fridge for 24–48 hours to redistribute moisture, then return to the chamber.
Fat Smearing
The finished pepperoni has a greasy, homogeneous texture instead of distinct lean and fat particles. This means the meat was too warm during grinding or mixing.
Prevention: Keep everything cold. Partially freeze meat before grinding. Chill grinder parts. Mix over ice. Work fast.
Too Sour
Overly acidic, unpleasant tang. The fermentation ran too long or too hot.
Fix: Reduce fermentation time or temperature next batch. Make sure dextrose measurement is accurate—too much sugar means more acid production.
No Fermentation (pH Stays High)
If pH doesn’t drop below 5.3 within 72 hours, the culture may have been killed. Common causes: meat was too hot and killed the culture on contact, the culture was expired, or the fermentation temperature was too low.
Fix: Check culture expiration dates. Store cultures in the freezer. Ensure fermentation environment reaches 72–80°F. If pH hasn’t dropped after 72 hours, discard the batch. Food safety is not negotiable.
Using Your Homemade Pepperoni
Homemade pepperoni is a different animal than the commercial stuff. It’s denser, more flavorful, and less greasy. Here’s how to use it:
- Pizza: Slice thin (1/16”). It will curl and crisp in a hot oven just like the best pizzeria pepperoni. For maximum cup-and-char, use natural casing pepperoni sliced slightly thicker (1/8”).
- Charcuterie boards: Slice thin and fan across the board. Pairs beautifully with aged cheddar, manchego, or pecorino. See our cheese pairing guide for more ideas.
- Snacking: Cut into thick coins and eat as-is. This is the ultimate test of your pepperoni’s quality.
- Sandwiches and antipasto: Layer with provolone, roasted peppers, and olive oil on crusty bread.
Storage
Whole, uncut pepperoni sticks store remarkably well:
- Hanging in the curing chamber: Indefinitely (it will continue to dry and intensify in flavor).
- Refrigerator, wrapped in butcher paper: 2–3 months. Don’t use plastic wrap—it traps moisture and promotes unwanted mold.
- Vacuum sealed, refrigerator: 4–6 months.
- Vacuum sealed, freezer: Up to a year.
Once you cut into a stick, wrap the cut end in butcher paper and refrigerate. Use within 2–3 weeks for best quality.
Making It Your Own
Once you’ve nailed the basic recipe, experiment. That’s the whole point of making your own.
- Heat level: Swap cayenne for ghost pepper powder or Carolina Reaper flakes for serious heat. Start with a quarter teaspoon and work up.
- Smoke: Try different woods. Apple gives a mild sweetness. Mesquite is aggressive. Oak is a solid middle ground.
- All-beef pepperoni: Skip the pork entirely for an all-beef version. Add 20–25% beef fat (suet) to compensate for the lower fat content.
- Wine: Add 2–3 tablespoons of dry red wine per 5 lbs of meat. It adds complexity and helps dissolve spices. Common in Italian-style recipes.
- Anise seed: Replace fennel with anise for a slightly different but equally traditional flavor profile.
The beauty of homemade pepperoni is that every batch can be different. Keep notes on your spice ratios, fermentation times, and curing conditions so you can replicate what works and adjust what doesn’t.
Final Thoughts
Making pepperoni at home is one of those projects that sounds more intimidating than it actually is. The ingredient list is straightforward. The equipment is the same as any other cured sausage. The technique is forgiving as long as you respect the safety fundamentals: proper curing salt measurement, successful fermentation, and adequate drying.
Your first batch probably won’t be perfect. The spice balance might be off, or the texture might not be exactly what you envisioned. That’s fine. Each batch teaches you something. By your third or fourth attempt, you’ll be making pepperoni that’s genuinely better than anything you can buy—and you’ll have the satisfaction of knowing exactly what went into it.
If you’re new to cured meats, consider starting with something simpler like duck prosciutto or pancetta before tackling pepperoni. But if you’ve already got a few cures under your belt, this is a natural next step. Go make some pepperoni.
More Charcuterie Guides
What Is Pink Curing Salt? Sodium Nitrite Explained for Home Charcuterie
Pink curing salt is the most essential — and most misunderstood — ingredient in meat curing. This guide explains what it is, why it's pink, how sodium nitrite prevents botulism, proper usage rates, and whether you can cure meat without it.
10 min readHow Long Does Charcuterie Last? Storage Guide for Cured Meats & Cheese
Understanding proper charcuterie storage ensures you enjoy it at peak quality while avoiding food safety risks.
10 min read