How to Make Pastrami at Home: The Complete Deli-Style Guide
Pastrami is arguably the most celebrated cured meat in American food culture. Walk into any great deli — Katz’s in New York, Langer’s in Los Angeles, Schwartz’s in Montreal — and what makes people line up for an hour isn’t the bread or the mustard. It’s the pastrami. That smoky, peppery, impossibly tender beef that falls apart when you look at it wrong.
The good news: you can make pastrami at home that rivals the best delis. The process takes about a week from start to finish (mostly hands-off curing time), but the actual work is straightforward. You brine a beef brisket, coat it in a spice rub heavy on black pepper and coriander, smoke it low and slow, then steam it until it reaches that iconic melt-in-your-mouth texture.
If you’ve ever made corned beef at home, you’re already halfway there. Pastrami is essentially corned beef that gets smoked and steamed instead of boiled. That extra step transforms a good piece of cured beef into something transcendent.
What Is Pastrami? A Quick History
Pastrami’s origin story is a winding path through multiple continents. The technique likely traces back to the Turkish pastırma (also spelled basturma), an air-dried, spiced beef that Ottoman-era butchers perfected as a preservation method. Romanian Jewish immigrants brought a version of this to New York City in the late 1800s, adapting it with available ingredients and local smoking traditions.
The key innovation that turned pastrami into what we know today happened in the delis of the Lower East Side. Romanian-style pastrami met American barbecue culture: instead of air-drying like the Turkish original, New York delis started smoking the cured beef over hardwood, then steaming it to finish. This created the tender, juicy, smoky product that became the foundation of the New York deli sandwich.
Traditional pastrami uses beef navel (plate), a fatty, well-marbled cut from the belly area. Most home cooks and many modern delis use brisket flat instead, which is more widely available and produces slightly leaner results. Both work beautifully — the navel gives you more fat and richness, while the flat gives you cleaner slices and a better meat-to-fat ratio for sandwiches.
Choosing Your Brisket
The cut you start with determines 80% of your final result. Here’s what to look for:
Brisket Flat vs. Whole Packer
For pastrami, the brisket flat (also called the “first cut”) is the standard choice. It’s the leaner, more uniform portion of the brisket that slices cleanly across the grain. Look for a flat that’s 5-7 pounds with an even thickness and a fat cap of about 1/4 inch on one side.
You can use a whole packer brisket (flat + point), but the point section is fattier and less uniform, which makes for uneven slicing. If you go whole packer, plan to separate the point after smoking and use it for burnt ends or chopped pastrami sandwiches.
What Grade?
- USDA Choice — The sweet spot for pastrami. Good marbling without the premium price. This is what most delis use.
- USDA Prime — More intramuscular fat means more flavor and juiciness. Worth it if you can find it at a reasonable price.
- USDA Select — Leaner and tougher. The extended brining and steaming help compensate, but you’ll notice the difference.
Regardless of grade, look for a brisket flat with visible marbling throughout the lean meat. Avoid flats that are thin at one end and thick at the other — uneven thickness means uneven curing.
The Curing Brine
Pastrami starts with a wet cure (brine), not a dry cure. The brine penetrates the thick brisket more evenly than a surface-applied dry cure, and it’s more forgiving of timing variations. Here’s the recipe for a 6-pound brisket flat:
Brine Ingredients
- 1 gallon cold water
- 1 cup (270g) kosher salt — Diamond Crystal preferred. If using Morton’s, reduce to 3/4 cup (the crystals are denser).
- 1/2 cup (100g) dark brown sugar — adds subtle sweetness and helps with bark color during smoking
- 1 tablespoon (17g) pink curing salt #1 (Prague Powder #1) — this is what gives pastrami its characteristic pink color and cured flavor. Not optional. See our curing salts guide for details.
- 6 cloves garlic, crushed
- 2 tablespoons whole black peppercorns
- 2 tablespoons whole coriander seeds
- 1 tablespoon yellow mustard seeds
- 2 teaspoons red pepper flakes
- 4 bay leaves
- 1 tablespoon juniper berries (optional — adds a piney complexity)
- 1 cinnamon stick (optional)
Making the Brine
Combine the water and salt in a large pot over medium heat. Stir until the salt and sugar dissolve completely. Add all the spices and aromatics. Bring to a simmer, then remove from heat and let cool to room temperature. Refrigerate until the brine is below 40°F (4°C) before adding the meat — never add meat to warm brine.
Place the brisket flat in a food-safe container (a 2-gallon zip-lock bag inside a baking dish works well, or a large food-safe bucket). Pour the cold brine over the brisket, making sure it’s fully submerged. If the meat floats, weigh it down with a plate.
Curing Time
Refrigerate the brining brisket for 5 to 7 days, flipping the meat once daily to ensure even curing. The timing depends on thickness:
- Under 2 inches thick: 5 days minimum
- 2-3 inches thick: 6-7 days
- Over 3 inches thick: 7 days, and consider injecting brine into the thickest sections
You’ll know the cure is complete when the brisket feels firm throughout — press the thickest part, and it should feel uniformly dense with no soft spots in the center.
Desalting (Critical Step)
After curing, remove the brisket from the brine and rinse under cold running water. Then soak it in a container of fresh cold water in the refrigerator for at least 1 hour, up to 4 hours, changing the water once halfway through. This removes excess surface salt.
To test: slice off a thin piece from a corner, pan-fry it quickly, and taste. It should be well-seasoned but not aggressively salty. If it’s too salty, soak another 30-60 minutes and test again. This step is the difference between great pastrami and a salt lick.
The Pastrami Rub
The rub is what makes pastrami look and taste like pastrami. That thick, coarse black-and-brown crust is the signature, and it’s almost entirely two ingredients: black pepper and coriander.
Rub Recipe
- 1/4 cup coarsely ground black pepper — grind your own from whole peppercorns. You want it coarse, not fine — pieces should be clearly visible, roughly cracked, not powdery.
- 1/4 cup coarsely ground coriander seeds — toast whole seeds in a dry skillet until fragrant (about 2 minutes), then crack them. Coriander is the citrusy, floral counterpoint to the pepper’s heat.
- 2 tablespoons granulated garlic
- 1 tablespoon smoked paprika
- 1 tablespoon onion powder
- 2 teaspoons yellow mustard powder
- 1 teaspoon brown sugar
The classic ratio is roughly equal parts pepper and coriander by volume, with everything else as supporting cast. Some delis go heavier on pepper (2:1 ratio), others add more sugar for bark development. Experiment after your first batch, but start with equal parts.
Pat the desalted brisket dry with paper towels, then apply the rub generously on all surfaces. Press it into the meat firmly — you want a thick, even coating, especially on the top (presentation side). Let the rubbed brisket sit uncovered in the refrigerator for at least 2 hours (overnight is better) to let the rub adhere and the surface dry slightly, which promotes better smoke adhesion.
Smoking the Pastrami
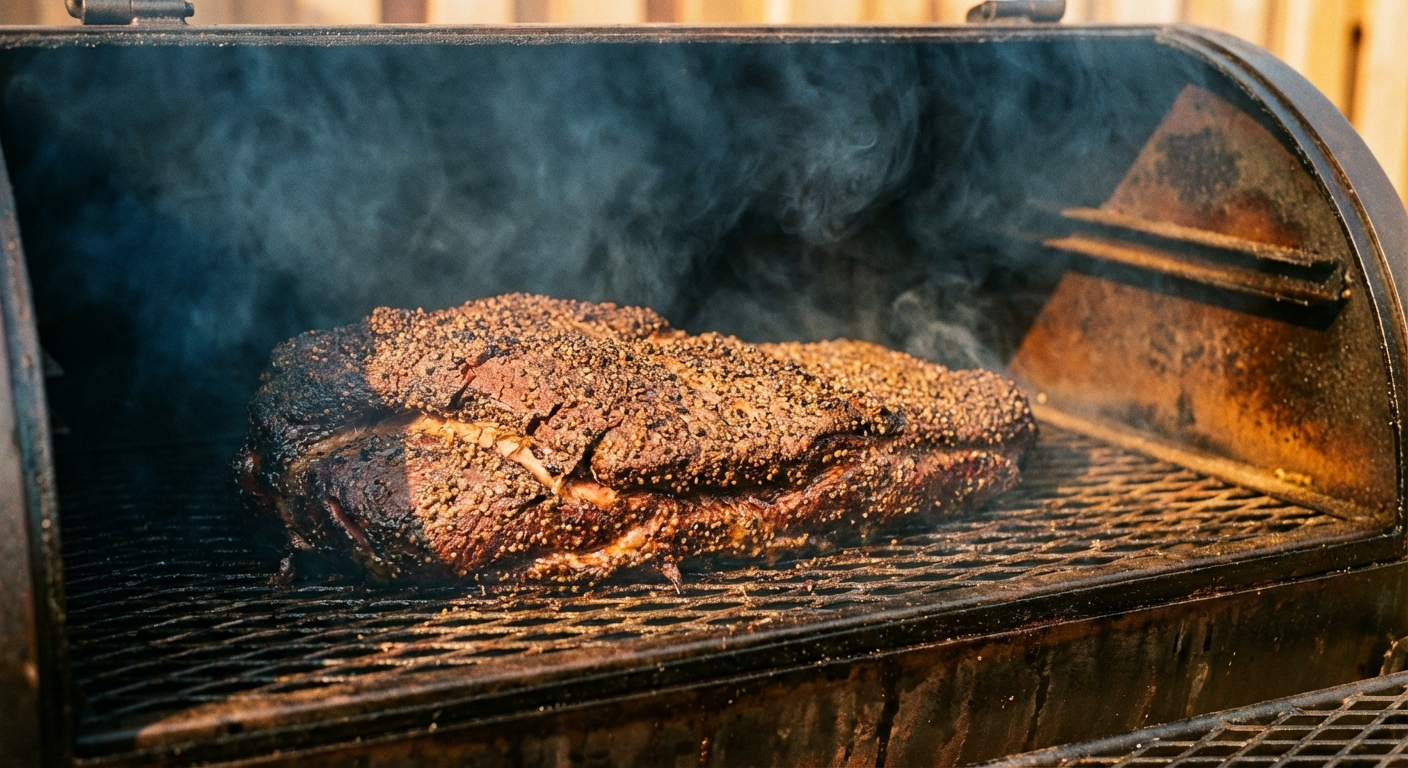
This is where pastrami diverges from corned beef and enters barbecue territory. The smoking step adds flavor complexity that no amount of seasoning can replicate.
Smoker Setup
- Temperature: 225-250°F (107-121°C) for the duration of the smoke
- Wood: Hardwood chunks or splits. Classic choices are oak, hickory, or cherry. Oak gives clean smoke flavor, hickory adds assertive smokiness, and cherry contributes a subtle sweetness and gorgeous mahogany bark color. Avoid mesquite — it’s too aggressive for a long cook.
- Water pan: Place a pan of water in the smoker to maintain humidity and prevent the surface from drying out before the fat renders.
The Smoke
Place the rubbed brisket fat-side up on the smoker grate. Insert a leave-in probe thermometer into the thickest part of the meat, avoiding fat pockets.
Smoke until the internal temperature reaches 165°F (74°C). This typically takes 6-8 hours for a 5-6 pound flat, but time varies widely based on your smoker, outdoor temperature, and the specific piece of meat. Don’t chase a time — chase the temperature.
During the smoke, you’ll likely hit “the stall” around 150-160°F, where evaporative cooling from the meat’s surface moisture causes the internal temperature to plateau for what can feel like an eternity. You have two options:
- Wait it out: Let the stall resolve naturally. This can take 2-4 additional hours but produces the best bark.
- Wrap it: When the internal temp hits 165°F and you have the bark color you want, wrap tightly in butcher paper or foil. This accelerates the cook but softens the bark. For pastrami, this is less of a concern since you’re steaming it next anyway.
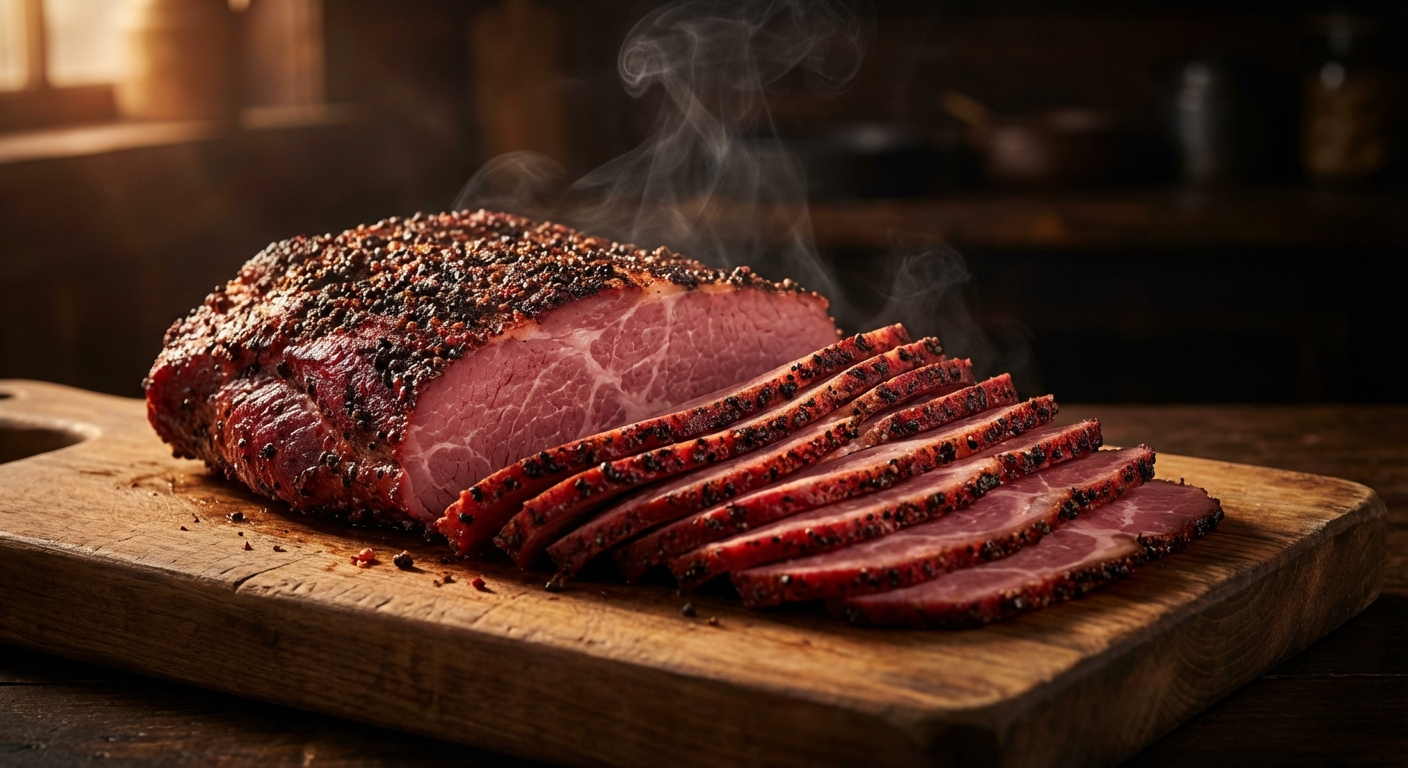
The pastrami is done smoking when it hits 165°F and has a deep, dark bark. It will look almost black in spots — that’s exactly right. The pepper and coriander crust will have set into a thick, fragrant shell.
The Steam: What Separates Good from Legendary
Here’s the step that most home cooks skip, and it’s the single biggest reason homemade pastrami often disappoints. Smoking alone won’t give you deli-style tenderness. The steam is what breaks down the remaining collagen and connective tissue, transforming firm smoked beef into that melt-on-your-tongue texture.
Steaming Method
You have several options:
- Stovetop steamer: Place a rack or steamer basket in a large pot with 2 inches of water. Bring to a simmer, add the smoked pastrami, cover tightly, and steam for 2-3 hours.
- Oven steam: Wrap the smoked pastrami tightly in foil with 1/4 cup of water or beef broth. Place in a 275°F (135°C) oven for 2-3 hours. This is technically braising more than steaming, but the results are excellent.
- Return to smoker: Wrap the pastrami tightly in butcher paper or foil, return to the smoker at 275°F, and cook until the internal temperature reaches 203°F (95°C). This is the “Texas brisket” approach and works beautifully.
Regardless of method, the target internal temperature is 200-205°F (93-96°C). At this temperature, the collagen in the brisket has fully rendered into gelatin, and the meat will be tender enough to pull apart with gentle pressure. When you probe it with a thermometer or toothpick, it should slide in with almost no resistance — like probing warm butter.
Resting
After steaming, let the pastrami rest for at least 30 minutes before slicing. If you’ve wrapped it in foil, keep it wrapped and let it rest in a cooler (no ice) for up to 2 hours. The juices need time to redistribute — cut too early and they’ll flood the cutting board instead of staying in the meat.
Slicing and Serving
Slicing technique matters enormously with pastrami. Always slice against the grain — look at the meat’s surface and identify the direction of the muscle fibers, then cut perpendicular to them. Slicing with the grain gives you stringy, tough pieces regardless of how well you cooked it.
For deli-style pastrami sandwiches, slice as thin as you can manage with a sharp knife — about 1/8 inch thick. A long, thin slicing knife (also called a Granton edge slicer) makes this dramatically easier. If you have a deli slicer, set it to about 1/16 inch for authentic paper-thin slices.
The Classic Pastrami Sandwich
Pile 6-8 ounces of thinly sliced pastrami on good rye bread with spicy brown mustard. That’s it. Maybe a pickle on the side. The Katz’s Delicatessen approach is deliberate minimalism: when the meat is this good, it doesn’t need anything competing with it.
Other excellent serving options:
- Pastrami Reuben: Pastrami on rye with Swiss cheese, sauerkraut, and Russian dressing, griddled until golden
- Pastrami hash: Dice leftover pastrami and fry with potatoes, onions, and a fried egg on top
- Charcuterie board addition: Thin-sliced pastrami rolled into rosettes on a charcuterie board with whole-grain mustard and cornichons
- Pastrami-spiced beef jerky: Use the same rub on thin-sliced eye of round and dehydrate for jerky
Storage and Reheating
Homemade pastrami keeps remarkably well:
- Refrigerator: Wrapped tightly in plastic wrap or vacuum-sealed, pastrami keeps for 7-10 days in the fridge.
- Freezer: Vacuum-sealed portions keep for 3-4 months in the freezer with minimal quality loss. Slice before freezing for easier portioning.
- Reheating: Always steam to reheat. Microwave turns pastrami rubbery. Place sliced pastrami in a steamer basket over simmering water for 3-5 minutes, or wrap in foil with a splash of water and heat in a 300°F oven for 10-15 minutes. The goal is to bring it back to serving temperature without drying it out.
Troubleshooting Common Issues
Too Salty
The brine was too concentrated or the desalting step was too short. Next time, extend the soaking time after curing, and always do the fry test before proceeding. If your finished pastrami is too salty, slicing it thinner and steaming it slightly longer can help — some salt will leach into the steam.
Dry and Tough
This almost always means you skipped or shortened the steaming step. Smoking alone doesn’t get the internal temperature high enough to break down collagen. Make sure you’re hitting 200-205°F during the steam. Also check that you didn’t start with too lean a brisket flat — some fat is essential for moisture.
No Smoke Ring
The smoke ring (that pink layer beneath the bark) is caused by nitric oxide from combustion reacting with myoglobin. If you’re using an electric or pellet smoker, the ring may be minimal. The good news: with pastrami, the entire interior is already pink from the curing salt, so the smoke ring is a non-issue visually. The flavor is still there.
Bark Too Thick or Bitter
Reduce the pepper in your rub slightly, or check your smoker temperature — running too hot (above 275°F) can burn the spice crust. Also ensure you’re using clean-burning hardwood, not green or treated wood that produces acrid smoke.
Pastrami vs. Montreal Smoked Meat
If you’re a cured meat enthusiast, you’ve probably encountered the New York pastrami vs. Montreal smoked meat debate. They’re close relatives with meaningful differences:
- Cure: New York pastrami uses a wet brine; Montreal smoked meat traditionally uses a dry cure rubbed directly on the brisket.
- Spices: Both use pepper and coriander, but Montreal smoked meat often includes more aromatic spices (clove, allspice, dill seed).
- Cut: Montreal smoked meat typically uses the whole brisket (flat + point), while New York pastrami often uses just the flat or the navel.
- Finish: Both are smoked and steamed, but Montreal smoked meat is generally sliced thicker and served on rye with yellow mustard.
Both are extraordinary. If you master one, try the other — the technique is nearly identical, and the flavor variations come down to the cure method and spice blend.
Timeline: Your Week-Long Pastrami Plan
Here’s the complete timeline for a batch of pastrami, assuming you start on a Sunday and want it ready for the following Saturday:
- Sunday: Make the brine, submerge the brisket, refrigerate
- Monday-Friday: Flip the brisket once daily (30 seconds of work)
- Friday evening: Remove from brine, rinse, soak in fresh water for 2-4 hours, apply rub, refrigerate uncovered overnight
- Saturday morning: Start the smoker. Smoke for 6-8 hours to 165°F internal
- Saturday afternoon: Steam/braise for 2-3 hours to 203°F internal
- Saturday evening: Rest, slice, and eat the best pastrami of your life
The total active time is about 2 hours across the entire week. The rest is just the brine and the smoker doing their jobs while you do other things. That’s the beauty of charcuterie: you invest patience, and time does the heavy lifting.
More Charcuterie Guides
What Is Pink Curing Salt? Sodium Nitrite Explained for Home Charcuterie
Pink curing salt is the most essential — and most misunderstood — ingredient in meat curing. This guide explains what it is, why it's pink, how sodium nitrite prevents botulism, proper usage rates, and whether you can cure meat without it.
10 min readHow Long Does Charcuterie Last? Storage Guide for Cured Meats & Cheese
Understanding proper charcuterie storage ensures you enjoy it at peak quality while avoiding food safety risks.
10 min read