How to Make Soppressata at Home: Traditional Italian Dry-Cured Salami
Soppressata is the salami that separates casual charcuterie fans from the truly obsessed. Where generic salami hides behind a fine grind and mild seasoning, soppressata announces itself — coarse-cut pork, aggressive red pepper, garlic that doesn’t apologize, and a texture you can actually see and feel in every slice. It’s the salami that Italian grandmothers made in their basements every winter, and it’s the one that disappears first from every charcuterie board.
I’ve been making soppressata for over fifteen years, and I still get a thrill every time I cut into a finished link. That moment when you slice through the casing and see the mosaic of lean meat and fat, smell the fermented tang and pepper heat — that’s what this whole craft is about. And the best part? It’s not as hard as you think.
This guide covers everything you need to make authentic soppressata at home, from meat selection through the final cure. No shortcuts, no compromises.
What Makes Soppressata Different
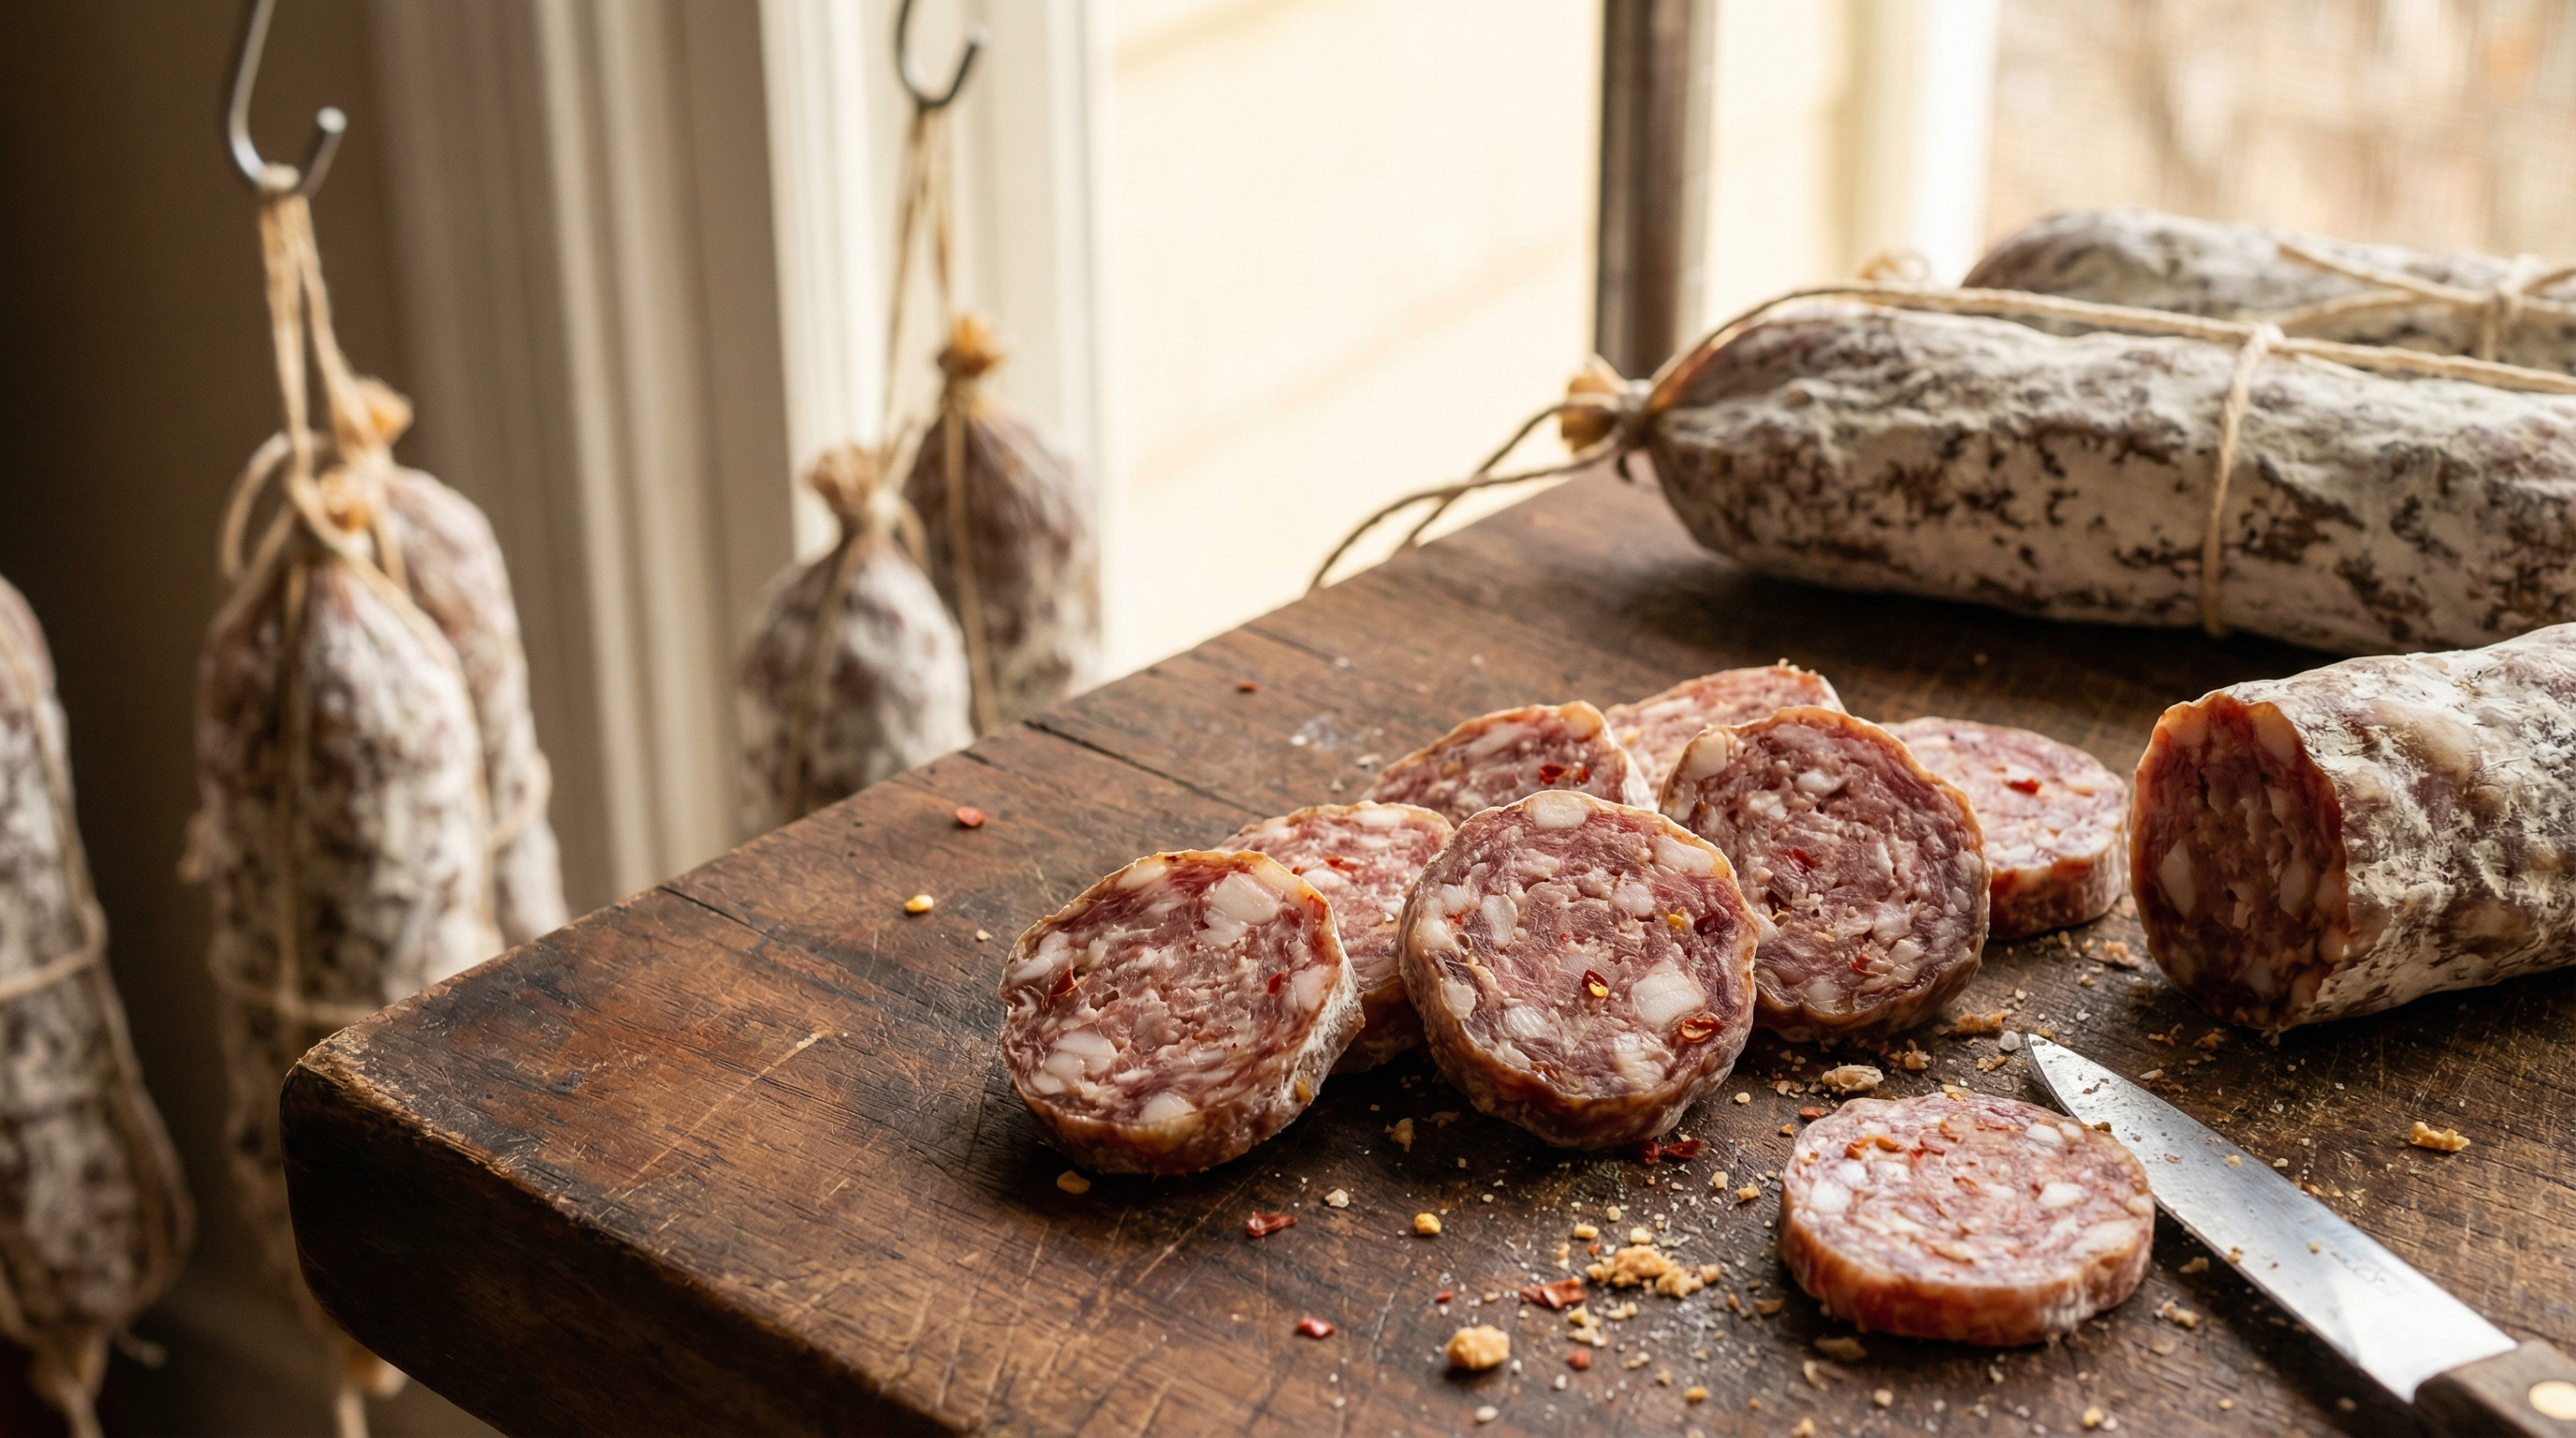
Before we get into the process, it helps to understand what sets soppressata apart from other dry-cured salamis. The name comes from the Italian word soppressare, meaning “to press,” and traditional soppressata is indeed pressed flat during the early stages of curing. This gives it that distinctive oval cross-section you see in Italian delis.
The defining characteristics are:
- Coarse grind: Unlike fine-ground Genoa salami, soppressata uses a coarse or hand-cut grind. You should see distinct pieces of meat and fat in every slice — typically 3/8-inch to 1/2-inch pieces.
- Bold seasoning: Red pepper flakes (often Calabrian chili), black pepper, garlic, and sometimes fennel seed or wine. Soppressata doesn’t whisper.
- Higher fat ratio: Traditional soppressata runs 30-35% fat, giving it richness and a melt-in-your-mouth quality when properly cured.
- Regional variation: There are two main styles — soppressata dolce (sweet/mild) and soppressata piccante (spicy). Calabrian soppressata tends toward fiery heat, while versions from Basilicata or Puglia may be milder with more wine and fennel.
For this guide, I’m teaching the Calabrian-style piccante version — bold, spicy, and unapologetically flavorful. You can dial back the heat for a dolce version by reducing the red pepper.
Equipment You’ll Need
You don’t need a professional setup, but soppressata does require a few specific tools. If you’ve already made salami at home, you likely have everything.
Essential Equipment
- Meat grinder: A dedicated grinder or a grinder attachment for your stand mixer. You need a coarse plate (3/8-inch or 10mm holes). The KitchenAid grinder attachment works fine for small batches.
- Sausage stuffer: A dedicated vertical stuffer is ideal. The grinder’s stuffing attachment works but compresses the meat too much — you lose that coarse texture that defines soppressata.
- Digital scale: Accurate to 0.1 grams for measuring curing salts. This is non-negotiable — curing salt measurements must be precise for safety.
- pH meter or pH strips: For monitoring fermentation. A digital pH meter accurate to 0.01 is best.
- Natural casings: Hog casings (38-42mm) for standard links, or beef middles (55-65mm) for the traditional large format.
- Curing chamber or controlled environment: You need a space that holds 55-60°F and 75-80% humidity for 4-8 weeks. A dedicated curing chamber is ideal, but a cool basement in winter can work.
- Butcher’s twine: For tying off links and hanging.
- Pricking tool: A sausage pricker or sterilized pin for removing air pockets.
Selecting Your Meat
Meat quality is everything in soppressata. You’re eating this raw (cured, but never cooked), so start with the best pork you can source.
The Ideal Pork
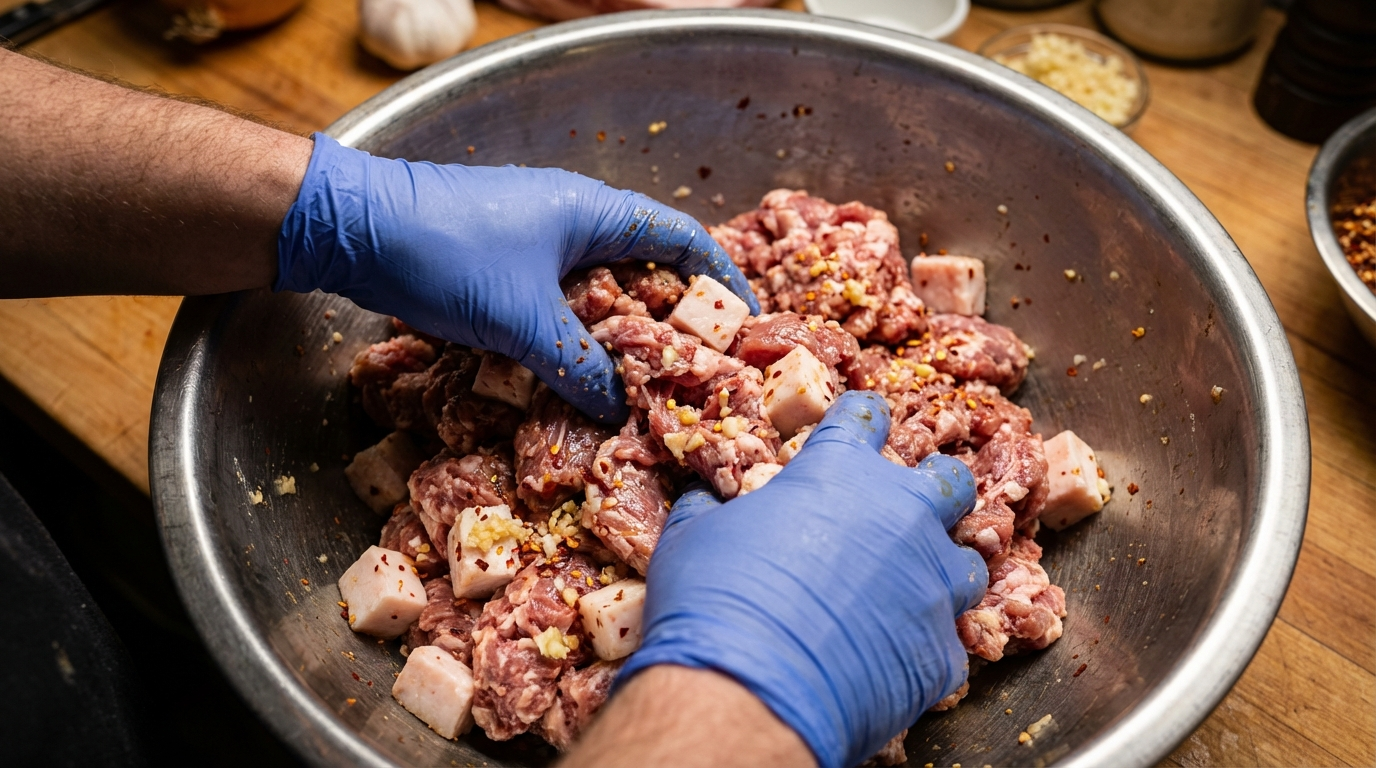
Pork shoulder (Boston butt) is the traditional cut for soppressata. It has the right balance of lean meat and intramuscular fat, plus connective tissue that adds body and richness during the cure. Look for heritage breed pork if you can find it — Berkshire, Duroc, or Red Wattle produce pork with more flavor and better fat quality than commodity breeds.
Additional back fat: Even with shoulder, you’ll likely need to add pure back fat to hit the 30-35% total fat target. Back fat is firm, clean-tasting, and holds its shape when ground coarsely. Don’t substitute belly fat — it’s too soft and will smear during grinding.
The Recipe (5 lb / 2.27 kg batch)
This recipe produces approximately 8-10 standard hog-casing links or 4-5 large beef middle links.
- 3.5 lbs (1.59 kg) pork shoulder — trimmed of sinew, cut into 1-inch cubes
- 1.5 lbs (680 g) pork back fat — cut into 1/2-inch cubes
- 25 g kosher salt (2.5% of total meat weight)
- 3 g Cure #2 (0.25% of total meat weight — Prague Powder #2, NOT Cure #1)
- 8 g coarse red pepper flakes (Calabrian if possible; adjust to taste)
- 4 g coarsely ground black pepper
- 6 g fresh garlic — minced fine
- 5 g dextrose (fermentation sugar)
- 0.15 g starter culture (Bactoferm T-SPX or F-RM-52)
- 30 ml dry red wine (optional — Calabrian tradition)
Critical safety note: Use Cure #2 (sodium nitrite + sodium nitrate) for dry-cured sausages, not Cure #1. The sodium nitrate in Cure #2 slowly converts to nitrite over the weeks-long curing process, providing ongoing protection against Clostridium botulinum. Cure #1 is for products that are cooked or smoked — it doesn’t provide long-term protection.
The Grinding Process
Temperature control during grinding is critical. If the meat gets warm, the fat smears instead of staying in distinct pieces — and you lose that beautiful coarse mosaic that makes soppressata special.
Preparation
- Freeze the meat partially: Spread your cubed shoulder and back fat on sheet pans and freeze for 30-45 minutes, until the pieces are firm but not frozen solid. You want them around 28-30°F.
- Chill your equipment: Put the grinder head, blade, and plate in the freezer for at least 30 minutes. Cold metal keeps the fat from smearing.
- Work fast: Once you start grinding, don’t stop for phone calls or coffee breaks. Speed keeps everything cold.
Grinding
Use the coarse plate (3/8-inch / 10mm). Feed the semi-frozen meat and fat through the grinder in alternating handfuls — some lean, some fat — to distribute evenly. Grind directly into a large chilled bowl set over ice.
For an even more traditional texture, some makers hand-cut the meat with a knife instead of grinding. Cut the lean into 3/8-inch dice and the fat into 1/4-inch dice. This takes longer but produces the most authentic texture — every piece is clean-cut with no smearing at all.
Mixing and Seasoning
Once ground, add all the seasonings, curing salt, dextrose, and starter culture to the meat. The starter culture should be dissolved in the red wine (or distilled water) 30 minutes before mixing.
Mix by hand — literally get your (gloved) hands in there and work the mixture until everything is evenly distributed. You should be able to see red pepper flakes and black pepper throughout the mix, with no pockets of unseasoned meat. Mix for 2-3 minutes until the meat becomes slightly tacky and sticky — this indicates the proteins are binding, which helps the sausage hold together.
Do a fry test: take a small portion, form a thin patty, and cook it in a pan. Taste for salt and heat levels. Remember that fermentation and drying will concentrate flavors, so the raw mix should taste slightly under-seasoned on salt but appropriately spicy. You can’t test for curing salt this way — trust your scale.
Stuffing the Casings
Soak your natural casings in warm water for at least 30 minutes before stuffing. Run warm water through each casing to check for holes and to make them pliable.
Stuffing Technique
- Load the stuffer: Pack the meat mixture into the stuffer cylinder, pressing down to eliminate air pockets. Air is your enemy — trapped air creates voids where harmful bacteria can grow.
- Thread the casing: Slide the casing onto the stuffing tube, leaving 4-6 inches hanging off the end. Don’t tie the end yet.
- Stuff firmly but not tight: Crank the stuffer at a steady pace. The casing should be full and firm, but not so tight that it’s about to burst. Remember — the meat will expand slightly during fermentation, and overstuffed casings will split.
- Manage air bubbles: As you stuff, watch for visible air pockets. When you see one, stop and prick it with your pricking tool immediately. Air pockets are the number one cause of spoilage in dry-cured sausage.
- Tie off links: For hog casings, twist or tie with butcher’s twine every 8-10 inches. For beef middles, tie one end, stuff the entire casing, then tie the other end. Create a loop of twine at one end for hanging.
Pressing (Traditional Method)
This is what makes soppressata soppressata. After stuffing, traditional makers press the links between two boards weighted with heavy objects (stones, bricks, or cast iron). Press for 12-24 hours in the refrigerator at 36-38°F. This flattens the sausage into its characteristic oval shape and helps eliminate any remaining air pockets.
If you skip the pressing, you’ll still make excellent dry-cured sausage — it just won’t have the traditional soppressata shape. Plenty of modern producers skip this step, and the flavor is identical.
Fermentation
Fermentation is where the magic starts. Your starter culture needs warmth to activate, consume the dextrose, and produce lactic acid that drops the pH and creates soppressata’s characteristic tang.
Fermentation Environment
- Temperature: 68-75°F (20-24°C)
- Humidity: 85-90%
- Duration: 36-72 hours
Hang the soppressata in your fermentation space. If you have a curing chamber, set it to fermentation mode. If not, a room-temperature closet with a pan of water (for humidity) works in a pinch.
Monitoring pH
Check pH at 24 hours and 48 hours. You’re looking for the pH to drop from around 5.8-6.0 (raw meat) to 5.0 or below. When pH hits 5.0, fermentation is complete and you should move immediately to the curing phase. If pH drops below 4.6, the soppressata will taste overly tangy — this means fermentation went too long or too warm.
Target pH range at the end of fermentation: 4.8-5.2
Curing and Drying

After fermentation, move the soppressata to your curing environment. This is where patience becomes your most important ingredient.
Curing Conditions
- Temperature: 55-60°F (13-15°C)
- Humidity: 75-80%
- Air circulation: Gentle, consistent airflow. Not a direct breeze — think slow-moving air that prevents dead spots.
- Duration: 4-8 weeks depending on casing diameter
What to Expect
Week 1-2: The casing will feel noticeably firmer as moisture begins to leave. You may see the first signs of white mold (Penicillium nalgiovense or candidum) forming on the surface. This is good — beneficial mold regulates moisture loss and produces enzymes that enhance flavor. If you see any green, blue, black, or fuzzy mold, wipe it off with a vinegar-dampened cloth. Isolated spots of non-white mold are normal; widespread coverage means your conditions need adjustment.
Week 3-4: The soppressata has lost significant moisture and feels quite firm when squeezed. The aroma should be pleasantly tangy and meaty with no off-odors. At this point, thinner hog-casing links may be ready.
Week 5-8: Larger beef-middle soppressata continues drying. The target is a 30-35% weight loss from the original stuffed weight. Weigh your links periodically — when they’ve lost 30-35% of their starting weight, they’re done.
Case Hardening: The Most Common Problem
Case hardening happens when the outer layer of the sausage dries too fast, forming a hard shell that traps moisture inside. The exterior looks done but the interior is still wet and potentially unsafe. Causes include:
- Humidity too low (below 70%)
- Too much airflow directly on the sausage
- Temperature too high, causing rapid surface drying
Prevention: maintain humidity at 75-80% and ensure gentle, indirect airflow. If you catch case hardening early, you can sometimes rescue the sausage by wrapping it in a damp towel for 24 hours to rehydrate the exterior, then resuming the cure at higher humidity.
Knowing When It’s Done
Soppressata is ready when:
- Weight loss: 30-35% loss from stuffed weight. This is the most reliable indicator.
- Firmness: The sausage feels uniformly firm when pressed — no soft or squishy spots, especially in the center.
- Water activity (aw): If you have a water activity meter, target aw of 0.88 or below. At this level, most pathogens cannot survive.
- Appearance: The casing has shrunk tightly around the meat. When sliced, the interior is uniformly dark red with distinct white fat pieces — no wet, sticky, or glossy areas.
Slicing and Storing
Slice soppressata thin — about 1/8-inch thick — at a slight angle for the largest cross-section. A sharp knife is essential; a dull blade tears the meat and smears the fat. For the best presentation, let slices come to room temperature for 10-15 minutes before serving. Cold soppressata tastes muted — the fat needs to soften slightly to release its full flavor.
Storage
- Whole, uncut: Hang in your curing chamber or wrap in parchment paper and refrigerate. It will continue to dry slowly, becoming firmer and more concentrated over time. Lasts 2-3 months refrigerated.
- Cut: Wrap the cut end tightly in parchment paper (not plastic wrap — it traps moisture). Refrigerate and consume within 3-4 weeks. The exposed end will darken — just trim the first slice and it’s fine.
- Vacuum sealed: Vacuum sealing stops the drying process and extends shelf life to 4-6 months refrigerated or up to a year frozen.
Troubleshooting Common Problems
Fat Smearing (Greasy Texture)
Your meat and equipment were too warm during grinding. Next time, freeze everything longer and work faster. Fat should stay in distinct pieces.
Air Pockets / Hollow Spots
Insufficient packing during stuffing, or the stuffer ran dry. Pack more firmly and prick any visible air bubbles immediately during stuffing.
Too Sour / Overly Tangy
Fermentation temperature was too high or lasted too long. Monitor pH closely and move to the curing phase as soon as pH hits 5.0. Reduce dextrose slightly in your next batch.
Off Odors (Ammonia, Rotten)
If the soppressata smells like ammonia, rotten eggs, or anything putrid, discard it. Do not taste it. This indicates harmful bacterial growth, likely from inadequate curing salt, improper fermentation, or contaminated meat. Review your curing salt calculations and equipment sanitation.
No Mold Growth
Some environments lack the beneficial mold spores. You can inoculate by spraying the casing with a Mold 600 (Penicillium nalgiovense) solution before hanging. This also helps prevent undesirable molds from colonizing first.
Soppressata Variations to Try
Once you’ve mastered the basic recipe, try these traditional variations:
- Soppressata dolce: Replace red pepper flakes with 4g sweet paprika. Add 2g fennel seed for a milder, more aromatic profile.
- Wine-forward soppressata: Increase red wine to 60ml and add 2g fennel pollen. Reduces some of the pork funk in favor of a more refined, complex flavor.
- Smoked soppressata: After stuffing and before fermentation, cold smoke at below 65°F for 4-6 hours. Adds a subtle smoke layer that complements the spice beautifully.
- Wild boar soppressata: Replace half the pork shoulder with wild boar. Increase back fat to 40% total since boar is leaner. The gamey flavor is outstanding in this format.
Soppressata is one of the most rewarding projects in charcuterie. The ingredients are simple, the process is straightforward, and the result is a salami that’ll put anything from the grocery store to shame. Give yourself 6-8 weeks of patience, and you’ll have something truly special hanging in your curing chamber. For quality pork to get started, check out The Meatery for premium cuts that make all the difference in charcuterie.
Frequently Asked Questions
What is the difference between soppressata and regular salami?
Soppressata uses a coarse grind (3/8-inch pieces) while regular salami is finely ground. Soppressata is also traditionally pressed flat during curing, giving it an oval cross-section. The seasoning is bolder — heavy on red pepper and garlic — compared to the milder spicing of Genoa-style salami.
How long does it take to cure soppressata?
Total time from stuffing to eating is typically 5-9 weeks: 2-3 days for fermentation followed by 4-8 weeks of drying. Thinner hog-casing links cure faster (4-5 weeks), while larger beef-middle casings need 6-8 weeks. The soppressata is done when it has lost 30-35% of its original stuffed weight.
Why do you use Cure #2 instead of Cure #1 for soppressata?
Cure #2 contains both sodium nitrite and sodium nitrate. The nitrate slowly converts to nitrite over weeks, providing ongoing antimicrobial protection throughout the long curing process. Cure #1 only contains nitrite, which dissipates quickly — it's designed for products that are cooked or hot-smoked, not dry-cured over weeks.
What temperature and humidity do you need to cure soppressata?
Fermentation requires 68-75°F and 85-90% humidity for 2-3 days. The main curing phase needs 55-60°F and 75-80% humidity for 4-8 weeks. A dedicated curing chamber gives the most control, but a cool basement in winter can work if conditions are right.
Is the white mold on soppressata safe to eat?
Yes — white mold (Penicillium nalgiovense or candidum) is beneficial and intentional. It regulates moisture loss, protects against harmful bacteria, and produces enzymes that enhance flavor. Green, blue, or black mold should be wiped away with vinegar. Widespread non-white mold indicates a curing environment problem.
More Charcuterie Guides
What Is Pink Curing Salt? Sodium Nitrite Explained for Home Charcuterie
Pink curing salt is the most essential — and most misunderstood — ingredient in meat curing. This guide explains what it is, why it's pink, how sodium nitrite prevents botulism, proper usage rates, and whether you can cure meat without it.
10 min readHow Long Does Charcuterie Last? Storage Guide for Cured Meats & Cheese
Understanding proper charcuterie storage ensures you enjoy it at peak quality while avoiding food safety risks.
10 min read