How to Make Capicola at Home: The Complete Dry-Curing Guide
How to Make Capicola at Home: The Complete Dry-Curing Guide
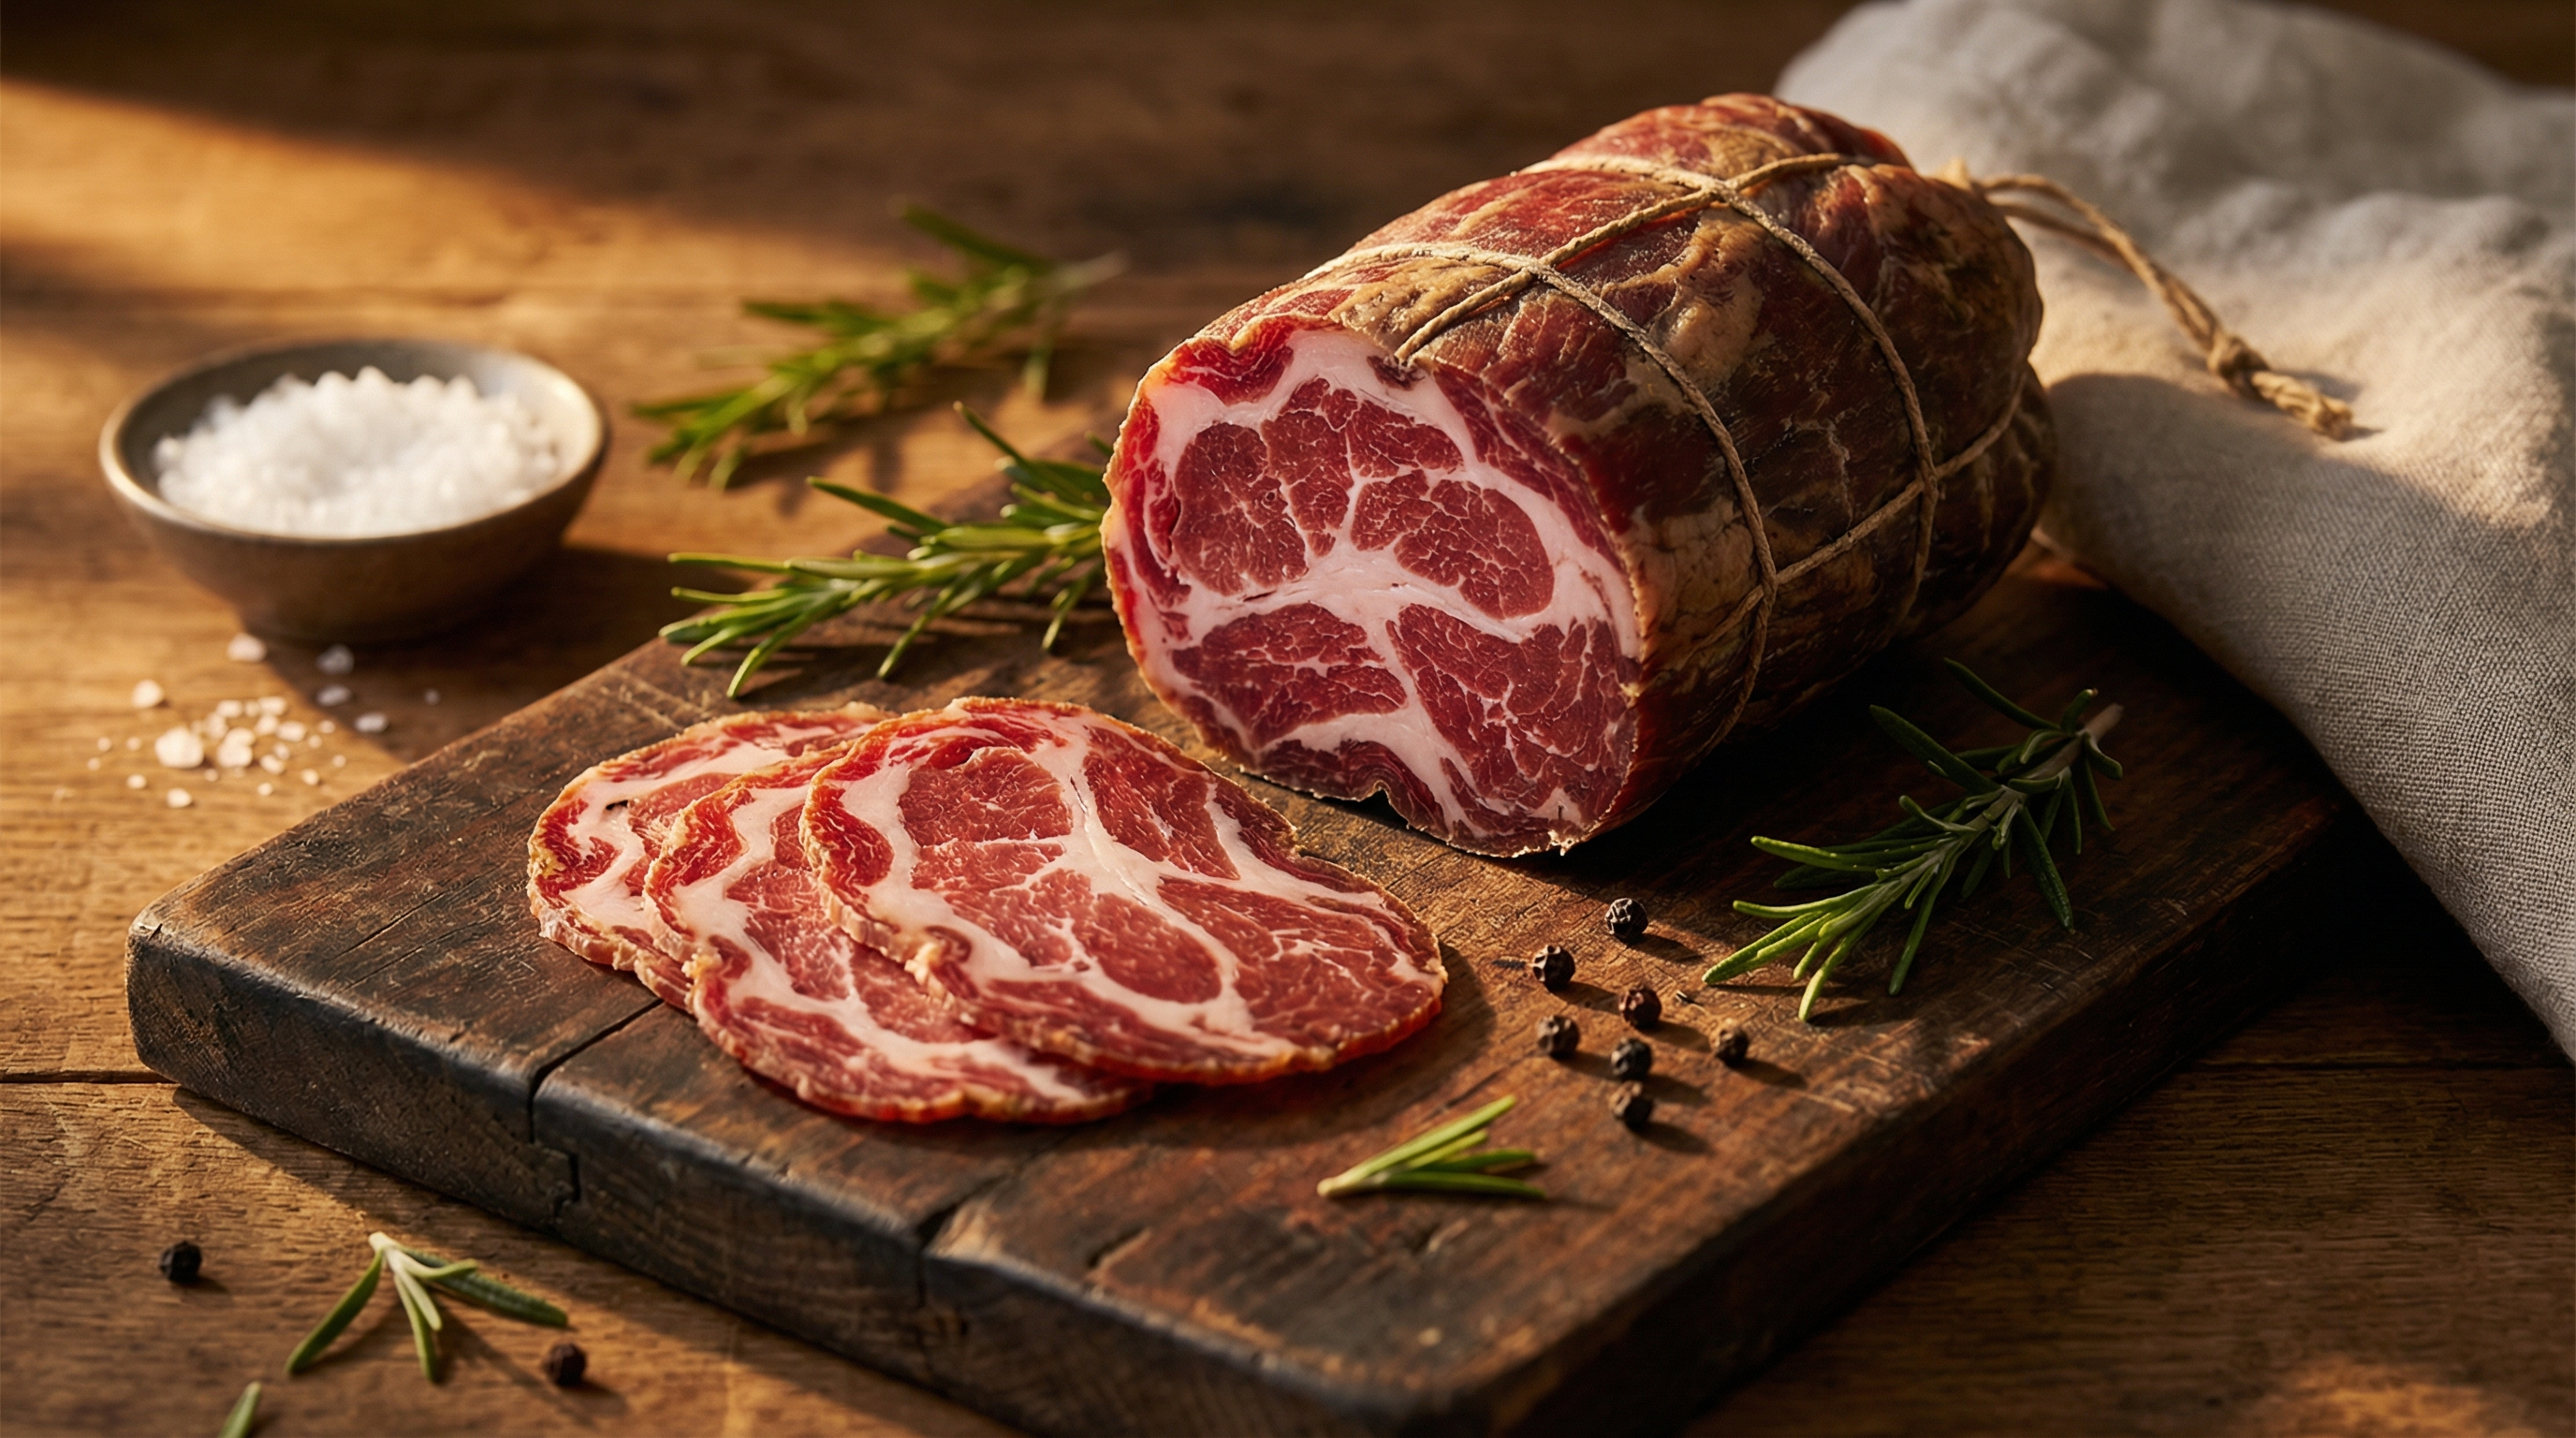
Capicola — also called coppa, capocollo, or gabagool if you grew up in New Jersey — is one of the most beautiful cured meats in the Italian tradition. That cross-section of deep ruby red meat laced with ribbons of white fat? That's the coppa muscle, taken from the neck and shoulder of the pig, dry-cured with spices, and hung to age until it transforms into something that makes you close your eyes when you taste it.
I've been making capicola at home for over fifteen years, and it remains one of my absolute favorites to produce. Unlike salami, you don't need to worry about fermentation or starter cultures. Unlike prosciutto, you're not waiting a full year. Capicola sits in a sweet spot — it's a whole-muscle cure that takes 2-3 months from start to finish, requires moderate skill, and delivers results that rival what you'd find in the best salumerie in Calabria.
Let me show you exactly how to make it.
What Is Capicola?
Capicola is a whole-muscle dry-cured meat made from the coppa muscle — the large muscle that runs from the back of the pig's neck into the upper shoulder. It sits right behind the head and above the shoulder blade, and it's one of the most beautifully marbled muscles on the entire animal.
The cut is prized for its ratio of lean to fat. Unlike a loin (very lean) or belly (very fatty), the coppa muscle has intramuscular fat woven throughout in a pattern that's almost reminiscent of wagyu beef. This marbling is what gives finished capicola its melt-in-your-mouth texture and rich, complex flavor.
In Italy, capicola goes by different names depending on the region. In Calabria and much of southern Italy, it's capocollo. In Emilia-Romagna, it's coppa. In Campania, it's capicola. The preparation varies slightly by region too — Calabrian versions tend to use more chili pepper, while northern Italian versions lean toward black pepper and sometimes wine.
All versions share the same core process: the coppa muscle is trimmed, rubbed with a salt-and-spice cure, refrigerated for 1-2 weeks, then encased and hung to dry-age for 6-10 weeks until it loses about 30-35% of its starting weight.
Selecting the Right Cut
Getting the right piece of meat is the single most important step. The coppa muscle is not a standard cut at most American grocery stores — you'll likely need to visit a butcher or order it specifically.
What to Ask For
Ask your butcher for the "coppa muscle" or "pork neck roast" — it's the muscle group that sits between the 4th and 5th cervical vertebrae and the 4th thoracic vertebra. In butcher terminology, it's sometimes called the "money muscle" of the shoulder (not to be confused with the competition BBQ "money muscle" on pork butt, which is a different cut entirely).
A whole coppa muscle typically weighs 3-5 pounds. Look for:
- Visible marbling: You want to see white fat streaks running through the red meat. More marbling means better flavor and texture in the finished product.
- Intact muscle: The coppa should be one solid piece, not multiple muscles tied together. Seams between muscles create pockets where bacteria can grow.
- Clean trimming: Some external fat is fine (up to 1/4 inch), but heavy external fat should be trimmed before curing. The fat you want is inside the muscle, not on the outside.
- Fresh, bright color: Deep pink to red meat, white to cream-colored fat. No gray areas, no off smells.
- Heritage breeds: If you can source Berkshire, Duroc, or Red Wattle coppa, the marbling and flavor will be significantly better. Worth the extra cost.
How Much to Buy
Plan for about 30-35% weight loss during curing and drying. A 4-pound coppa will yield roughly 2.5-2.8 pounds of finished capicola. For your first attempt, I recommend starting with one piece in the 3.5-4 pound range. It's manageable, dries evenly, and gives you enough finished product to actually enjoy.
The Cure: Ingredients and Ratios
The cure is where you build flavor and preserve the meat. Every capicola recipe starts with salt and curing salt — everything else is a matter of regional style and personal preference.
Base Cure (per pound of meat)
- Kosher salt: 2.75% of the meat's weight (this is the critical number — weigh it precisely)
- Instacure #2 (Prague Powder #2): 0.25% of the meat's weight
Instacure #2 is essential for whole-muscle cures that will be dried over weeks. It contains both sodium nitrite and sodium nitrate — the nitrate slowly converts to nitrite over time, providing ongoing protection against Clostridium botulinum throughout the long drying period. Do not substitute Instacure #1 (Prague Powder #1), which only contains nitrite and is designed for short cures. For a deeper understanding of curing salts, check our curing salts guide.
Spice Blend (Calabrian-Style)
This is my go-to recipe. It produces a capicola with warmth, depth, and a gentle heat that builds without overpowering:
- Coarsely ground black pepper: 1 tablespoon per pound
- Sweet paprika: 1 teaspoon per pound
- Calabrian chili flakes (peperoncino): 1/2 teaspoon per pound (adjust to taste)
- Fennel seed, lightly toasted and cracked: 1/2 teaspoon per pound
- Granulated garlic: 1/4 teaspoon per pound
- Brown sugar: 1/2 teaspoon per pound
Northern Italian Variation
For a more classic Emilia-Romagna style coppa, swap the chili flakes for additional black pepper, add a pinch of nutmeg and clove, and consider brushing the meat with red wine (Barolo or Sangiovese) before applying the dry cure. This version is more subtle, with warm spice notes instead of heat.
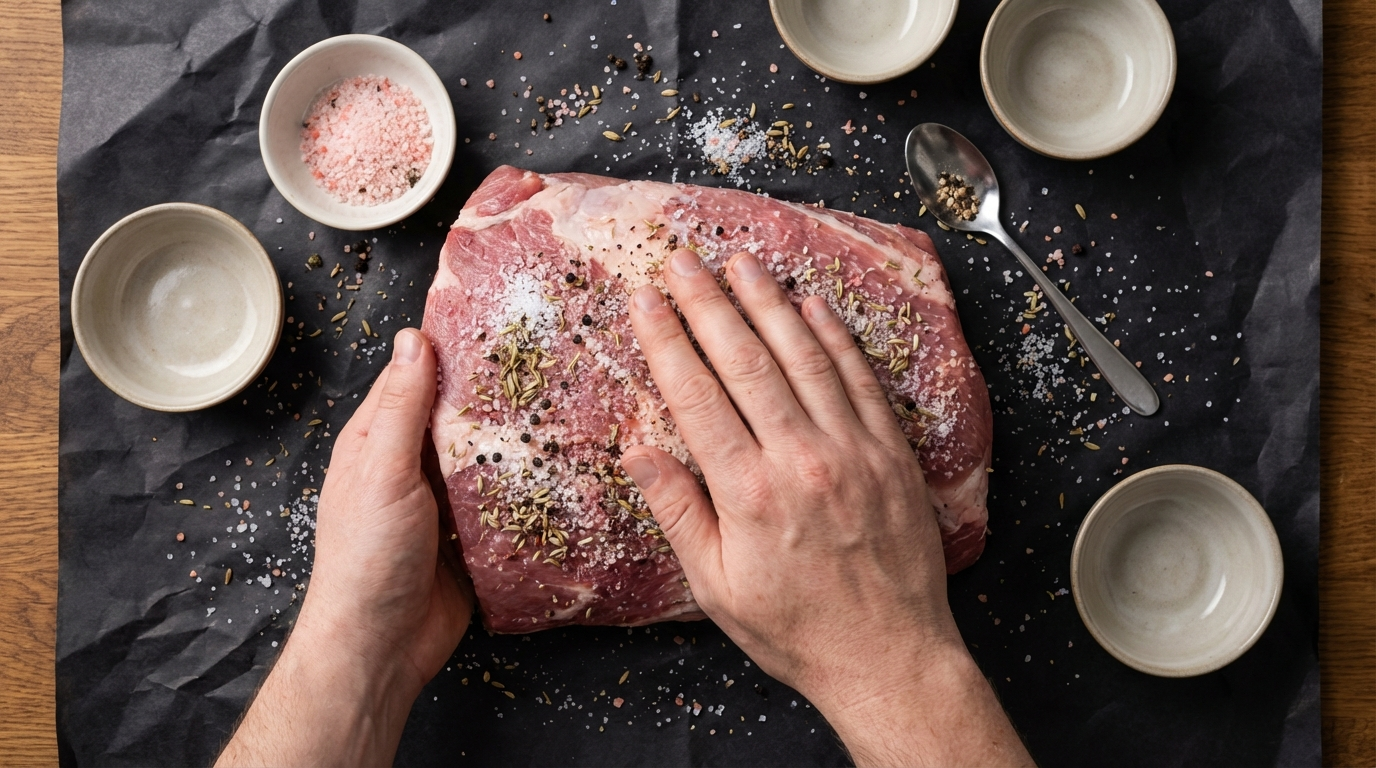
Applying the Cure
Precision matters here. This isn't a "rub it on generously and hope for the best" situation — you're calculating exact percentages based on weight.
- Weigh the meat: Use a digital kitchen scale. Record the weight in grams for accuracy. A 4-pound coppa is roughly 1,814 grams.
- Calculate the cure: Multiply the meat weight by 0.0275 for kosher salt and 0.0025 for Instacure #2. For our 1,814g example: 49.9g salt and 4.5g Instacure #2.
- Mix everything: Combine the salt, curing salt, and spice blend in a bowl. Mix thoroughly so the curing salt is evenly distributed.
- Apply the cure: Rub the mixture over every surface of the coppa, working it into crevices and folds. Every square inch needs contact with the cure.
- Bag it: Place the cured meat in a vacuum-seal bag or a large zip-lock with as much air removed as possible. If using zip-lock, press out air carefully and seal.
- Refrigerate: Place on a tray (to catch any leaks) in the back of your fridge, 36-38°F.
- Flip daily: Turn the bag once a day so the drawn-out liquid (the liquore) redistributes evenly.
- Cure time: 10-14 days, depending on thickness. Thicker pieces need longer. The meat should feel firm throughout — press the thickest part and it should feel uniformly dense, not soft in the center.
Rinsing and Prepping for Hanging
After the cure period, remove the coppa from the bag. The meat will have darkened to a deep burgundy color and will feel significantly firmer than when it went in. That's the salt at work — it's drawn out moisture and the proteins have tightened.
- Rinse briefly: Give the coppa a quick rinse under cold water to remove surface salt and spice residue. Don't soak it — just a 30-second rinse.
- Pat dry: Thoroughly dry with paper towels. Surface moisture is the enemy at this stage.
- Optional wine wash: Some makers brush the surface with red wine at this point, then apply a fresh coating of coarsely ground black pepper. This is traditional in several Italian regions and adds another layer of flavor. I do this about half the time — it's excellent but not required.
Casing the Coppa
The coppa needs to be encased before hanging to dry. The casing serves three purposes: it holds the cylindrical shape, it controls the rate of moisture loss (preventing case hardening), and it protects the surface from unwanted mold.
Beef Bung Caps
The traditional casing for capicola is a beef bung cap — the large intestine of a cow, sold salted and packed in brine. It's wide enough to accommodate the coppa muscle without excessive compression, and its natural porosity allows moisture to escape at the right rate.
Soak the bung cap in warm water for 30 minutes before using. Rinse inside and out. Slide the coppa inside, tie one end with butcher's twine, press out air pockets, and tie the other end. The casing should be snug but not stretched tight — you want contact with the meat surface without compressing it.
Collagen Casings
If you can't find beef bung caps, large-diameter collagen casings (100mm+) work as an alternative. They're easier to source and more consistent, but they don't breathe quite as well as natural casings. If using collagen, consider pricking the casing with a needle in a dozen spots to improve airflow.
Tying
After casing, tie the capicola with butcher's twine in a spiral pattern, with loops about 1 inch apart. This serves two purposes: it maintains a tight, even cylindrical shape during drying, and it gives you something to hang from. Leave a long loop at one end for your hook.
The Drying Chamber
This is where capicola either succeeds or fails. The drying environment needs to maintain specific conditions for 6-10 weeks:
- Temperature: 55-60°F (13-16°C). This is cool enough to prevent spoilage but warm enough for the enzymatic reactions that develop flavor.
- Humidity: 65-75% relative humidity. Too dry and the surface hardens before the interior can lose moisture (case hardening). Too wet and you get excessive mold growth and potential spoilage.
- Airflow: Gentle, consistent air circulation. Not a direct fan blast, but enough movement to prevent stagnant pockets of moisture around the meat.
If you have a dedicated curing chamber, you're set. If not, a spare refrigerator with an external temperature controller (like an Inkbird ITC-308) and a small humidifier or pan of salt water works well. Some people successfully cure in wine fridges, basement cellars, or even cool garages during winter months — as long as conditions stay within range.
Mold Management
White mold on the casing surface is normal and often desirable. Penicillium nalgiovense — the same white mold found on high-quality salami — protects against harmful organisms and contributes to flavor development. You can inoculate with a commercial mold culture (Bactoferm Mold 600) or simply let wild molds colonize naturally if your chamber has a good microbiome from previous cures.
Green, black, or orange mold is problematic. Wipe it off with a cloth dampened in a vinegar-water solution (1:1 ratio). If it returns aggressively, your humidity may be too high or your airflow insufficient. Adjust conditions and monitor closely.
Monitoring the Dry
The key metric during drying is weight loss. You're targeting 30-35% weight loss from the original pre-cure weight. Weigh your capicola weekly and record the numbers.
- Week 1-2: Expect rapid initial weight loss (3-5% per week). The outer layers are drying quickly.
- Week 3-5: Weight loss slows as moisture from the interior migrates outward. About 2-3% per week.
- Week 6-10: Final drying. Weight loss is slow and steady. Check firmness by pressing — the capicola should feel firm around the edges but still have slight give in the center.
At 30% weight loss, you'll have a capicola that's sliceable but still moist and tender. At 35%, it'll be firmer and more intensely flavored — closer to what you'd find in a traditional Italian salumeria. I usually pull mine at about 32-33%, which gives the best balance of texture and flavor for my taste.
Knowing When It's Done
Beyond the weight loss number, here's how to tell your capicola is ready:
- Firmness: Press the center of the log. It should feel firm but not rock-hard. Think of the resistance of a ripe avocado — there's a little give, but it's definitely solid.
- Color: When you slice a test piece from the end, the interior should be deep ruby to garnet red, with white fat streaks clearly defined. If the center still looks wet or pink (rather than deep red), it needs more time.
- Aroma: It should smell richly meaty, slightly funky in a good way, with the spices you used in the cure. No sour or ammonia smells.
- Sliceability: A properly finished capicola can be sliced paper-thin on a deli slicer or meat slicer without crumbling or tearing. If it shreds or falls apart, it may be too dry or may not have had enough intramuscular fat to begin with.
Slicing and Serving
This is the moment you've been waiting for 2-3 months for. Remove the twine and peel off the casing. If white mold is present on the casing, it comes off with the casing — don't worry about it.
Slice as thin as humanly possible. A meat slicer is ideal — set it to 1-2mm thickness. If you're slicing by hand, use the sharpest, longest knife you have, and chill the capicola in the freezer for 20 minutes first. The cold firms up the fat and makes thin slicing much easier.
Serve capicola at room temperature. Cold capicola straight from the fridge is good, but letting it warm to room temperature for 15-20 minutes allows the fat to soften slightly, which dramatically improves the texture and releases more aroma.
Classic serving ideas:
- On a charcuterie board with aged cheeses, olives, and crusty bread
- Draped over warm focaccia or Italian hoagie rolls
- With fresh mozzarella and roasted peppers for a classic Italian sub
- Wrapped around melon or figs as an appetizer
- Diced into pasta sauces, risottos, or frittatas
Troubleshooting Common Issues
Case Hardening
The outer layer is rock-hard while the inside is still soft and wet. This happens when the surface dries too fast — usually because humidity is too low or there's too much direct airflow. Prevention: maintain 65-75% humidity and ensure airflow is gentle, not direct. If you catch it early, wrap the capicola in a damp (not wet) cheesecloth for 24-48 hours to rehydrate the surface, then return to the chamber at higher humidity.
Excessive Mold
A thin coating of white mold is fine. Thick, fuzzy overgrowth means humidity is too high. Wipe down with vinegar solution, reduce humidity by 5%, and increase airflow slightly. If green or black mold appears and penetrates beyond the casing into the meat, discard the piece — don't take chances.
Sour Smell
A slightly tangy or lactic smell is normal during early drying. A strong sour or rotten smell is not. If the meat smells genuinely off, it may be spoiled. This usually happens when the cure wasn't applied properly (missed spots) or the temperature was too warm. When in doubt, throw it out.
Too Salty
This usually means the cure time was too long for the size of the piece, or the salt percentage was too high. For future batches, stick to 2.75% salt by weight and cure for 10 days for pieces under 4 pounds, 14 days for pieces over 4 pounds. Also consider that finished capicola tastes saltier when eaten in thick slices — slice thinner.
Storage
Finished capicola keeps for 2-3 months in the refrigerator when wrapped tightly in plastic wrap or vacuum-sealed. Once you cut into it, rewrap the cut face tightly to prevent the exposed surface from drying out further.
For longer storage, vacuum-seal portions and freeze for up to 6 months. Thaw in the refrigerator overnight before slicing. The texture holds up remarkably well after freezing if the piece was vacuum-sealed properly.
Once you've made your first capicola and tasted the difference between homemade and store-bought, there's no going back. The depth of flavor, the silky texture of properly marbled coppa muscle cured with real spices and aged with patience — it's one of the most rewarding things you can make in a home kitchen. Start with quality pork from a trusted source, follow the process, and trust the cure. You'll be slicing your own coppa in 10 weeks.
Frequently Asked Questions
How long does it take to make capicola at home?
From start to finish, plan on 10-12 weeks total. The salt cure takes 10-14 days in the refrigerator. Drying takes 6-10 weeks in a curing chamber at 55-60°F and 65-75% humidity. The capicola is ready when it has lost 30-35% of its original weight.
What cut of pork is used for capicola?
Capicola is made from the coppa muscle — the large, well-marbled muscle from the back of the pig's neck into the upper shoulder. Ask your butcher for "coppa muscle" or "pork neck roast." A whole coppa typically weighs 3-5 pounds. Heritage breeds like Berkshire or Duroc have superior marbling.
Do I need a curing chamber for capicola?
A dedicated curing chamber is ideal but not required. You need a space that maintains 55-60°F temperature, 65-75% humidity, and gentle airflow. A spare refrigerator with an external temperature controller and small humidifier works well. Wine fridges and cool basement cellars can also work if conditions are right.
What is the difference between capicola and coppa?
They are the same product — the regional names vary across Italy. In Calabria it's capocollo, in Emilia-Romagna it's coppa, in Campania it's capicola. American-Italian communities often call it "gabagool." The preparation varies slightly by region, but the core process is identical.
Can I use Instacure #1 instead of Instacure #2 for capicola?
No. Instacure #2 (Prague Powder #2) is required for dry-cured meats that will be air-dried for weeks. It contains both sodium nitrite and sodium nitrate, which provides sustained protection throughout the long drying period. Instacure #1 only contains nitrite and is designed for short cures like bacon or sausage.
More Charcuterie Guides
What Is Pink Curing Salt? Sodium Nitrite Explained for Home Charcuterie
Pink curing salt is the most essential — and most misunderstood — ingredient in meat curing. This guide explains what it is, why it's pink, how sodium nitrite prevents botulism, proper usage rates, and whether you can cure meat without it.
10 min readHow Long Does Charcuterie Last? Storage Guide for Cured Meats & Cheese
Understanding proper charcuterie storage ensures you enjoy it at peak quality while avoiding food safety risks.
10 min read