Pulled Pork: From Whole Shoulder to Perfect Shred
If you're new to smoking and want to build confidence, start with pulled pork. I mean it. Brisket gets all the glory, but pork shoulder is more forgiving, harder to mess up, cheaper per pound, and — when done right — every bit as satisfying. I've taught hundreds of people to smoke, and I always start them on pork shoulder.
A bone-in Boston butt (which is actually the upper part of the pork shoulder, not the rear end — butchers have a weird sense of humor) has so much intramuscular fat and connective tissue that it practically bastes itself during the cook. You have to try pretty hard to dry it out.
Selecting Your Pork Shoulder
Boston Butt vs. Picnic
The whole pork shoulder is divided into two sub-primals:
- Boston butt (upper shoulder): This is what you want. It's a thick, rectangular cut with excellent marbling, a bone running through the center, and a fat cap on one side. Typically 7-10 pounds.
- Picnic (lower shoulder): More irregular shape, tougher skin, less marbling. It makes fine pulled pork but the butt is easier to work with and more consistent.
Buy bone-in Boston butt. The bone adds flavor during the cook and serves as a built-in doneness indicator — when the bone wiggles freely and slides out clean, the pork is done.
What to Look For
- Good marbling throughout — visible white streaks of fat within the meat
- A decent fat cap (1/4 to 1/2 inch) on one side
- Bright pinkish-red color, no gray or brown spots
- 7-9 pound range is ideal for most smokers
I typically pay $2-3 per pound for pork shoulder. For the amount of meat you get and the quality of the result, it's the best deal in BBQ.
Trimming and Prep
Pork shoulder requires minimal trimming. Just clean up any loose flaps of meat and trim the fat cap to about 1/4 inch if it's excessively thick. Some cooks remove the fat cap entirely to maximize bark surface — that's fine too, the internal fat is more than enough to keep it moist.
Injection (Optional)
For competition, I inject my pork shoulders with a mixture of apple juice, pork broth, salt, and a touch of Worcestershire. The injection adds flavor deep inside the meat where rub can't reach. For backyard cooks, injection is optional — the shoulder has enough fat to be juicy without it.
If you inject, do it the night before and refrigerate. Use a meat injector with a large-gauge needle and inject on a 1-inch grid pattern, pushing the needle in from multiple angles. You want about 1-2 ounces of liquid per pound of meat.
Seasoning
My pork rub is sweeter and more complex than my brisket rub. Pork loves sugar:
- Brown sugar (the base — creates caramelized bark)
- Paprika (color and mild sweetness)
- Kosher salt
- Black pepper
- Garlic powder
- Onion powder
- Cumin
- Cayenne (just enough for a hint of heat)
- Dry mustard
Apply yellow mustard as a binder, then coat generously with rub. All surfaces. Pork shoulder is thick — you need aggressive seasoning on the outside because it's serving a lot of meat. Season the night before if you can; the salt in the rub acts as a dry brine and helps with moisture retention.
The Cook
Temperature and Wood
I cook pork shoulder at 250°F using hickory — sometimes a hickory/pecan blend. Hickory's strong, smoky flavor is a perfect match for pork. Cherry makes a nice addition if you want to add color and a touch of sweetness.
Phase 1: Building the Bark (Hours 1-5)
Place the shoulder fat cap up (I prefer this for pork, unlike brisket) on the smoker. For the first 5 hours, leave it alone. Don't spritz, don't peek, don't touch it. The rub is building bark and the meat is absorbing smoke.
After 5 hours, the surface should be dark and crusty, and the internal temp should be somewhere in the 150-165°F range.
Phase 2: The Stall (Hours 5-9)
Just like brisket, pork shoulder hits the stall around 150-170°F. Same cause — evaporative cooling. You can wrap in foil or butcher paper to push through it faster, or just wait it out.
For pulled pork, I usually wrap in foil at around 165°F with a splash of apple juice. The foil braise effect adds moisture and speeds things up. Unlike brisket, bark texture isn't as critical on pulled pork because you're going to shred the whole thing anyway.
Phase 3: The Finish (Hours 9-13)
After the stall breaks, keep cooking until the internal temperature hits 200-205°F and the bone wiggles freely in its socket. The probe test works here too — a thermometer or skewer should slide into the meat with zero resistance.
A common question: "Can I overcook pulled pork?" Technically yes, but the window is huge. I've had shoulders come out perfect anywhere from 198°F to 210°F internal. The fat content is so high that it stays moist even if you go a few degrees over. Compare that to brisket flat, where 5 degrees over can mean the difference between tender and dry.
Resting and Pulling
The Rest
Wrap the finished shoulder in foil (if it isn't already), then a towel, and rest in a cooler or Cambro for at least one hour. Two hours is better. The rest allows the juices to redistribute and the collagen to continue converting to gelatin in the residual heat.
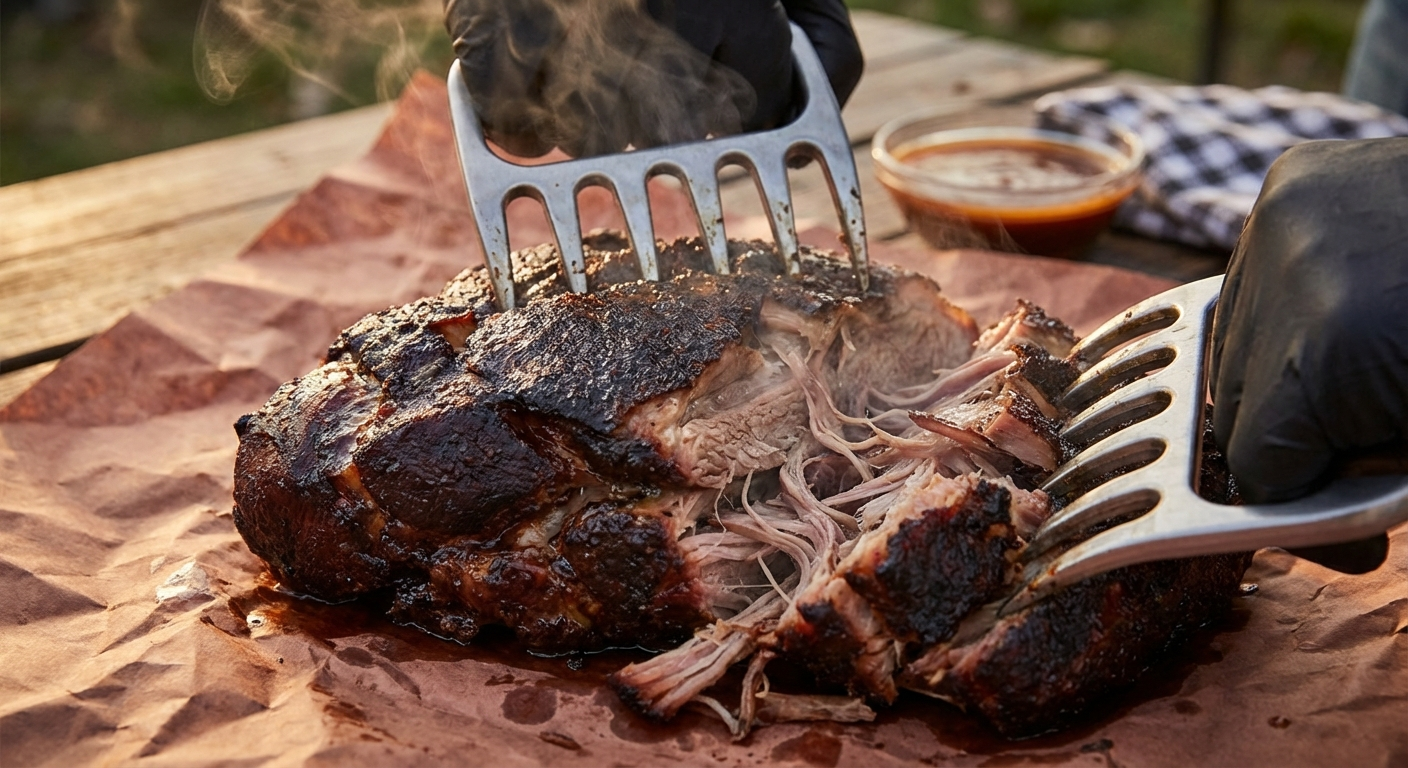
Pulling
When you're ready to pull, the bone should slide out cleanly with a gentle tug — no meat sticking to it. If meat is still clinging to the bone, it needed more time.
I pull pork by hand with heat-resistant gloves. Grab a chunk and pull it apart into long shreds — the meat should separate easily along the grain. Remove any large chunks of fat or connective tissue that didn't render.
Don't over-shred. You want varied texture — some big chunks, some long shreds, some fine pieces. A mix of textures makes for a more interesting bite.
Finishing
Once pulled, mix the shredded pork with any accumulated juices from the foil wrap. Season with a bit more rub if needed. If you want to add sauce, add a small amount and toss to coat — the pork should be flavorful on its own, with sauce as an option, not a requirement.
I also like to take some of the bark — the dark, crusty exterior pieces — and chop them finely, then mix them into the pulled meat. This distributes the smoky, seasoned bark flavor throughout and adds texture.
Serving Suggestions
- Sandwiches: Pile it on a soft potato bun with coleslaw. Classic.
- Plates: Serve with mac and cheese, baked beans, and pickles.
- Tacos: My personal favorite — pulled pork on corn tortillas with pickled onions, cilantro, and a squeeze of lime.
- Loaded potatoes: Pile pulled pork over a baked potato with cheese and sour cream.
Pulled pork reheats beautifully. Vacuum-seal portions and freeze for up to 3 months. Reheat in a pot with a splash of apple juice over low heat, or sous vide in the bag at 165°F. And if you're feeling adventurous, try smoking a wagyu pork shoulder or beef cut from The Meatery using these same techniques — the extra marbling is incredible in a low-and-slow cook.
Frequently Asked Questions
What temperature do you cook pulled pork to?
Cook pork shoulder to 200-205°F internal temperature, or until the bone wiggles freely and a probe slides in with zero resistance. The stall happens around 150-170°F. Total cook time is 10-14 hours at 250°F for a 7-9 pound Boston butt.
Boston butt or picnic for pulled pork?
Boston butt (upper pork shoulder) is preferred. It has better marbling, a more uniform shape, and is easier to work with. Picnic (lower shoulder) works but has tougher skin and less consistent fat distribution. Buy bone-in for best results.
Should I wrap pork shoulder?
I wrap in foil at around 165°F with a splash of apple juice. For pulled pork, foil works great because bark texture matters less than with brisket — you're shredding the whole thing anyway. Wrapping speeds through the stall and adds moisture.
How long should you rest pulled pork?
Rest for a minimum of one hour, ideally two, wrapped in foil and a towel inside a cooler or Cambro. The rest allows juices to redistribute and collagen to continue converting to gelatin. You can hold a pork shoulder for up to 4-5 hours in an insulated cooler and it'll still be serving temperature.
More Charcuterie Guides
What Is Pink Curing Salt? Sodium Nitrite Explained for Home Charcuterie
Pink curing salt is the most essential — and most misunderstood — ingredient in meat curing. This guide explains what it is, why it's pink, how sodium nitrite prevents botulism, proper usage rates, and whether you can cure meat without it.
10 min readHow Long Does Charcuterie Last? Storage Guide for Cured Meats & Cheese
Understanding proper charcuterie storage ensures you enjoy it at peak quality while avoiding food safety risks.
10 min read