How to Make Prosciutto at Home: The Complete Guide to Dry-Cured Pork Leg
Prosciutto is the mountain that every home charcutier eventually decides to climb. It’s not technically difficult—there are only two ingredients in traditional prosciutto, pork and salt—but the timeline tests your patience like nothing else in the curing world. We’re talking 12 to 24 months from start to finish, depending on the size of your leg and your target flavor profile.
But here’s the thing: once you’ve hung a prosciutto and tasted the result, nothing from a deli counter will ever quite satisfy you again. The depth of flavor, the silky texture, the knowledge that you transformed a raw pork leg into something extraordinary with just salt and time—it changes your relationship with food.
This guide covers the entire process, from choosing the right pork to slicing your finished prosciutto. If you’ve already made shorter-timeline projects like pancetta, duck prosciutto, or bresaola, you have the foundational skills. Prosciutto is the next logical step.
What Is Prosciutto?
Prosciutto crudo (literally “raw ham”) is a dry-cured, uncooked pork leg that originated in Italy. The two most famous regional styles are Prosciutto di Parma from Emilia-Romagna and Prosciutto di San Daniele from Friuli Venezia Giulia, both of which hold DOP (Denominazione di Origine Protetta) status in the European Union.
The defining characteristics of prosciutto:
- Whole leg: Unlike most cured meats that use individual muscles, prosciutto cures an entire bone-in hind leg. This is what gives it that complex layering of textures—lean meat, fat cap, and the rich marrow-adjacent meat near the bone.
- Salt-only cure: Traditional Italian prosciutto uses nothing but sea salt. No curing salts (sodium nitrite), no sugar, no spices. The salt, controlled environment, and time do all the work.
- Extended aging: Prosciutto di Parma requires a minimum of 12 months, though 18–24 months is common for premium quality. San Daniele requires a minimum of 13 months.
- Sweet and nutty flavor: Well-aged prosciutto develops complex sweet, nutty, and slightly funky flavors that deepen with time. The fat becomes almost translucent and melts on your tongue.
For home production, we’ll follow the traditional salt-only method while adapting the environmental controls to what’s achievable in a home curing setup.
Selecting the Right Pork Leg
The quality of your finished prosciutto depends more on the quality of your pork than on any technique. This is a project where sourcing matters enormously.
What to Look For
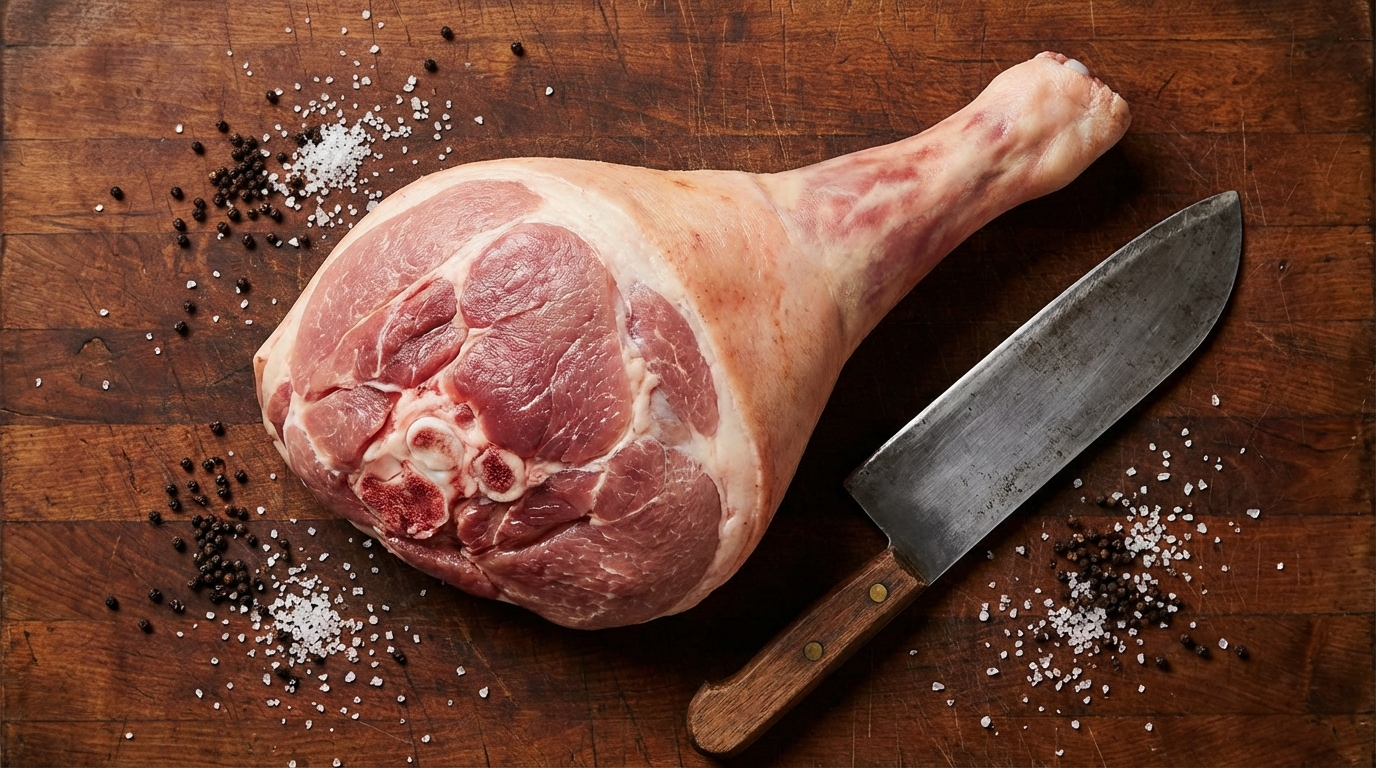
You want a fresh (never frozen) bone-in hind leg from a well-finished hog. The ideal leg weighs between 25 and 35 pounds with the trotter (foot) still attached. Here’s what to evaluate:
- Fat coverage: The exterior fat cap should be at least ¾ inch thick across most of the leg. This fat protects the meat during the long aging process and prevents case hardening. Avoid legs that have been trimmed too aggressively.
- Skin: The skin should be intact on the fat side. During aging, the skin acts as a natural barrier that regulates moisture loss.
- Freshness: The meat should be deep pink to light red with a clean, sweet smell. Any sour or off odors mean the leg has been mishandled.
- Bone integrity: Check that the aitch bone (pelvic bone) is intact or has been cleanly removed. A cracked or splintered bone creates pockets where bacteria can develop.
Heritage Breed vs. Commercial Pork
If you can source heritage breed pork—Berkshire, Duroc, Red Wattle, or Mangalitsa—you’ll get noticeably better results. These breeds develop more intramuscular fat (marbling), which translates directly to flavor and texture in the finished prosciutto. The fat from heritage breeds also tends to be firmer and more flavorful, with higher levels of oleic acid that give it that silky, almost sweet quality.
That said, a well-raised commercial hog will still produce good prosciutto. The more important factor is how the animal was finished—hogs that were fed a diverse diet including acorns, whey, or other natural supplements produce fat with more complex flavor than those finished on straight corn and soy.
Preparing the Leg
Before curing, the leg needs some preparation:
- Remove the aitch bone: If your butcher hasn’t already done this, carefully cut around the pelvic bone and remove it while keeping the femur intact. This creates a cavity that you’ll pack with salt, ensuring the cure penetrates the thickest part of the leg near the joint.
- Press the femoral artery: Using firm pressure, run your hand along the inner thigh from the aitch bone cavity toward the hock, pressing out any residual blood from the femoral artery. This is critical for preventing bone-sour, a type of spoilage that occurs near the bone.
- Trim selectively: Remove any loose flaps of meat or ragged edges that won’t cure evenly. Leave the fat cap and skin intact. If there are any blood spots on the surface, trim them away.
- Weigh the leg: Record the starting weight. You’ll use this to track moisture loss throughout the aging process. Your target is 30–35% weight loss for a finished prosciutto.
The Salt Cure
The salt cure is the foundation of the entire process. Salt serves three critical functions: it draws moisture out of the meat, it inhibits bacterial growth, and it denatures proteins in a way that creates prosciutto’s distinctive silky texture.
The Traditional Method
Italian prosciutto makers use a remarkably simple formula: coarse sea salt, applied in stages over a period of days, with the total curing time calculated by weight.
The rule of thumb for curing time:
- 1 day per pound of leg weight, plus 2–5 extra days
So a 30-pound leg would cure for 32–35 days total. During this time, the leg rests on a bed of salt in a cold environment (36–40°F / 2–4°C) and gets re-salted at intervals.
Step-by-Step Salt Cure
You’ll need approximately 1 pound of coarse sea salt per 2 pounds of pork. For a 30-pound leg, that’s about 15 pounds of salt. Use coarse sea salt or kosher salt—not table salt, which contains anti-caking agents.
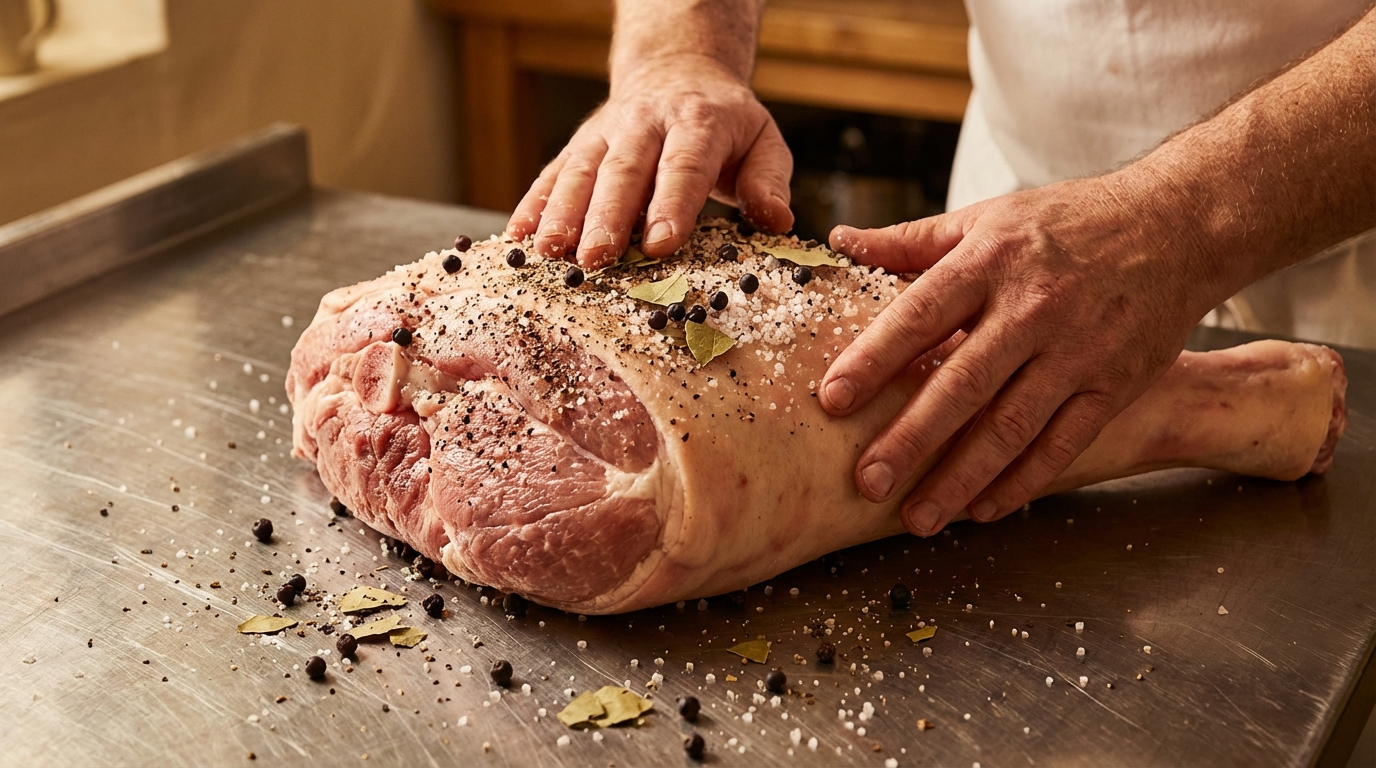
- Day 1 — First salt application: Cover the bottom of a food-grade plastic or stainless steel tray with a ½-inch layer of salt. Place the leg skin-side down on the salt bed. Pack salt generously into the aitch bone cavity, around the exposed femur at the hock end, and over all exposed meat surfaces. The skin side needs only a light coating. The lean surfaces should have ¼ to ½ inch of salt packed against them.
- Day 7 — First re-salt: Remove the leg from the tray. Brush off the old salt, which will be wet and partially dissolved. Discard this used salt. Apply fresh salt using the same method as Day 1. You’ll notice the leg has already firmed up noticeably and lost some moisture.
- Day 14 — Second re-salt: Repeat the process. By now the leg should feel significantly firmer, especially in the thinner areas near the hock. The skin side may have developed a slightly tacky feel, which is normal.
- Remaining days: For larger legs (over 30 pounds), apply a third re-salt at day 21. The leg remains in salt until the calculated curing time is complete.
Temperature During Curing
The curing phase must happen in a cold environment: 36–40°F (2–4°C) with moderate humidity (70–80%). A dedicated refrigerator works well. If using a standard fridge, the bottom shelf or crisper drawer tends to be the coldest spot. The key is consistency—temperature fluctuations during curing can lead to uneven salt penetration.
Washing and Resting
Once the salt cure is complete, the leg enters a transition phase that prepares it for the long hang.
Washing
Remove the leg from the salt and brush off all remaining salt crystals. Using cold water, thoroughly wash the entire surface of the leg. Some Italian producers use a mix of cold water and wine vinegar (about 10:1 ratio) for the wash, which adds a subtle flavor note and helps create an inhospitable surface for unwanted molds. Pay special attention to the aitch bone cavity and any crevices around the hock.
After washing, pat the leg completely dry with clean towels. Any surface moisture left behind can encourage the wrong types of mold growth in the early days of hanging.
Pressing (Optional but Recommended)
Traditional Prosciutto di Parma undergoes a pressing phase after the salt cure. The leg is placed on a flat surface and weighted down (30–50 pounds of evenly distributed weight) for 15–20 days at 36–40°F. This accomplishes two things: it further redistributes the salt and moisture within the meat, and it shapes the leg into the classic flattened profile that makes for even drying and beautiful thin slicing.
For home production, pressing is optional but recommended if you have the space. A clean shelf in your refrigerator with a sanitized cutting board and heavy pots or canned goods on top works fine.
The Aging Environment

This is where most home prosciutto projects succeed or fail. The aging environment needs to provide stable temperature, controlled humidity, and gentle airflow for 12+ months. Getting this right is worth more effort than any other part of the process.
Ideal Conditions
- Temperature: 55–65°F (13–18°C) for the majority of aging. Some producers start cooler (50°F) and gradually warm to 65°F over several months.
- Humidity: 65–75% relative humidity. Too low and the exterior dries too fast (case hardening), creating a hard shell that traps moisture inside. Too high and you risk excessive mold growth and potential spoilage.
- Airflow: Gentle and consistent. You want enough air movement to carry away moisture from the surface but not so much that it creates uneven drying. A small computer fan on low speed works well in a converted fridge.
Home Curing Chamber Options
The most reliable option for home prosciutto is a converted refrigerator or chest freezer controlled by an external temperature controller (like an Inkbird ITC-308) and a small humidifier or dehumidifier. This setup gives you precise control over both temperature and humidity.
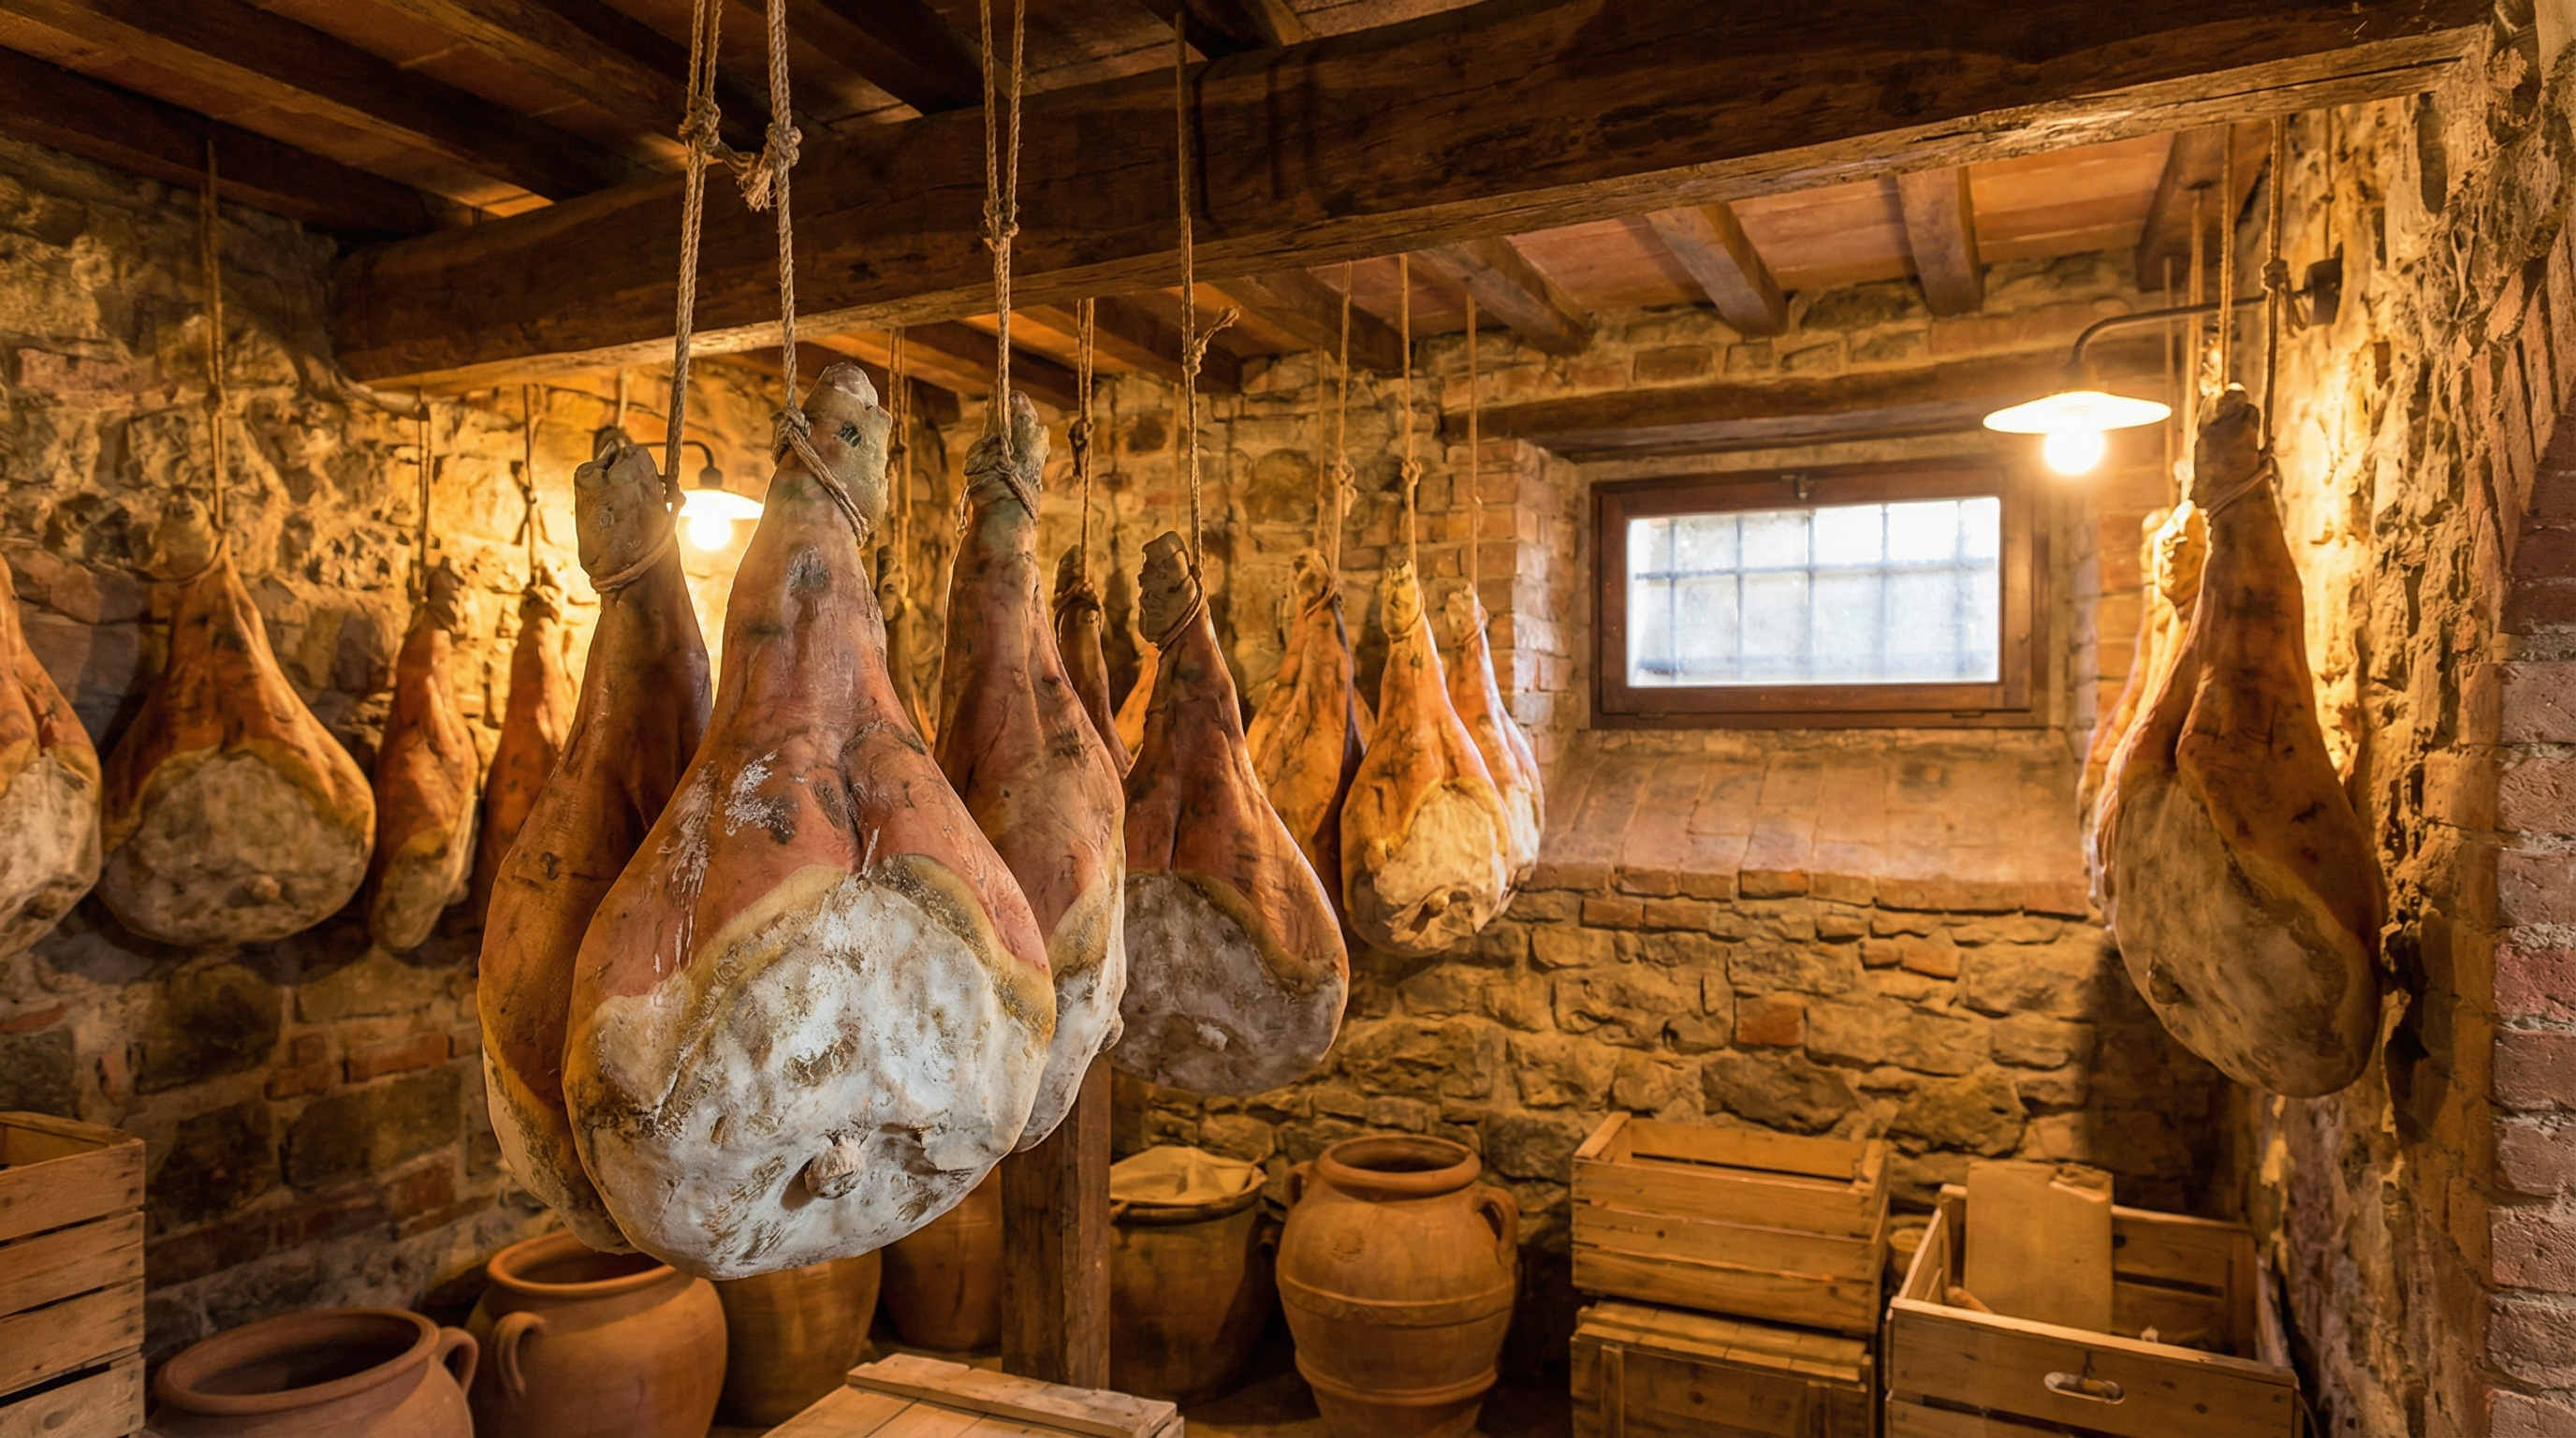
If you’re fortunate enough to have a basement, wine cellar, or root cellar that naturally maintains temperatures in the 55–65°F range with moderate humidity, that’s ideal. Italian producers have used natural caves and cellars for centuries. The advantage of a natural environment is consistent conditions without mechanical intervention—the disadvantage is that you’re at the mercy of seasonal changes.
Whichever setup you use, invest in a good digital thermometer/hygrometer and monitor conditions daily, especially during the first few weeks. Record the readings. Over time, you’ll learn how your specific environment behaves and can make adjustments.
Hanging the Leg
Use a strong stainless steel or food-grade hook through the hock end, making sure it’s secure enough to support the weight of the leg for a year or more. Hang the leg with the hock end up and the wider butt end down. This orientation allows gravity to help distribute moisture downward during the early drying phase.
Leave at least 4–6 inches of clearance on all sides of the leg. It should not touch walls, other hanging meats, or shelves. Adequate clearance ensures even air circulation around the entire surface.
The Sugna (Lard Paste Application)
Around 3–4 months into the aging process, you’ll notice the exposed lean meat surfaces starting to dry and darken significantly. This is when you apply the sugna—a paste of rendered lard mixed with flour, salt, and sometimes black pepper—to the exposed areas.
The sugna serves a critical purpose: it slows moisture loss from the lean surfaces to match the rate of moisture loss through the fat-covered and skin-covered portions. Without it, the lean areas would case-harden while the interior remains wet, creating a prosciutto that’s tough on the outside and potentially spoiled on the inside.
Making Sugna
Mix together:
- 2 parts rendered pork lard (at room temperature)
- 1 part rice flour or fine wheat flour
- A generous pinch of fine salt
- Freshly ground black pepper (optional)
Blend until you have a smooth, spreadable paste about the consistency of soft butter. Apply a layer approximately ¼ inch thick to all exposed lean surfaces. Do not apply to the skin or fat cap. Reapply as needed throughout the aging process—if the sugna cracks or pulls away, smooth it back or apply a fresh layer.
Monitoring the Cure
The months of aging are mostly about watching, waiting, and monitoring. But there are specific things to check and potential problems to address.
Weight Loss Tracking
Weigh the leg monthly and record the results. Healthy moisture loss follows a curve—faster in the first few months, gradually slowing as the exterior firms up. A rough guide:
- Months 1–3: 1.5–2% weight loss per week
- Months 4–8: 0.75–1.5% per week
- Months 9–12+: 0.5–0.75% per week
Your target total weight loss is 30–35%. A leg that started at 30 pounds should finish around 19.5–21 pounds. If weight loss stalls well before reaching your target, check your humidity—it may be too high.
The Bone Test
The traditional way to assess prosciutto readiness is the spillatura—the bone test. Insert a thin, pointed horse bone (or a food-grade plastic probe) into the meat near the three traditional test points: near the femur head, at the center of the flat face, and near the aitch bone cavity. Pull it out and smell it immediately.
A well-cured prosciutto should smell sweet, nutty, and pleasantly porky. Any sour, rotten, or ammonia-like smell near the bone indicates bone-sour and means the leg has failed. This is rare if your initial blood pressing was thorough and your salt cure was sufficient, but it’s the reason experienced curers always check before cutting.
Mold Management
Mold growth on prosciutto is normal and, in many cases, desirable. Here’s how to read it:
- White, powdery mold: This is Penicillium nalgiovense or similar beneficial molds. Leave it alone—it protects the surface and contributes to flavor development.
- Green or blue-green mold: Common Penicillium species, generally harmless. Wipe with a cloth dampened in vinegar if it bothers you, but it’s not a concern unless it’s spreading into the meat through cracks.
- Black mold: Wipe off immediately with vinegar. Check your humidity—black mold usually indicates conditions that are too damp. If it keeps returning, lower humidity by 5–10%.
- Slimy or wet patches: These indicate bacterial growth, not mold. Wipe with a strong vinegar solution and increase airflow. If the area smells off, the prosciutto may be compromised.
Slicing and Serving
After 12–24 months of aging, your prosciutto is ready. The surface should be firm, the weight loss should be in the 30–35% range, and the bone test should confirm sweet, clean aromas.
Cutting Into the Leg
To start slicing, you need to open the leg. Using a sharp, long-bladed knife (a dedicated prosciutto knife is ideal), cut away the skin and fat cap from the area you plan to slice. Only expose as much surface as you’ll consume within a week or two—the skin and fat protect the rest of the leg from drying out further.
Remove the sugna from the cutting area and trim away any dried or discolored surface meat (the first ¼ inch or so). The meat underneath should be a gorgeous deep rose to burgundy color with veins of creamy white fat running through it.
Hand Slicing vs. Machine
Traditional Italian prosciutto is hand-sliced with a long, flexible knife. This is a skill that takes practice, but the result is worth it—hand-cut slices have slightly irregular thickness that creates a more interesting texture on the palate. Aim for slices thin enough to see through, roughly 1–2 millimeters thick.
If you have a meat slicer, set it to the thinnest possible setting. A slicer will give you more consistent results, but you’ll need to work with smaller pieces since a whole leg won’t fit on most home slicers. Cut manageable sections from the leg and slice them on the machine.
Serving
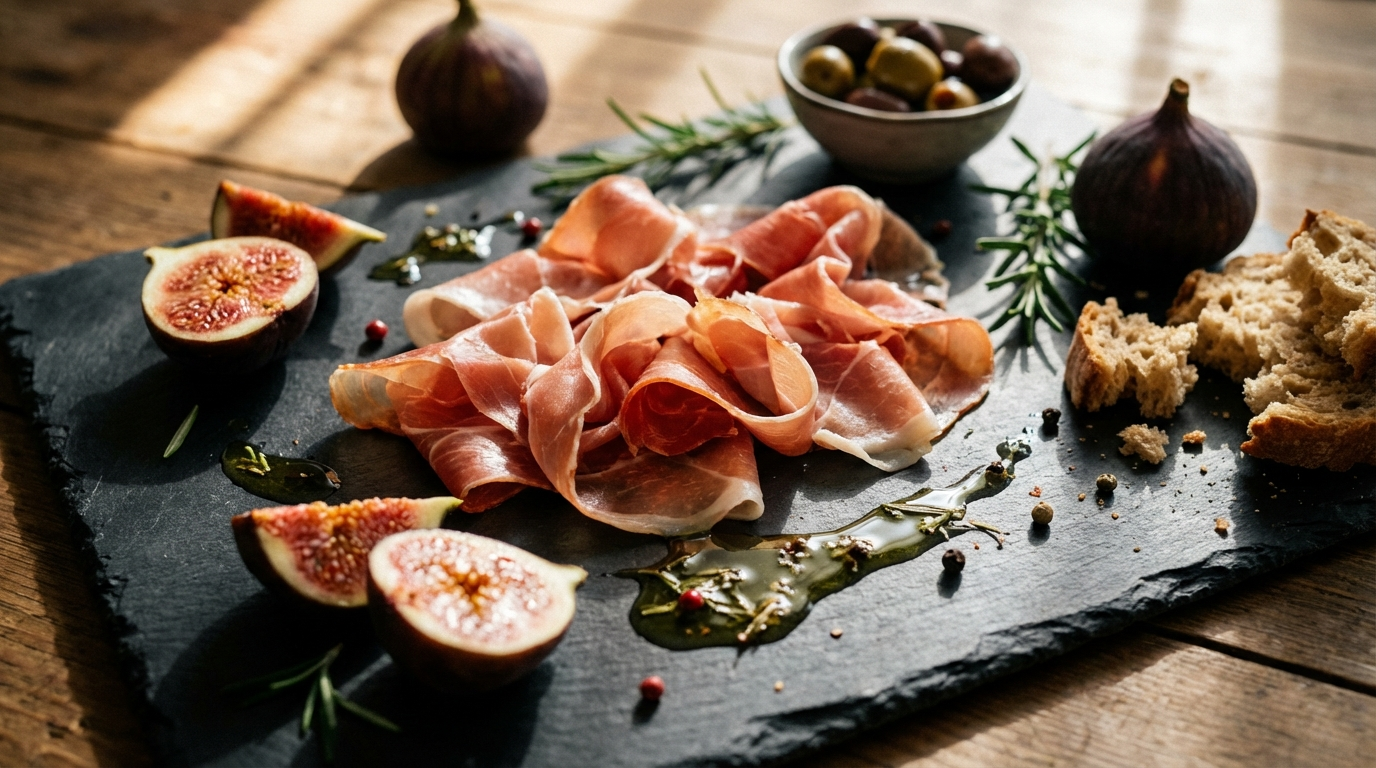
Prosciutto is best served at room temperature. Take your slices out of the refrigerator 20–30 minutes before serving to let the fat soften and the flavors open up. Arrange slices loosely on a plate or board—don’t stack or compress them.
Classic pairings:
- Fresh fruit: Ripe figs, cantaloupe melon, or pears. The sweetness of the fruit against the salty, nutty prosciutto is one of the great flavor combinations in Italian cuisine.
- Cheese: Parmigiano-Reggiano, fresh mozzarella, or burrata. The richness of the cheese complements the lean, silky meat.
- Bread: Grissini (breadsticks), focaccia, or crusty country bread with good olive oil.
- Wine: Prosecco, Lambrusco, or a light Sangiovese. The effervescence of sparkling wine cuts through the fat beautifully.
Storing Your Prosciutto
A whole prosciutto leg, with its skin and fat cap intact, will continue to age and develop flavor for months after you start slicing it. Keep it hanging in your curing chamber or store it in a cool, dark place (55–65°F). After each slicing session, press a piece of plastic wrap against the exposed cut face, or apply a thin layer of olive oil or fresh sugna to prevent excessive drying.
Sliced prosciutto should be consumed within a few days for optimal flavor and texture. If you must store slices, layer them between sheets of wax paper or parchment and refrigerate in an airtight container for up to a week. Bring to room temperature before serving.
The beauty of making prosciutto at home is that a single leg feeds you for months. Each time you slice, the exposed face develops slightly different flavors as it interacts with air. Some of the best bites come from deep inside the leg, near the bone, where the meat has aged the longest and developed the most complex character.
Common Mistakes and Troubleshooting
Even experienced charcutiers run into issues on their first whole-leg project. Here are the most common problems and how to address them:
- Case hardening: The exterior is rock-hard while the interior is still soft and wet. This happens when humidity is too low or airflow is too strong. If caught early, wrap the leg in a damp (not wet) towel for 24 hours to rehydrate the surface, then adjust your chamber conditions. Prevention is better than cure: maintain 65–75% humidity and use gentle, indirect airflow.
- Bone sour: A foul smell near the bone, detected during the bone test. This usually means blood wasn’t thoroughly expressed during preparation, or the salt didn’t penetrate deeply enough near the joint. Unfortunately, bone sour is usually fatal to the project. The affected area must be cut away, and if the smell has permeated deeply, the entire leg may be lost.
- Excessive weight loss: If the leg has lost more than 40% of its original weight, it may be over-dried. The texture will be tough and the flavor may be overly concentrated and salty. This typically happens when humidity is too low for too long. There’s no fix, but the meat is still safe to eat—use it shaved thin or diced into pasta dishes where the intense flavor becomes an asset.
- Rancid fat: The exterior fat develops an off smell or yellowish color. This can happen if the aging temperature is too high (above 65°F for extended periods) or if the fat was already oxidizing when you started. Trim away the affected fat—the meat underneath is usually fine.
- Insect contamination: Ham mites or cheese flies can be a problem, especially in non-sealed environments. Prevention is key: use fine mesh screening on any openings in your curing space, and consider food-grade insect traps. If you spot mites, a light coating of olive oil on the surface can smother them.
Timeline Summary
For a 30-pound bone-in pork leg, expect this approximate timeline:
- Day 0: Preparation, first salt application
- Days 1–35: Salt curing phase (cold storage at 36–40°F)
- Days 35–37: Washing and drying
- Days 37–55: Pressing phase (optional, 15–20 days)
- Day 55: Hang in curing chamber (55–65°F, 65–75% RH)
- Month 3–4: Apply sugna to exposed lean areas
- Months 4–12: Aging, monthly weight checks, mold management
- Month 12+: Bone test to assess readiness
- Month 14–24: Continue aging for deeper flavor (optional)
Yes, it’s a long road. But every charcutier who has made it to the end will tell you the same thing: the first slice of your own prosciutto is one of the most rewarding moments you’ll ever have in a kitchen.
Frequently Asked Questions
Do I need curing salt (Prague Powder) for prosciutto?
No. Traditional Italian prosciutto uses only sea salt. The extended curing and aging process, combined with low water activity, makes the meat safe without sodium nitrite. However, some home curers add a small amount of Cure #2 (Prague Powder #2) for an extra safety margin on their first attempt. If you choose to use it, follow the manufacturer's recommended ratio.
Can I make prosciutto from a smaller cut instead of a whole leg?
You can make a prosciutto-style product from a boneless pork loin or a smaller leg section, but it won't be true prosciutto. These smaller cuts cure and age much faster (3–6 months) and produce a different texture and flavor profile. For a whole-leg prosciutto experience at a smaller scale, look for a bone-in fresh ham from a smaller heritage breed hog (15–20 pounds).
What temperature and humidity do I need for aging prosciutto?
Aim for 55–65°F (13–18°C) and 65–75% relative humidity. A converted refrigerator or chest freezer with an external temperature controller and a small humidifier gives you the most precise control. Monitor conditions daily, especially during the first month.
How do I know when my prosciutto is finished aging?
The traditional method is the bone test (spillatura): insert a thin probe near the bone in three locations and smell it. The aroma should be sweet, nutty, and clean. Additionally, the leg should have lost 30–35% of its original weight. Most prosciutto benefits from at least 12 months of aging, with 18–24 months producing the best results.
Is the mold growing on my prosciutto dangerous?
White and green molds are typically beneficial Penicillium species that are normal and even desirable during prosciutto aging. They help regulate moisture loss and contribute to flavor. Black mold should be wiped off with vinegar, and slimy or wet patches indicate bacterial growth that needs immediate attention. As long as the meat underneath smells clean, surface mold is manageable.
More Charcuterie Guides
What Is Pink Curing Salt? Sodium Nitrite Explained for Home Charcuterie
Pink curing salt is the most essential — and most misunderstood — ingredient in meat curing. This guide explains what it is, why it's pink, how sodium nitrite prevents botulism, proper usage rates, and whether you can cure meat without it.
10 min readHow Long Does Charcuterie Last? Storage Guide for Cured Meats & Cheese
Understanding proper charcuterie storage ensures you enjoy it at peak quality while avoiding food safety risks.
10 min read