How to Make Lonza at Home: Italian Cured Pork Loin Guide
How to Make Lonza at Home: Italian Cured Pork Loin Guide
If you've worked your way through pancetta, bresaola, and capicola, lonza is the natural next step — and in many ways, it's the most rewarding whole-muscle cure you'll ever make. Where coppa is rich and fatty, lonza is lean and refined. Where bresaola is beef, lonza is pure pork elegance. It's the kind of cured meat that makes people stop mid-bite and ask, "You made this?"
Lonza — sometimes called lonza di maiale or lomo — is air-cured pork loin. It's produced throughout central Italy, particularly in Umbria and Le Marche, where it's been a staple of the norcineria tradition for centuries. The Spanish version, lomo embuchado, follows similar principles but with smoked paprika (pimentón) as the defining spice. Both produce something extraordinary: a dense, silky cured meat with a clean, concentrated pork flavor that's impossible to achieve any other way.
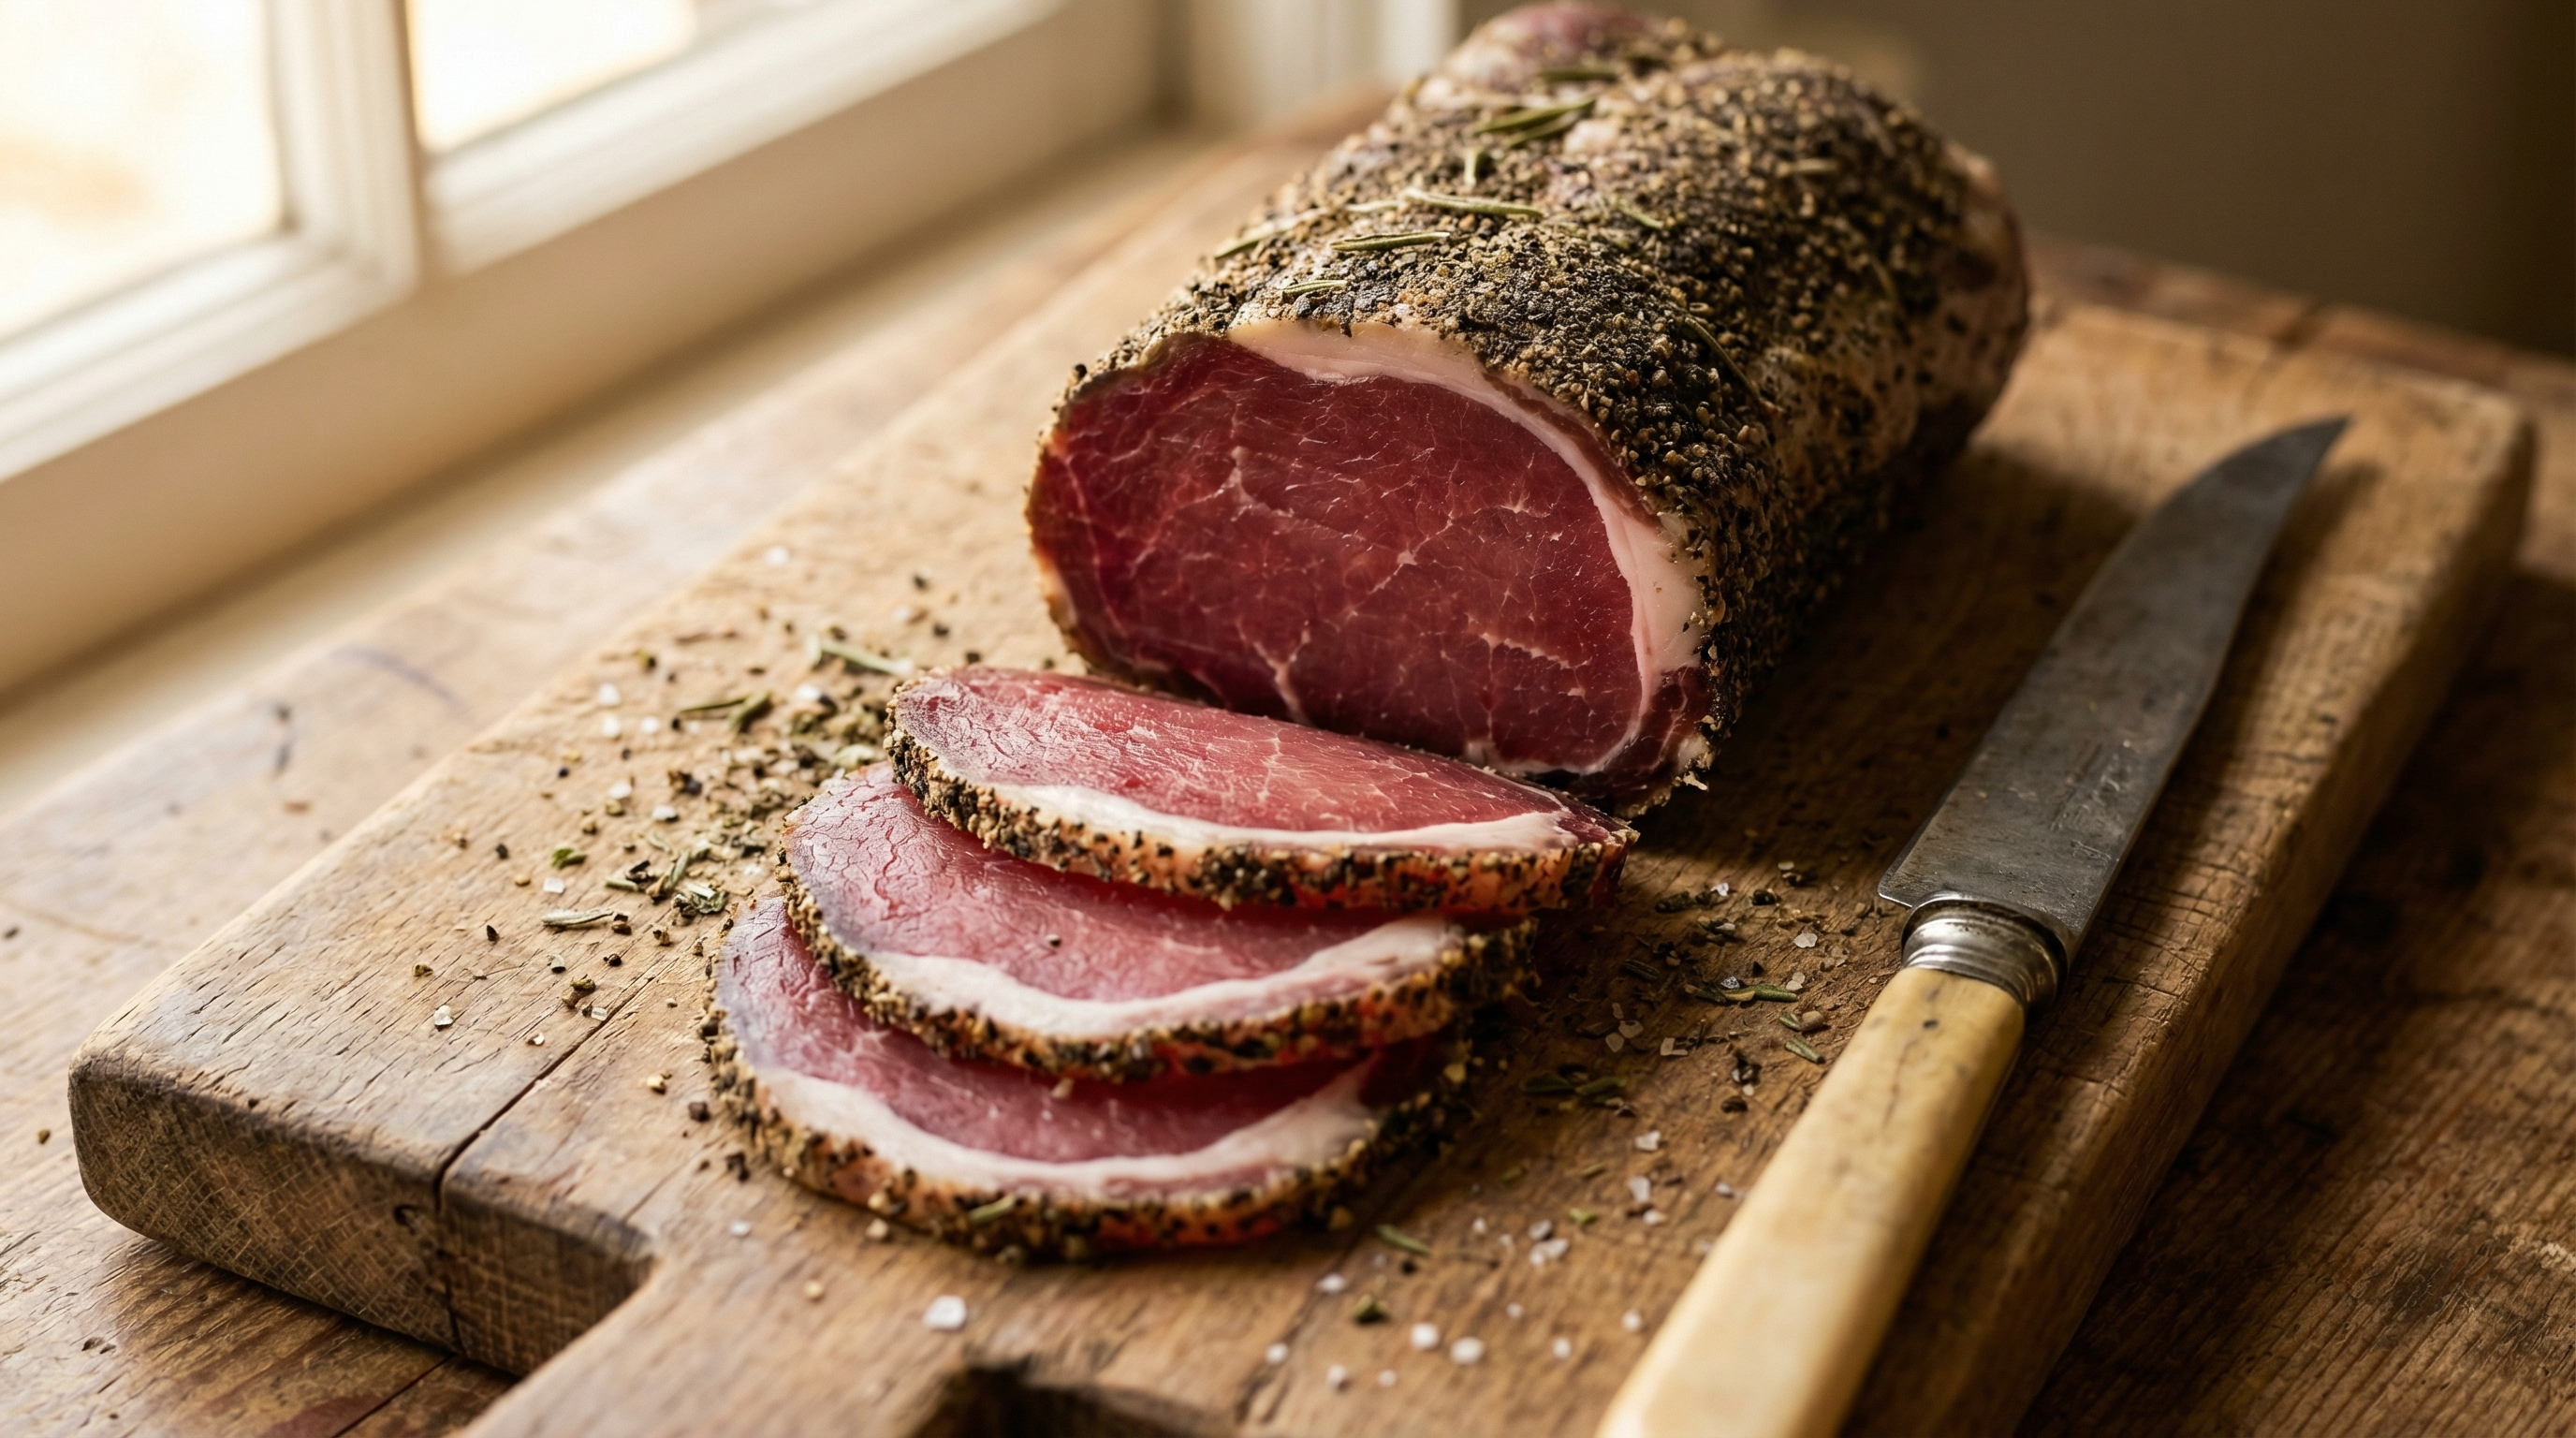
I've been making lonza for years, and it remains one of my favorite projects. The pork loin is forgiving to work with, the cure is straightforward, and the finished product — paper-thin slices of deep rose-pink meat with a fragrant herb crust — consistently impresses even people who've eaten their way through Italy's best salumerie.
What Makes Lonza Special
Lonza occupies a unique niche in the world of salumi. Here's what sets it apart from other whole-muscle cures:
- Lean but not dry: Pork loin is one of the leanest primal cuts, which sounds like a disadvantage for curing. But lonza's genius is in the technique — the cure, the casing, and the controlled drying environment keep the interior moist and silky despite the low fat content. When sliced thin, lonza has a texture closer to bresaola than to fatty coppa.
- Clean flavor: Without heavy intramuscular fat, lonza lets the cure and aromatics shine. You taste the pork, the pepper, the herbs — every element is distinct and balanced. It's a showcase for spice work in a way that fattier cuts can't match.
- Speed: A pork loin is relatively uniform in diameter and not excessively thick, which means lonza dries faster than most whole-muscle cures. Expect 4-6 weeks of hanging time compared to 3-6 months for larger cuts like prosciutto or culatello.
- Versatility: Lonza works on charcuterie boards, in sandwiches, draped over salads, or eaten alone with good bread and olive oil. Its lean profile makes it a favorite pairing with bold accompaniments like truffle honey or aged balsamic.
- Beginner-friendly: The uniform shape of pork loin means even drying with minimal risk of case hardening — the enemy of all whole-muscle cures. If you can make basic cured meats, you can make lonza.
Sourcing Your Pork Loin
The pork loin you choose matters enormously. This isn't a cut where heavy marbling masks imperfections — lonza's lean character means every shortcoming in the raw material shows up in the finished product.
What to Buy
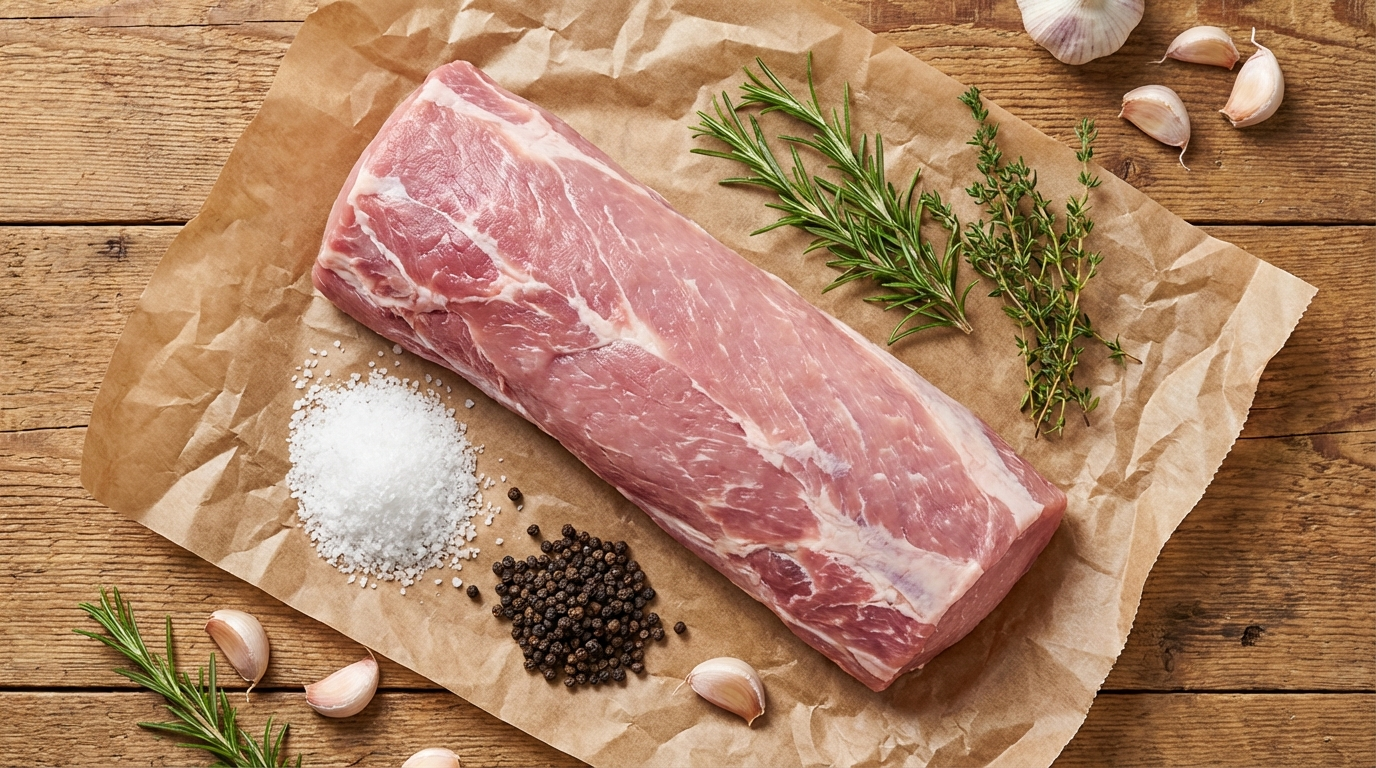
- Whole boneless pork loin: You want a center-cut section, roughly 2-3 pounds, with a uniform diameter. Avoid the tapered end near the sirloin — it'll dry unevenly and the thin end will over-cure while the thick end stays underdone.
- Fat cap intact: A thin layer of back fat on one side (about 1/4 inch) helps protect the meat during drying and adds flavor. Don't buy a completely trimmed "extra lean" loin — you need that fat.
- Heritage breeds if possible: Berkshire (Kurobuta), Duroc, or Red Wattle pork loins have more intramuscular fat, deeper flavor, and better texture than commodity pork. The difference in the finished lonza is dramatic.
- Color and freshness: The meat should be pinkish-red, not pale or gray. Fresh pork loin has a clean, slightly sweet smell. Any sour or off odors mean pass.
Where to Find Quality Pork Loin
- Local butcher shops: Ask for a whole boneless center-cut loin, skin and silverskin removed, fat cap on. Most butchers will cut this to your preferred length.
- Farmers' markets: Small heritage breed farms are your best source for exceptional pork. The loin from a Berkshire hog raised on pasture is a different animal — literally — from what you'll find at the grocery store.
- Online: The Meatery ships quality pork products that are well-suited for curing projects.
Equipment and Ingredients
Lonza doesn't require much specialized equipment, but what you do need, you need to get right. Curing is food safety — there's no room for improvisation with the critical components.
Equipment
- Digital kitchen scale: Precision matters. You're measuring cure by weight, not volume. A scale accurate to 1 gram is essential.
- Natural hog casings or collagen casings: The casing holds the loin's shape during drying and helps control moisture loss. Beef middles work too if you want a larger diameter casing. Some makers use cheesecloth or netting instead — it works but casings produce a more professional result.
- Butcher's twine: For tying the cased loin at regular intervals. This prevents the casing from pulling away from the meat and creating air pockets.
- Curing chamber or dedicated fridge: You need a controlled environment at 50-60°F with 65-75% relative humidity. A modified wine fridge or mini fridge with an Inkbird temperature/humidity controller is the standard home setup. Read my curing chamber guide if you haven't built one yet.
- Hygrometer: To monitor humidity in your curing space. Accuracy matters — invest in a calibrated digital unit.
- Meat hooks or S-hooks: For hanging the lonza in your curing chamber.
Ingredients (for a 2-pound loin)
- 2 lbs (900g) boneless pork loin, center-cut, fat cap on
- 50g (about 2.5 Tbsp) fine sea salt — this is roughly 2.75% of the meat weight
- 5g (1 tsp) curing salt #2 (Prague Powder #2) — 0.25% of meat weight. This is non-negotiable for air-dried products. Read the curing salts guide if you're unsure why.
- 3g (1.5 tsp) coarsely ground black pepper
- 2g (1 tsp) dried thyme
- 2g (1 tsp) crushed fennel seed
- 2g (1 tsp) granulated garlic
- 1g (0.5 tsp) crushed red pepper flakes (optional)
- 2g fresh rosemary, finely minced
- 50ml (about 3 Tbsp) dry red wine — a full-bodied Italian red like Montepulciano or Sangiovese
Important note on curing salt #2: Do not substitute curing salt #1 (Prague Powder #1). Lonza is an air-dried product that hangs for 4-6 weeks. Curing salt #2 contains both sodium nitrite and sodium nitrate — the nitrate slowly converts to nitrite over time, providing ongoing antimicrobial protection throughout the drying period. Curing salt #1 is only appropriate for products that will be cooked or smoked shortly after curing.
The Curing Process: Step by Step
Day 1: Trimming and Applying the Cure
- Trim the loin: Remove any silverskin (the thin, tough membrane) from the surface. Leave the fat cap intact. Square off the ends so the loin is a uniform cylinder — irregular ends will over-dry.
- Mix the cure: Combine the sea salt, curing salt #2, black pepper, thyme, fennel, garlic, red pepper flakes, and rosemary in a bowl. Add the red wine and mix until you have a thick, aromatic paste.
- Apply the cure: Rub the cure mixture over every surface of the loin, pressing it into any crevices. Be thorough — every square inch needs coverage. The fat cap side gets the same treatment as the lean sides.
- Bag it: Place the cured loin in a vacuum bag (preferred) or a heavy-duty zip-lock bag with as much air removed as possible. The cure needs to stay in direct contact with the meat.
- Refrigerate: Place the bagged loin in the refrigerator (regular fridge, 36-40°F). This is the primary cure phase.
Days 2-10: The Cure Phase
The loin stays in the refrigerator for 7-10 days. During this time:
- Flip daily: Turn the bag over once a day so the cure distributes evenly. You'll notice liquid accumulating — this is normal. It's moisture being drawn out of the meat by the salt.
- Massage gently: Every time you flip, give the bag a gentle massage to redistribute the cure. This ensures even penetration.
- Timing: 7 days is minimum for a 2-pound loin. I prefer the full 10 days — the cure penetrates more completely and the flavor develops further. For loins over 2.5 pounds, go the full 10 days.
Day 10: Rinsing and Casing
- Rinse the loin: Remove from the bag and rinse under cold running water, rubbing gently to remove excess surface cure. You don't want a thick salt crust — the salt has already done its work by penetrating the meat.
- Pat completely dry: Use paper towels to dry the surface thoroughly. Any residual moisture under the casing promotes bacterial growth.
- Apply the external spice coat: Mix together additional black pepper, crushed fennel seed, and a touch of dried thyme. Roll the rinsed, dried loin in this mixture, pressing the spices firmly into the surface. This outer coating becomes the aromatic crust of your finished lonza.
- Case the loin: Slide the spice-coated loin into a pre-soaked natural casing (beef middle or large hog casing). The casing should fit snugly with no air pockets. If using collagen casings, follow the manufacturer's instructions.
- Tie it: Using butcher's twine, tie the cased loin at 1-inch intervals. Start with a secure knot at one end, then work your way down with evenly spaced ties. The twine keeps the casing tight against the meat as it shrinks during drying. Finish with a loop at one end for hanging.
- Prick the casing: Using a sterile pin or sausage pricker, poke small holes throughout the casing. This allows moisture to escape evenly during drying. Focus on any spots where you see air trapped between the casing and the meat.
The Drying Phase
This is where the magic happens — and where patience is everything. The drying phase transforms salted raw pork into something entirely different: a concentrated, shelf-stable cured meat with complex flavors that develop over weeks.
Environmental Requirements
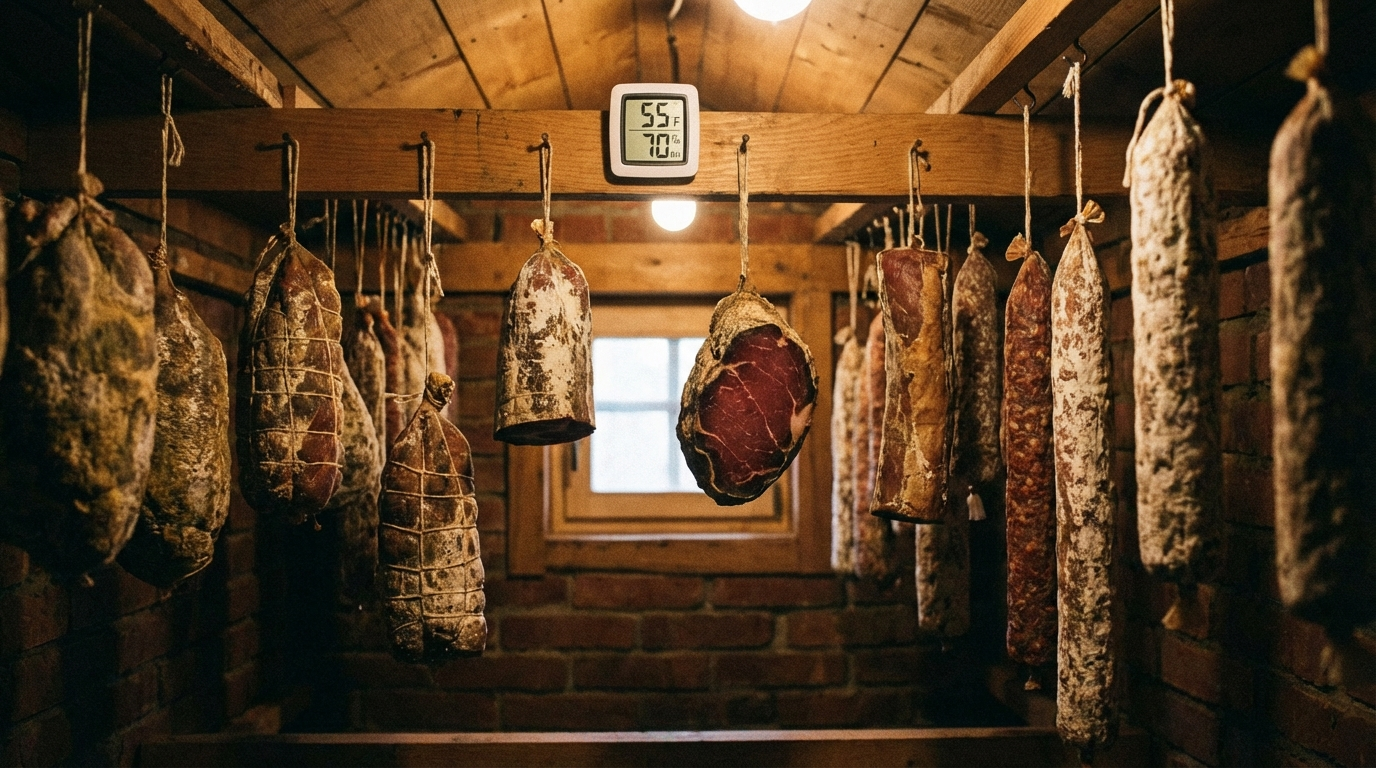
- Temperature: 50-60°F (10-15°C). Colder than this and drying slows to a crawl. Warmer and you risk bacterial growth and off-flavors. I aim for 55°F as the sweet spot.
- Humidity: 65-75% relative humidity. Too dry and the exterior hardens before the interior can lose moisture — this is case hardening, and it's the most common failure mode for home curers. Too humid and you get excessive mold growth and potential spoilage. 70% is ideal.
- Air circulation: Gentle, consistent airflow. Not a direct fan blast — that dries the surface too fast. A small computer fan in the curing chamber, running on a timer or low speed, provides enough circulation. The goal is to prevent stagnant air pockets where mold can take hold unevenly.
Hanging and Monitoring
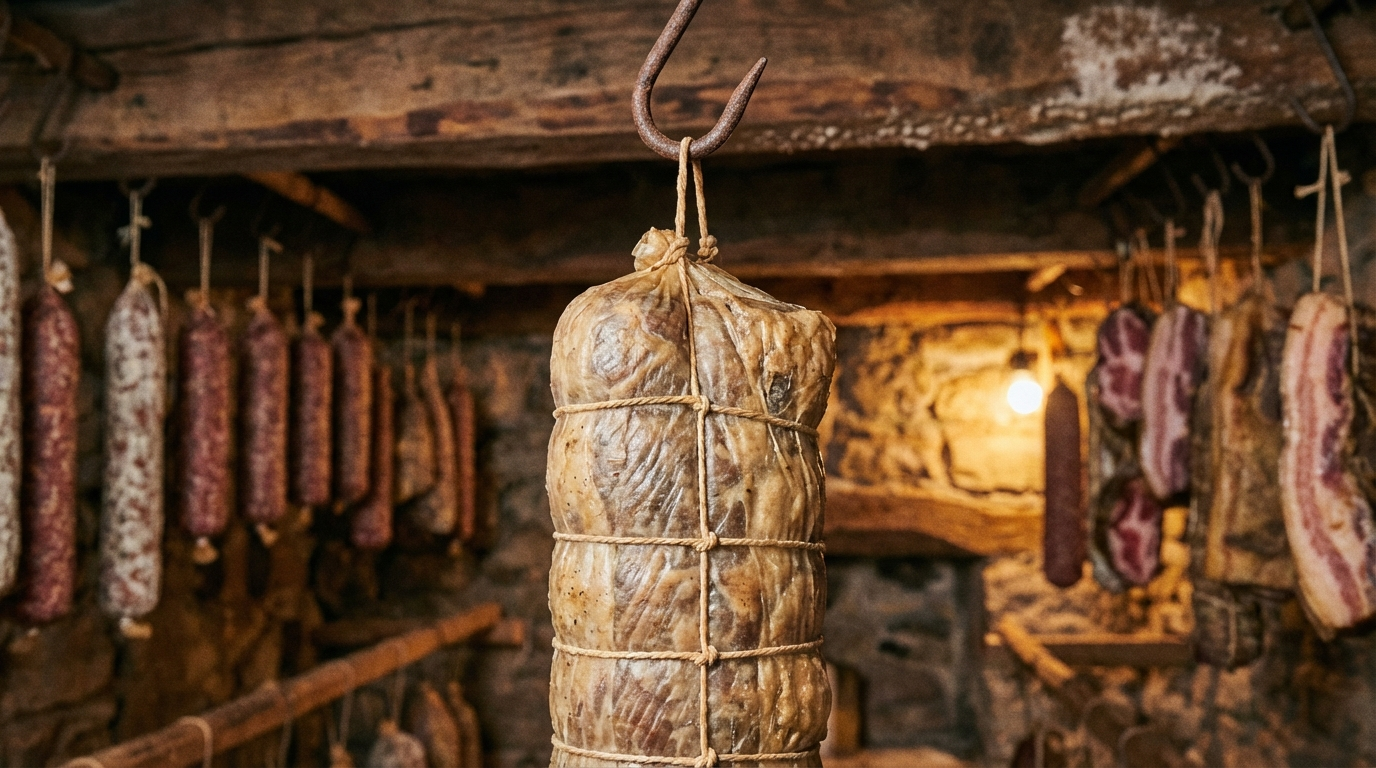
Hang the cased lonza from an S-hook or meat hook in your curing chamber. Make sure it's not touching any walls or other products — air needs to circulate around the entire surface.
Weigh it on day one. Record the starting weight. You're done when the lonza has lost 30-35% of its starting weight. For a 2-pound (900g) loin, that means you're targeting a finished weight of approximately 1.3-1.4 pounds (585-630g).
Weigh weekly. A healthy weight loss rate is about 3-5% per week. If it's losing weight faster than this, your humidity is too low. Slower, and the humidity is too high or the temperature is too cold.
Timeline
- Week 1-2: The most critical period. Check daily for any signs of off-putting mold or sour smell. White, chalky mold on the surface is normal and even desirable — it's Penicillium nalgiovense, the same mold used in salami production. Green, black, or fuzzy mold should be wiped off with a vinegar-dampened cloth.
- Week 3-4: The lonza is firming up noticeably. The surface develops its characteristic dry, slightly dusty appearance. Keep monitoring weight loss.
- Week 4-6: Approaching the 30-35% weight loss target. Start checking texture — the lonza should feel firm throughout when pressed, with no soft or squishy spots in the center.
Troubleshooting Drying Issues
- Case hardening: The exterior feels rock-hard but the center is still soft and wet. This happens when humidity is too low or airflow is too direct. If caught early, wrap the lonza loosely in a damp towel and refrigerate for 24-48 hours to equalize moisture. Then return to the curing chamber with increased humidity.
- Excessive mold: Some white mold is fine. But if it's getting out of control, wipe with vinegar and reduce humidity slightly. Check that airflow is reaching all surfaces.
- Sour or off smell: If the lonza smells sour, ammonia-like, or putrid at any point, something has gone wrong. If it's just surface odor, wipe with vinegar. If the smell is coming from inside the meat, discard it. Safety first.
- Slow weight loss: If you're not seeing 3% loss per week, reduce humidity by 5% or increase airflow slightly.
Knowing When It's Done
The 30-35% weight loss target is your primary indicator, but texture and feel confirm it:
- Firmness: Press the lonza at its thickest point. It should feel uniformly firm — like a ripe plum, with a slight give but no soft center. If the center still feels noticeably softer than the exterior, it needs more time.
- Visual: The exterior will be dark, with a crust of pepper and herbs visible through the casing. The casing itself should look dried and slightly wrinkled, fitting tightly against the shrunken meat.
- Slice test: Cut a thin slice from one end. The interior should be deep rose-pink to ruby-red, uniform in color, with no wet or raw-looking areas. A thin ring of white fat should be visible at the edge. The texture should be smooth and dense, not grainy or mushy.
Slicing and Serving
Lonza's lean character means slicing technique matters more than with fattier cures. Too thick and it's chewy. Paper-thin is the goal.
Slicing Tips
- Chill slightly before slicing: 30 minutes in the refrigerator firms the lonza up, making it easier to cut thin. Don't freeze it — that changes the texture.
- Sharp knife or deli slicer: A very sharp, long slicing knife works, but a home deli slicer set to the thinnest setting produces the most consistent results. If you're doing charcuterie regularly, a deli slicer is a worthwhile investment.
- Remove the casing: Peel off the casing before slicing. The twine comes off first, then the casing. Some people eat the casing — it's edible — but most find it easier to remove.
- Slice against the grain: Cut perpendicular to the length of the loin. Each slice should be nearly translucent — you should almost be able to read through it.
Serving Suggestions
- Charcuterie board: Lonza is a standout on any charcuterie board. Its lean elegance contrasts beautifully with richer items like nduja or a triple-cream cheese. Pair with Parmigiano-Reggiano or aged Pecorino.
- With bread and oil: Drape slices over crusty bread with a drizzle of good olive oil. This is how it's eaten in Umbria, and it's perfect in its simplicity.
- On salads: Lay slices over arugula with shaved Parmesan, lemon juice, and olive oil. The peppery arugula complements lonza's herb crust.
- Wrapped around melon or figs: Lonza's lean character works beautifully with sweet fruit — similar to prosciutto e melone but with a different flavor profile.
- Wine pairing: A medium-bodied Italian red — Rosso di Montalcino, Barbera d'Asti, or a good Chianti Classico. The wine should complement the pork without overwhelming its delicate flavor. Check our wine pairing guide for more options.
Storage
Properly cured lonza keeps remarkably well:
- Whole, in the curing chamber: An uncut lonza continues to dry slowly. It'll keep for months, though it will get progressively firmer and more concentrated in flavor. If you like it at a particular stage, slice what you need and vacuum-seal the rest.
- Vacuum-sealed, refrigerated: Once cut, vacuum seal the remaining piece and refrigerate. It'll keep for 2-3 months without significant quality loss.
- Vacuum-sealed, frozen: Lonza freezes well. Vacuum seal portions and freeze for up to 6 months. Thaw in the refrigerator overnight.
- Sliced, refrigerated: Pre-sliced lonza in a covered container or wrap will keep 5-7 days in the fridge. But it's always better to slice as you need it — freshly sliced tastes noticeably better.
Lonza vs. Other Whole-Muscle Cures
Understanding where lonza fits in the salumi family helps you appreciate what makes it unique:
- Lonza vs. Coppa (Capicola): Both are Italian whole-muscle cures, but coppa comes from the pork neck/shoulder — a fattier, more marbled cut. Coppa is richer and more intensely porky. Lonza is leaner, cleaner, and more refined. Think of lonza as the soprano and coppa as the tenor — different registers, both beautiful.
- Lonza vs. Bresaola: Bresaola is cured beef eye of round, while lonza is pork. Both are lean whole-muscle cures, but bresaola has a distinct beefy minerality that lonza lacks. Lonza has the sweetness of pork and carries herb flavors differently.
- Lonza vs. Lomo Embuchado: Lomo embuchado is the Spanish cousin of lonza, made from pork loin seasoned with pimentón (smoked paprika), garlic, and oregano instead of the Italian herb profile. The technique is nearly identical — the spicing is what differentiates them.
- Lonza vs. Prosciutto: Prosciutto is cured whole pork leg — a vastly larger and fattier cut that takes 12-24 months. Lonza is faster, leaner, and more manageable for home production.
Spanish Variation: Lomo Embuchado
If you want to try the Spanish approach, replace the Italian seasoning with:
- 15g sweet pimentón de la Vera (Spanish smoked paprika)
- 3g hot pimentón (optional, for heat)
- 5g granulated garlic
- 2g dried oregano
- 50ml dry white wine (instead of red)
The curing and drying process is identical. The result is a strikingly different product — the pimentón gives the lomo a deep brick-red color and a smoky, slightly sweet flavor that's distinctly Spanish. Both versions are exceptional.
Frequently Asked Questions
How long does it take to make lonza at home?
Lonza takes 5-8 weeks total: 7-10 days of curing in the refrigerator, followed by 4-6 weeks of air-drying in a controlled environment at 50-60°F and 65-75% humidity. The drying time depends on the thickness of your pork loin and your chamber conditions. Target 30-35% weight loss from the starting weight.
What is the difference between lonza and capicola?
Lonza is made from pork loin — a lean, tender cut from the back. Capicola (coppa) is made from the pork neck/shoulder, which is fattier and more marbled. Lonza has a cleaner, more refined flavor and leaner texture, while capicola is richer and more intensely porky. Both are Italian whole-muscle cures but produce distinctly different results.
Can I use curing salt #1 instead of #2 for lonza?
No. Lonza is an air-dried product that hangs for 4-6 weeks and requires curing salt #2 (Prague Powder #2). It contains both sodium nitrite and sodium nitrate — the nitrate slowly converts to nitrite over time, providing ongoing antimicrobial protection during the extended drying period. Curing salt #1 only contains nitrite and is designed for products that are cooked or smoked shortly after curing.
What kind of pork loin is best for making lonza?
Use a boneless center-cut pork loin, about 2-3 pounds, with a uniform diameter and a thin layer of back fat still attached. Heritage breed pork (Berkshire, Duroc, Red Wattle) produces superior lonza with better flavor and texture. Avoid the tapered sirloin end, which dries unevenly, and skip extra-lean loins that have had all fat removed.
How do I know when lonza is done drying?
Lonza is done when it has lost 30-35% of its starting weight, feels uniformly firm when pressed (like a ripe plum with slight give), and slicing reveals a deep rose-pink interior with no wet or raw-looking areas. A thin ring of white fat should be visible at the edge. The exterior should be dark with a visible herb and pepper crust.
More Charcuterie Guides
What Is Pink Curing Salt? Sodium Nitrite Explained for Home Charcuterie
Pink curing salt is the most essential — and most misunderstood — ingredient in meat curing. This guide explains what it is, why it's pink, how sodium nitrite prevents botulism, proper usage rates, and whether you can cure meat without it.
10 min readHow Long Does Charcuterie Last? Storage Guide for Cured Meats & Cheese
Understanding proper charcuterie storage ensures you enjoy it at peak quality while avoiding food safety risks.
10 min read