How to Make Chorizo at Home: Spanish & Mexican Styles

How to Make Chorizo at Home: Spanish & Mexican Styles
Chorizo might be the most misunderstood sausage in the English-speaking world. Say the word in Spain and you'll get a firm, dry-cured sausage stained brick-red with pimentón — sliced thin and eaten cold on a wooden board with manchego and olives. Say it in Mexico and you'll get a loose, crumbly fresh sausage fired with dried chili peppers, squeezed from its casing into a sizzling skillet and scrambled with eggs or stuffed into tacos.
Both are called chorizo. Both are extraordinary. And both are surprisingly easy to make at home once you understand what makes each style tick. If you've already tackled projects like homemade salami or soppressata, the Spanish dry-cured version will feel familiar. If you've never made sausage before, the Mexican fresh version is one of the best places to start — no curing chamber, no waiting, just bold flavor from day one.
This guide covers both styles end to end: ingredients, equipment, technique, and the science behind why each version works the way it does.
Spanish vs Mexican Chorizo: Understanding the Difference
Before you buy a single ingredient, you need to decide which style you're making, because they share almost nothing beyond the name and a pork base.
Spanish chorizo (chorizo español) is a dry-cured, fermented sausage. Ground pork is seasoned heavily with smoked Spanish paprika (pimentón), stuffed into natural casings, and hung to dry for weeks or months. The result is a firm, sliceable sausage with a complex flavor built from smoke, fermentation, and time. It's eaten raw — sliced thin as part of a tapas spread, diced into stews like fabada asturiana, or cooked into dishes where its rendered fat becomes the foundation of flavor.
Mexican chorizo (chorizo mexicano) is a fresh sausage — never cured, never dried. Ground pork is mixed with a paste made from rehydrated dried chili peppers (guajillo, ancho, pasilla), vinegar, garlic, and spices. It's cooked within days of making and always served hot. The texture is loose and crumbly, more like seasoned ground meat than a cohesive sausage link. It's the base of countless Mexican breakfast dishes, tacos, and tortas.
The key differences:
- Heat source: Spanish uses smoked paprika (mild to hot). Mexican uses dried chili peppers (earthy, complex heat).
- Preservation: Spanish is dry-cured (shelf-stable). Mexican is fresh (must be refrigerated and cooked).
- Texture: Spanish is firm and sliceable. Mexican is soft, loose, and crumbly when cooked.
- Vinegar: Mexican chorizo almost always includes vinegar. Spanish rarely does.
- Color: Both are red, but from different sources — pimentón vs dried chili paste.
This guide covers both. We'll start with the Spanish version because it's the more involved project, then cover the Mexican style, which you can make and eat the same day.
Essential Ingredients for Both Styles
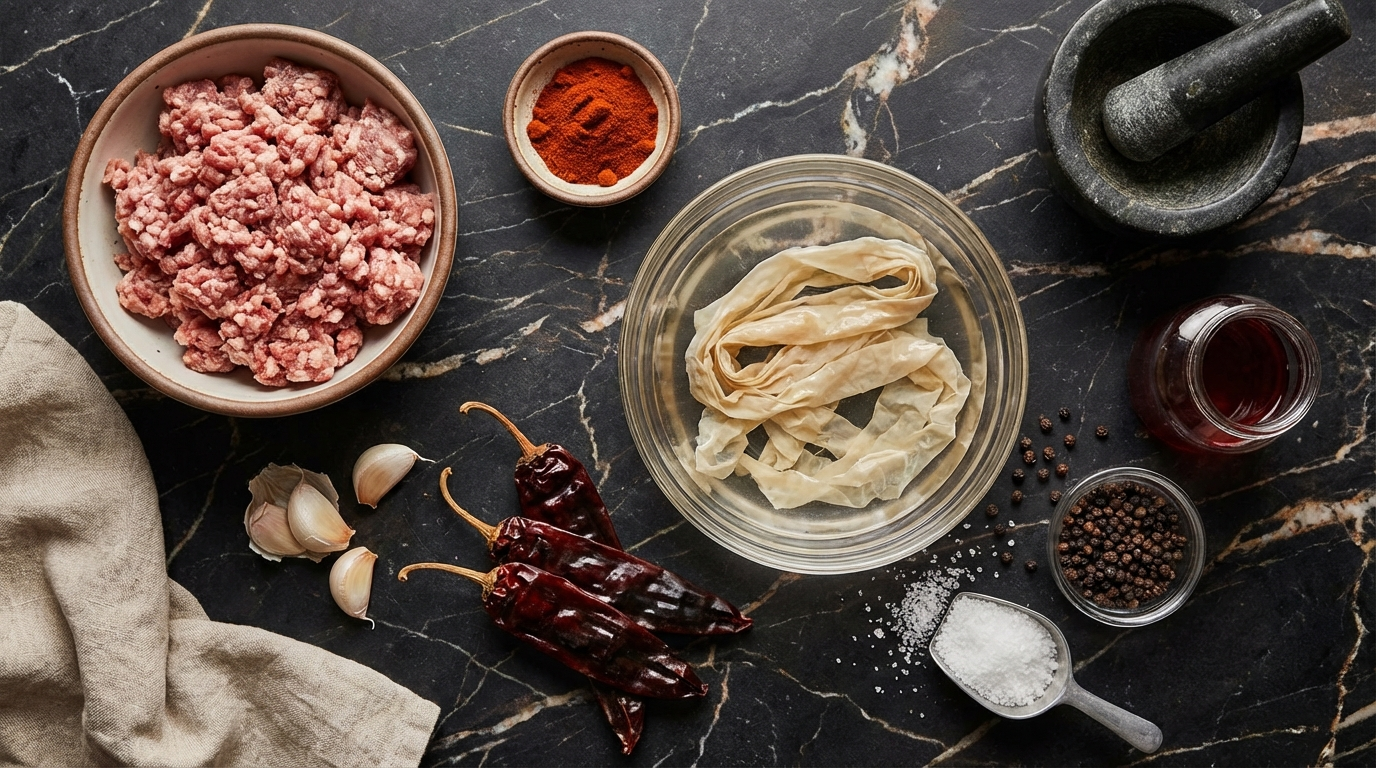
Pork
Both styles use pork shoulder (Boston butt) as the primary meat. You want a cut with a fat ratio around 70-75% lean to 25-30% fat. Pork shoulder naturally falls in this range, which is why it's the standard choice for sausage making. If your shoulder is particularly lean, supplement with additional pork back fat to hit the target ratio — too lean and the chorizo will be dry and crumbly in a bad way.
For the best results, buy a whole boneless pork shoulder and grind it yourself. Pre-ground pork from the supermarket works in a pinch for Mexican-style, but for Spanish dry-cured chorizo, you want full control over grind size and freshness.
For Spanish Chorizo
- Pimentón de la Vera (smoked Spanish paprika): This is the soul of Spanish chorizo. Regular paprika won't cut it — you need the actual DOP pimentón from the La Vera region, which is smoked over oak wood for weeks. It comes in three heat levels: dulce (sweet/mild), agridulce (bittersweet/medium), and picante (hot). Most traditional recipes use dulce or a blend of dulce and picante. Budget 30-50 grams per kilogram of meat.
- Garlic: Fresh, minced fine. Spanish chorizo uses generous amounts — typically 10-15 grams per kilo of meat.
- Salt: 25-28 grams per kilo of meat for dry-cured. If you're using curing salt (which you should for dry-cured), count it toward your total salt weight.
- Curing salt #2 (Prague Powder #2): Contains sodium nitrate in addition to sodium nitrite — essential for long-cured sausages. Use 2.5 grams per kilo of meat. The nitrate slowly converts to nitrite during the extended drying period, providing ongoing preservation.
- Starter culture (optional but recommended): A commercial culture like T-SPX or Bactoferm F-RM-52 drops the pH quickly, creating a safely acidic environment that inhibits harmful bacteria during the early stages of drying.
- Dextrose: A simple sugar that feeds the starter culture. If using a culture, add 3-5 grams per kilo.
- White wine: A splash (about 30ml per kilo) helps distribute seasonings and aids in binding.
For Mexican Chorizo
- Dried chili peppers: A blend of guajillo (fruity, mild), ancho (rich, sweet), and optionally pasilla (earthy, dark) or chili de árbol (sharp heat). This is where Mexican chorizo gets its depth — not from a single spice but from a complex chili paste.
- Apple cider vinegar: Typically 30-45ml per kilo of meat. The acidity acts as a mild preservative and gives Mexican chorizo its characteristic tang.
- Garlic: Generous amounts, either fresh or roasted.
- Cumin: Ground, about 5 grams per kilo.
- Mexican oregano: Different from Mediterranean oregano — earthier and more pungent. About 3 grams per kilo.
- Cloves and cinnamon: Just a pinch of each — these warm spices are the secret background notes that distinguish great Mexican chorizo from merely good.
- Salt: 18-22 grams per kilo — less than Spanish because it's fresh, not cured.
Casings
Natural hog casings work for both styles. For Spanish chorizo, use 32-36mm casings — these are the standard diameter that allows proper drying without the center staying wet too long. For Mexican chorizo, casings are optional — many recipes skip them entirely since the sausage gets removed from the casing before cooking anyway. If you do case Mexican chorizo, 32mm hog casings work fine.
Equipment You'll Need
The equipment list varies dramatically depending on which style you're making:
For Both Styles
- Meat grinder: A KitchenAid attachment works fine. A dedicated grinder is better. Keep everything cold — meat, grinder parts, bowls — to prevent fat smearing.
- Large mixing bowls: Stainless steel, kept in the freezer before use.
- Kitchen scale: Precision matters in sausage making. Measure by weight, not volume.
- Sharp knives and cutting board: For breaking down the pork shoulder.
Additional for Spanish Chorizo
- Sausage stuffer: A dedicated vertical stuffer is ideal. The KitchenAid stuffing attachment works but is slower and less consistent. You need enough control to fill casings evenly without air pockets.
- Curing chamber or suitable drying space: You need a space that holds 55-60°F (13-15°C) and 70-80% relative humidity for 4-8 weeks. A converted mini fridge with a temperature and humidity controller is the gold standard for home production.
- Butcher's twine: For tying links and creating hanging loops.
- S-hooks or dowels: For hanging sausages during drying.
- pH meter (optional): Useful for monitoring fermentation if you're using a starter culture.
Additional for Mexican Chorizo
- Blender or food processor: For making the chili paste — you need a smooth, uniform paste from rehydrated peppers.
- Comal or dry skillet: For toasting dried peppers before rehydrating.
Spanish Chorizo: Step-by-Step Process
Day 1: Grinding and Seasoning
1. Prep the meat. Cut your pork shoulder into 1-inch cubes, keeping all the fat attached. If adding extra back fat, cube that separately. Spread everything on a sheet pan and freeze for 30-45 minutes until the surface is firm but the center isn't frozen solid. Cold meat grinds cleanly; warm meat smears into a paste.
2. Grind. Run the semi-frozen pork through the coarse plate (8-10mm) of your grinder. For traditional Spanish chorizo, you want a relatively coarse grind — the finished sausage should have visible pieces of meat and fat, not a homogeneous paste. Some regions of Spain use an even coarser chop, almost hand-cut. If you prefer a finer texture, run it through the medium plate (6mm) instead.
3. Season. In a large chilled bowl, combine the ground pork with pimentón, garlic, salt, curing salt #2, dextrose, and white wine. If using a starter culture, dissolve it in a small amount of distilled water according to the manufacturer's directions and add it to the mix. Mix everything by hand for 3-4 minutes until the seasonings are evenly distributed and the mixture becomes slightly tacky and cohesive — this means the proteins are binding, which is what you want for a sausage that will hold together during drying.
4. Test fry. Pinch off a small piece and cook it in a skillet. Taste for seasoning. Remember that the flavors will concentrate as the sausage dries, so it should taste slightly under-seasoned at this stage — the salt will intensify as moisture leaves.
5. Rest overnight. Cover the seasoned meat and refrigerate overnight (12-24 hours). This allows the cure to distribute evenly and the flavors to meld.
Day 2: Stuffing and Linking
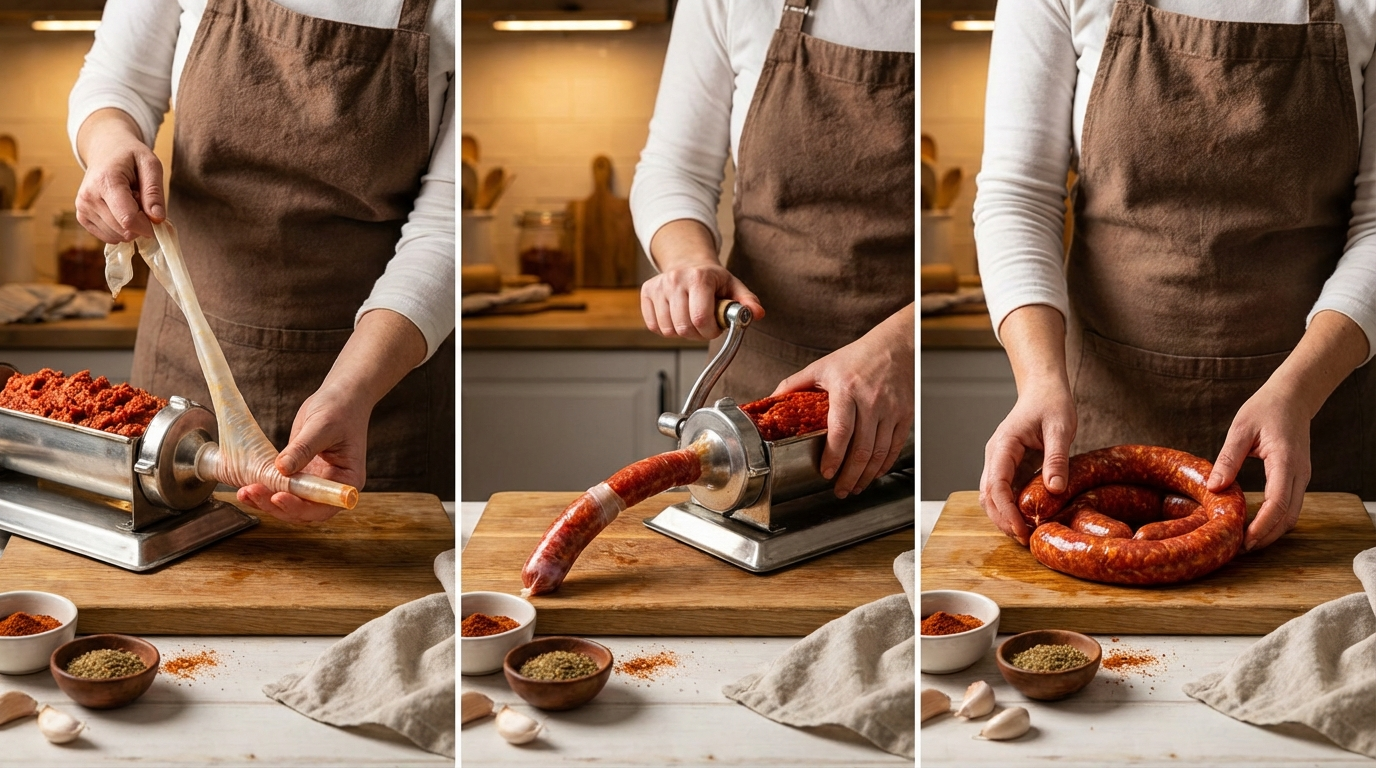
1. Prep casings. Soak your hog casings in warm water for at least 30 minutes, then flush each one by running water through it. This removes excess salt and makes the casings pliable and easy to slide onto the stuffing tube.
2. Stuff. Load your stuffer with the seasoned meat. Thread a length of casing onto the stuffing tube, tying a knot at the end. Stuff the casings firmly but not drum-tight — if you over-stuff, the casings will burst during fermentation as the meat expands slightly from gas production. Leave about a finger's width of give. As you stuff, prick any visible air bubbles with a sterilized pin — trapped air creates voids where unwanted mold and bacteria can develop inside the sausage.
3. Link. Twist the stuffed casing into 6-8 inch links. Tie each end with butcher's twine, leaving a loop at one end for hanging. Some makers prefer longer U-shaped links hung over a dowel — both approaches work.
Fermentation (Days 3-5)
If you used a starter culture, hang the sausages in a warm environment — 68-75°F (20-24°C) with 85-90% humidity — for 24-48 hours. This is the fermentation phase, where the beneficial bacteria multiply rapidly, producing lactic acid that drops the pH to around 5.0-5.3. This acidic environment is what makes the sausage safe by inhibiting growth of pathogens like Clostridium botulinum and Listeria.
If you're not using a culture, skip this step and go straight to the drying phase — the curing salt provides the primary safety margin in that case, and the higher pimentón content in Spanish chorizo also has some antimicrobial properties.
Drying (Weeks 2-8)
Move the sausages to your curing chamber or drying space. Target conditions:
- Temperature: 55-60°F (13-15°C)
- Humidity: 70-80% — start at the higher end for the first week, then you can let it drift lower
- Air circulation: Gentle and consistent — a small fan on low prevents stagnant spots
The sausages are done when they've lost 30-35% of their original weight. Weigh a few links on day one and check weekly. For 32mm casings stuffed to about 200 grams each, expect roughly 4-6 weeks to reach target weight loss. Thicker links take longer; thinner links dry faster.
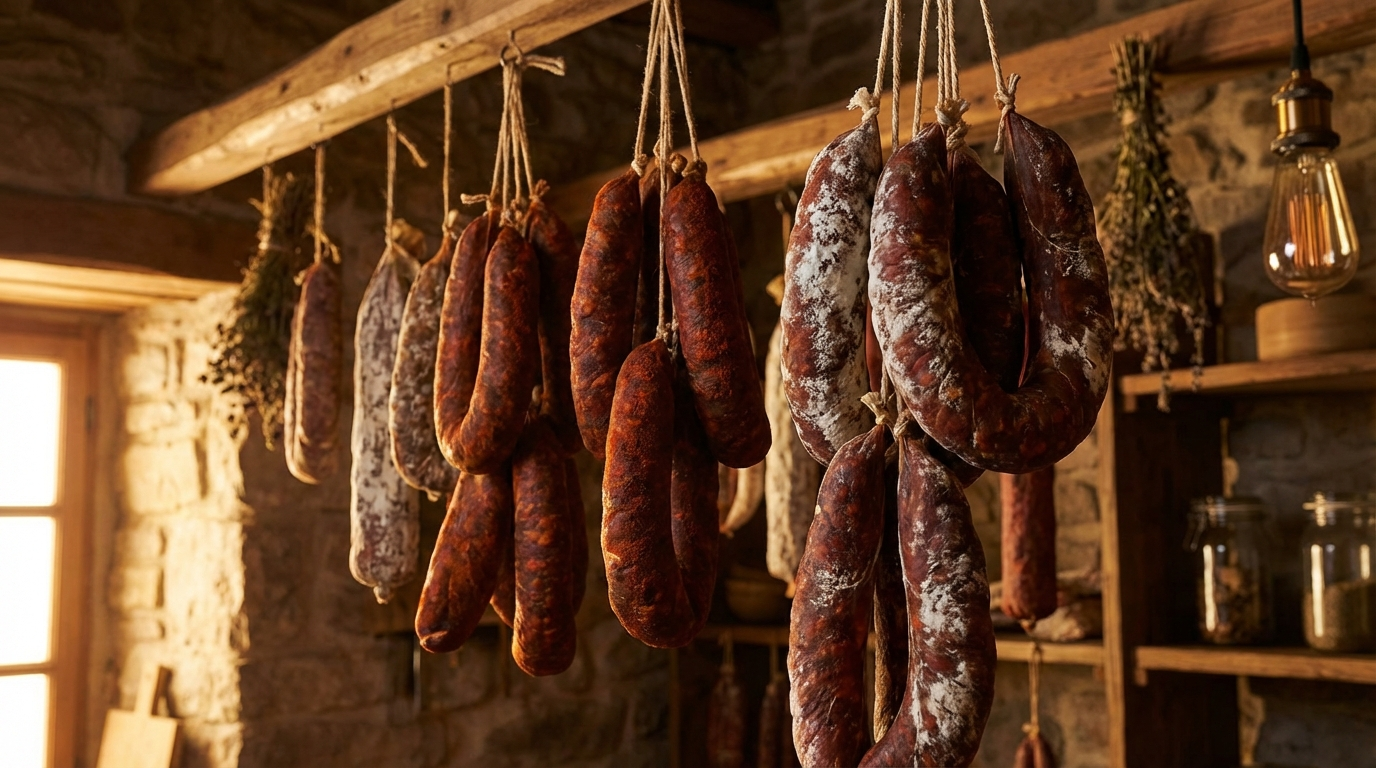
During drying, you may see white mold develop on the surface. This is normal and desirable — it's Penicillium nalgiovense, the same beneficial mold you see on salami. It regulates moisture loss and protects the surface. If you see green, black, or fuzzy mold in unusual colors, wipe it off with a cloth dipped in vinegar. Persistent off-color mold means your humidity is too high or air circulation is inadequate.
The Drying and Curing Phase
The drying phase is where Spanish chorizo transforms from raw sausage into a shelf-stable cured product. Understanding what happens inside the casing during these weeks will help you troubleshoot problems and know when your chorizo is truly ready.
Week 1: Moisture migrates outward from the center of the sausage to the surface, where it evaporates. The casing darkens and firms up first. The interior is still soft and slightly tacky. Don't panic — this is normal. If the casing dries too fast (case hardening), the surface forms a hard shell that traps moisture inside, leading to spoilage. This is why maintaining humidity at 75-80% during the first week matters.
Weeks 2-3: The sausage firms progressively from the outside in. You'll notice it becoming less yielding when squeezed. The color deepens as the pimentón oxidizes and the meat concentrates. Weigh your sausages — you should be seeing steady weight loss of about 5% per week.
Weeks 4-6: The sausage reaches the 30-35% weight loss target. Press it with your thumb — it should feel firm throughout, with slight give in the center. If the center is still notably softer than the exterior, give it another week. Slice one test link: the interior should be uniformly dense, deep red-orange from the pimentón, with visible fat pieces that are white to slightly translucent. No gray spots, no wet center, no off smells.
Once dried, your Spanish chorizo is shelf-stable. Wrap individual links in butcher paper or vacuum seal them. Stored in a cool, dark place (a wine fridge is ideal), they'll keep for months. In the refrigerator, vacuum-sealed chorizo lasts 6+ months easily. The flavor actually improves over the first few weeks of storage as the fat continues to mellow and the spice flavors integrate further.
Mexican Chorizo: Step-by-Step Process
Mexican chorizo is the instant-gratification version of this project. No curing, no drying, no waiting weeks. You can make it in the morning and eat it for dinner.
Step 1: Make the Chili Paste
This is the defining step. The chili paste is what separates real Mexican chorizo from pork mixed with chili powder.
1. Toast the peppers. Remove stems and seeds from 6-8 dried guajillo peppers and 3-4 dried ancho peppers. Heat a dry comal or cast iron skillet over medium heat. Press each pepper flat against the hot surface for 10-15 seconds per side, until fragrant and slightly darkened. Don't burn them — you want toasted, not charred.
2. Rehydrate. Place the toasted peppers in a bowl and cover with boiling water. Let them soak for 20-30 minutes until completely soft and pliable.
3. Blend. Transfer the rehydrated peppers to a blender with 2-3 tablespoons of the soaking liquid, 4-5 garlic cloves, 30ml apple cider vinegar, and all your spices (cumin, oregano, cloves, cinnamon, salt). Blend until you have a smooth, thick paste. It should be vibrant red-orange and intensely aromatic.
Step 2: Mix and Season
Combine your ground pork shoulder with the chili paste in a large bowl. Mix by hand for 2-3 minutes until the paste is evenly distributed throughout the meat. The mixture should be a uniform deep red color with no streaks of plain pork visible.
Fry a small test patty and taste. Adjust salt, vinegar, and heat levels. Mexican chorizo should taste bold, spicy, tangy, and savory — more intense than you think it needs to be, because it'll be tempered when cooked with eggs, potatoes, or other ingredients.
Step 3: Stuff or Store
You have two options:
- Stuff into casings: Use 32mm hog casings and stuff loosely. Twist into 4-5 inch links. This is the traditional presentation and makes for cleaner storage and portioning.
- Bulk style: Skip the casings entirely. Portion the seasoned meat into 200-250 gram portions, wrap tightly in plastic wrap, and refrigerate or freeze. This is what most home cooks do since you'll remove it from the casing before cooking anyway.
Fresh Mexican chorizo keeps 5-7 days in the refrigerator or up to 3 months frozen. Thaw in the refrigerator overnight before cooking.
Cooking Mexican Chorizo
Heat a dry skillet over medium-high heat. Remove chorizo from its casing (if stuffed) and add to the hot pan. Break it up with a wooden spoon as it cooks, letting it develop some crispy edges — this takes 8-10 minutes. The fat renders and becomes the cooking medium, tinting everything orange-red from the chili paste.
Classic uses: scrambled with eggs (chorizo con huevos), mixed with diced potatoes (chorizo con papas), spooned into tacos with cilantro and onion, or crumbled over nachos. It's also brilliant mixed into cornbread batter, stirred into mac and cheese, or used as a pizza topping.
Serving, Storing, and Using Your Chorizo
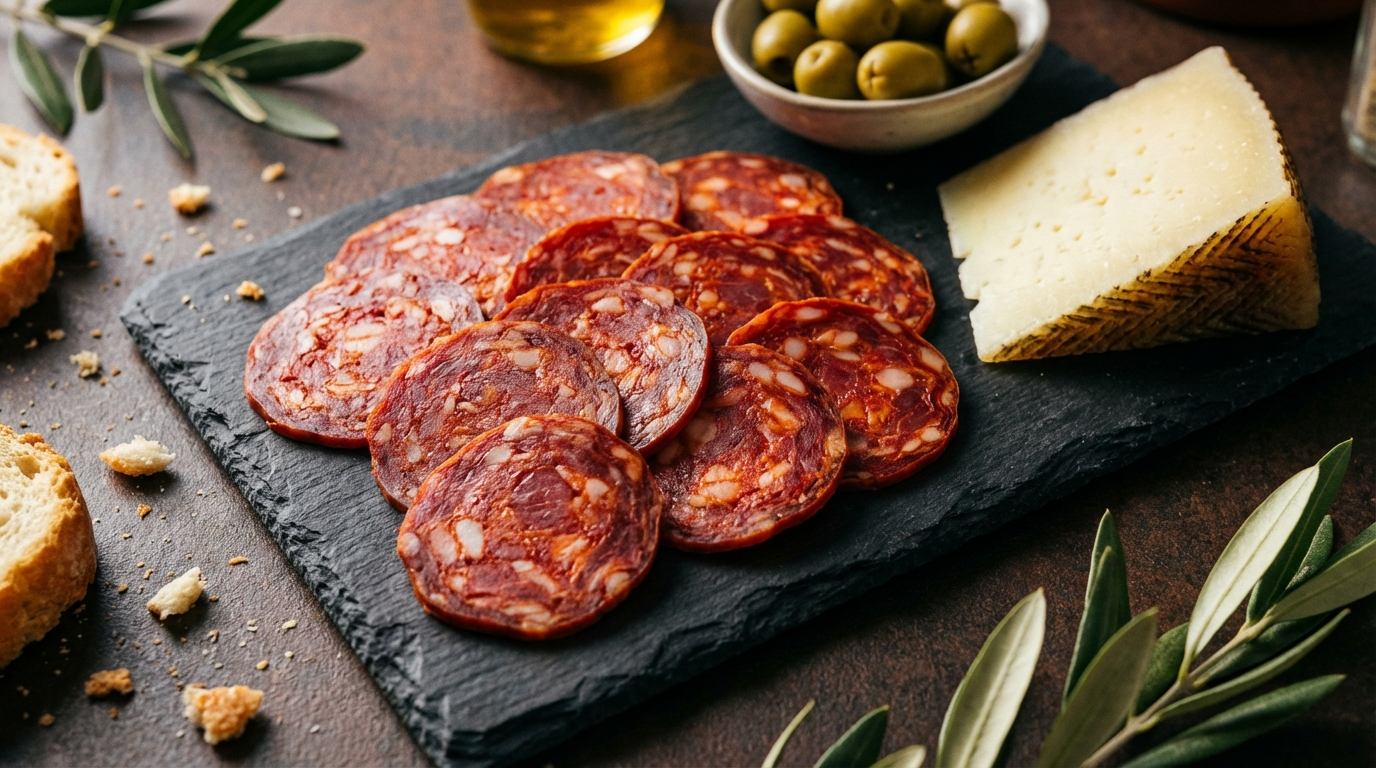
Spanish chorizo is at its best sliced thin (2-3mm) and served at room temperature. The fat softens slightly and the flavors bloom. Classic pairings include:
- Tapas board: Alongside manchego cheese, marcona almonds, green olives, and crusty bread — add it to your charcuterie board
- Cooked in dishes: Diced and rendered into paella, fabada asturiana (Asturian bean stew), caldo gallego, or scrambled into eggs (revuelto de chorizo)
- With wine: Tempranillo, Garnacha, or Monastrell — medium-bodied Spanish reds that complement the smoky richness without overpowering it
Mexican chorizo is always served cooked and hot. Beyond the classics mentioned above, try it:
- As a charcuterie board accompaniment — cooked, crumbled, and served warm in a small bowl with tortilla chips
- Stuffed into poblano peppers and baked with melted cheese
- Mixed into refried beans for a deeply savory side dish
- As a base for chorizo queso fundido — melted cheese with cooked chorizo, served bubbly and hot with tortillas
Common Problems and How to Fix Them
Even experienced sausage makers run into issues. Here's what to watch for:
Case hardening (Spanish): The exterior dries hard while the center stays wet. This happens when humidity is too low during the first week or air circulation is too aggressive. Prevention: start at 80% humidity and drop gradually. If it's already happened, wrap the affected sausages in a damp towel for 24 hours to rehydrate the casing, then resume drying at higher humidity.
Fat smearing (both styles): The ground meat looks pasty and greasy instead of showing distinct pieces of meat and fat. This means your meat, grinder, or hands were too warm during grinding. Always work with semi-frozen meat and chilled equipment. If it happens, you can still use the sausage — it just won't have the ideal texture.
Sour off-flavors (Spanish): Over-fermentation. The pH dropped too low (below 4.8), creating an overly acidic, sour taste. This usually happens when the fermentation temperature was too high or went on too long. Reduce fermentation time to 24 hours or lower the temperature to 68°F next batch.
Bland Mexican chorizo: Usually means not enough chili paste or too-mild peppers. Mexican chorizo should be assertively seasoned. Add more chili paste, increase the vinegar for tang, or supplement with a teaspoon of chili de árbol powder for sharp heat.
Grainy texture (Mexican): The chili paste wasn't blended smooth enough, or the peppers weren't fully rehydrated. Blend longer and add a splash more soaking liquid. The paste should be completely smooth, like thick tomato sauce.
Safety Notes
For Mexican chorizo, standard food safety applies — treat it like any fresh ground pork. Keep it cold, cook to 160°F (71°C) internal temperature, and consume within a week of making.
For Spanish dry-cured chorizo, you're relying on a combination of safety hurdles that work together:
- Curing salt #2 provides nitrite/nitrate protection against C. botulinum throughout the long drying process
- Salt concentration (2.5-2.8%) inhibits most bacterial growth
- pH reduction from fermentation (if using starter culture) creates an acidic environment hostile to pathogens
- Water activity reduction from drying — as the sausage loses 30-35% of its weight in water, the remaining moisture is too low to support bacterial growth
These four hurdles together create a product that's safe to eat without cooking. But they must all work properly. Don't skip the curing salt for dry-cured chorizo — it's not optional. If you're new to dry-curing, read our curing salts guide and home curing guide before starting your first project.
With both styles mastered, you'll have year-round access to one of the world's great sausage traditions — from slow-cured Spanish links that elevate any tapas spread to fiery Mexican chorizo that transforms breakfast from routine to remarkable.
More Charcuterie Guides
What Is Pink Curing Salt? Sodium Nitrite Explained for Home Charcuterie
Pink curing salt is the most essential — and most misunderstood — ingredient in meat curing. This guide explains what it is, why it's pink, how sodium nitrite prevents botulism, proper usage rates, and whether you can cure meat without it.
10 min readHow Long Does Charcuterie Last? Storage Guide for Cured Meats & Cheese
Understanding proper charcuterie storage ensures you enjoy it at peak quality while avoiding food safety risks.
10 min read