Dry Cure vs Wet Brine: Which Curing Method to Use and When
Every charcuterie project starts with the same decision: dry cure or wet brine? Both methods use salt to preserve meat, inhibit bacteria, and develop flavor. But they work through different mechanisms and produce distinctly different results. Choose wrong and you end up with a product that’s too salty, too dry, unevenly cured, or just not what you wanted.
I’ve used both methods on hundreds of projects. Here’s what actually matters when deciding between them—the science, the technique, and the practical rules that keep your charcuterie consistent.
The Fundamental Difference
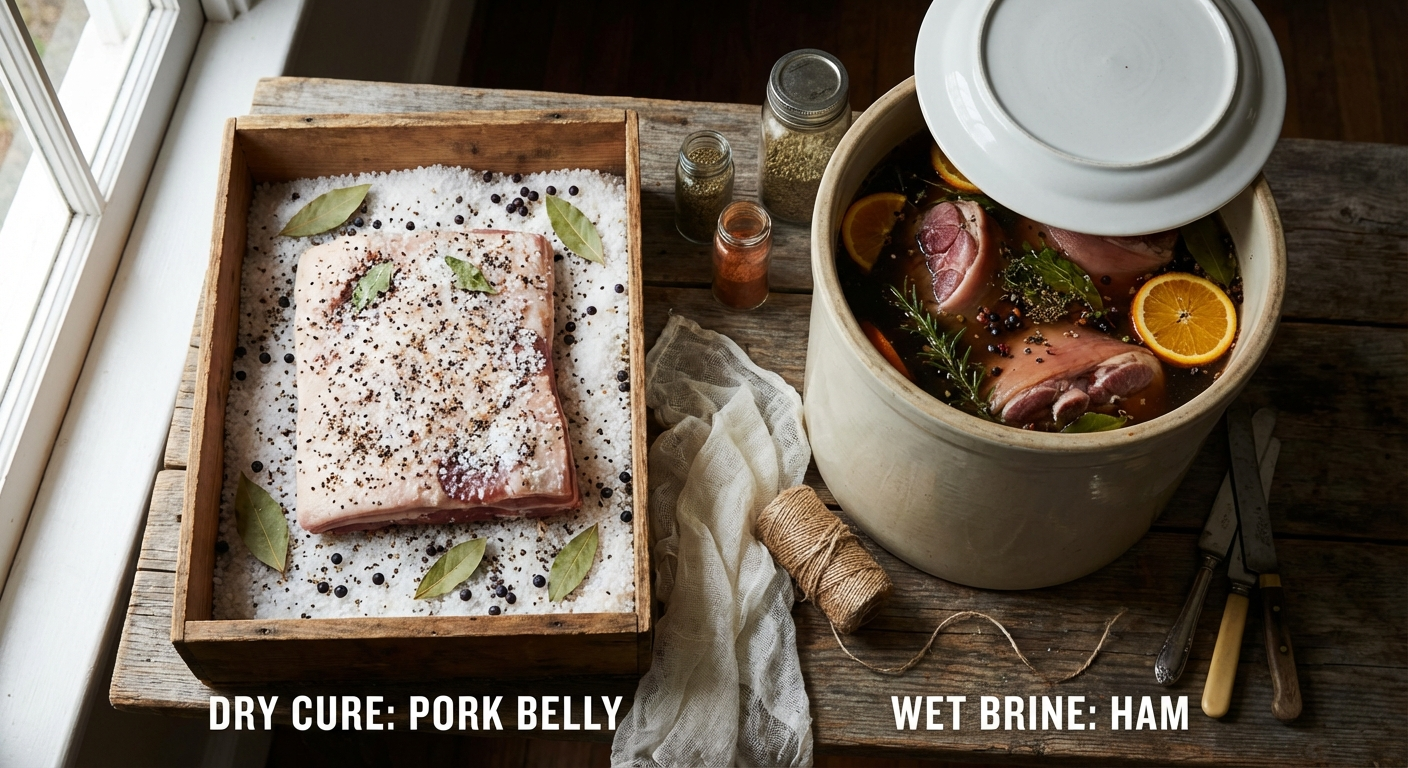
The distinction is simple at the surface: dry curing packs salt directly onto the meat. Wet brining submerges meat in a salt-water solution. But the real difference is about how moisture moves.
Dry curing draws moisture out of the meat through osmosis. Salt on the surface creates a concentration gradient that pulls water from inside the muscle fibers to the exterior. As the meat loses moisture, it concentrates in flavor, firms in texture, and becomes inhospitable to bacteria. The final product is denser, more intensely flavored, and shelf-stable when done correctly.
Wet brining moves salt into the meat through diffusion and osmosis. The meat sits in a salt solution, and equilibrium drives salt molecules into the muscle tissue while some moisture moves out, then back in as proteins denature and absorb the brine. The result is meat that’s seasoned throughout, retains or even gains moisture, and has a softer, juicier texture after cooking.
Neither method is better. They’re different tools for different goals.
How Dry Curing Works
Dry curing is the older method—it predates refrigeration by millennia. Ancient civilizations from Rome to China discovered that packing meat in salt prevented spoilage and created something delicious in the process. Every great cured meat tradition—prosciutto, bresaola, guanciale, lonza—relies on dry curing.
The Science
When you pack salt onto raw meat, several things happen simultaneously:
- Osmotic pressure. The high salt concentration on the surface pulls water out of muscle cells. This is why you see liquid pooling around dry-cured meat within hours—that’s cellular moisture being extracted.
- Salt penetration. While water moves out, salt slowly moves in. Salt penetrates meat at roughly 1 centimeter per week under refrigeration, though this varies with fat content, temperature, and the specific cut.
- Water activity reduction. As the meat loses moisture, its water activity (aw) drops. Most spoilage bacteria need aw above 0.91 to grow. Properly dry-cured meats reach 0.85–0.89, making them shelf-stable.
- Protein denaturation. Salt denatures myosin proteins, which changes the meat’s texture from raw and soft to firm and sliceable—even without cooking.
- Flavor concentration. Less water means more concentrated flavor per bite. This is why a thin slice of prosciutto has more flavor impact than a thick slice of fresh pork.
Dry Cure Salt Ratios
There are two approaches to dry cure salt measurement, and getting this right is critical:
Equilibrium curing (recommended): Calculate salt as a percentage of the meat’s total weight. Use 2.5–3% kosher salt by weight. For a 2 kg pork belly, that’s 50–60 grams of salt. The meat can only absorb the salt you apply, so it’s nearly impossible to over-salt. Leave it in the cure until fully penetrated (about 1 week per inch of thickness at the thickest point).
Excess salt method (traditional): Pack the meat in far more salt than it can absorb—a thick layer covering every surface. The meat takes what it needs. You then rinse and soak the finished product to remove surface salt. This method is faster but less precise and risks over-salting thin sections.
For beginners, equilibrium curing is the safer choice. It’s more forgiving and produces consistent results.
Adding Curing Salt
For whole-muscle dry curing (prosciutto, bresaola, lonza, guanciale), add Prague Powder #2 (sodium nitrate + sodium nitrite) at 0.25% of the meat weight. The nitrate slowly converts to nitrite over the long curing period, providing ongoing bacterial protection. For short-cure items like bacon (under 2 weeks), use Prague Powder #1 (sodium nitrite only) at the same rate.
Curing salt is not optional for whole-muscle dry curing. It prevents Clostridium botulinum, the bacterium that causes botulism. The interior of a large muscle like a pork leg stays in the danger zone for days or weeks before salt penetration is complete. Without curing salt, you’re gambling.
Best Cuts for Dry Curing
- Fatty cuts: Pork belly (bacon), guanciale (jowl), lardo (back fat). Fat doesn’t lose moisture the way lean muscle does, so these cuts stay supple and rich even after significant drying.
- Whole muscles with good fat coverage: Coppa (pork neck), lonza (pork loin), pork leg (prosciutto). The exterior fat cap protects the lean interior from drying too fast.
- Dense, lean muscles (with care): Beef eye of round (bresaola), duck breast. These work but dry faster and need careful humidity control to prevent case hardening.
How Wet Brining Works
Wet brining is the workhorse of cooked meat preparations. Corned beef, holiday turkey, deli ham, pastrami (before smoking), pickled tongue—all start with a wet brine. The technique is simpler than dry curing and more forgiving of timing errors.
The Science
When meat sits in a salt solution, diffusion drives salt from the high-concentration brine into the low-concentration meat interior. But something else happens too:
- Salt dissolves proteins. As salt penetrates muscle fibers, it dissolves some of the myosin proteins. These dissolved proteins form a gel that traps moisture.
- Moisture retention. The denatured proteins hold onto water more effectively during cooking. This is why a brined turkey stays juicier than an unbrined one—the meat can hold 10–15% more moisture.
- Even seasoning. Because the brine contacts the entire surface uniformly, and diffusion is a steady process, wet brining produces more even salt distribution than dry curing on irregular shapes.
- Flavor infusion. Unlike dry curing, a wet brine can carry dissolved sugars, spices, garlic, herbs, and aromatics directly into the meat. Corned beef’s complex spice profile comes from the brine, not a surface rub.
Brine Salt Ratios
A standard wet brine uses 3–6% salt by weight of the water. For most applications:
- Light brine (3–4%): 30–40 grams salt per liter of water. Good for poultry, pork chops, and fish. Seasons gently without making the meat taste “cured.”
- Medium brine (5–6%): 50–60 grams per liter. Standard for corned beef, pastrami, and cured ham. Produces a distinctly cured texture and flavor.
- Heavy brine (8–10%): 80–100 grams per liter. Used for heavily preserved products or when brining time is short. More aggressive—watch your timing carefully.
Important: Always dissolve salt completely in the water before adding meat. Heat the water if needed, then cool the brine to below 40°F before submerging the meat. Never put meat in warm brine.
Adding Curing Salt to Brine
For cured products (corned beef, pastrami, cured ham), add Prague Powder #1 at 1 gram per liter of brine. This gives the characteristic pink color and cured flavor. For products that will be air-dried or cold-smoked after brining, use Prague Powder #2 instead.
Best Cuts for Wet Brining
- Large, lean cuts: Beef brisket (corned beef), pork loin (Canadian bacon), turkey breast. These benefit from the moisture retention that brining provides. Without it, they’d dry out during cooking.
- Whole birds: Turkey, chicken, duck. The brine seasons evenly despite the irregular shape, and the moisture retention is game-changing for poultry.
- Thick, uneven cuts: Pork shoulder, beef round, tongue. The brine works its way in from all sides simultaneously, so uneven thickness matters less than with dry curing.
- Fish for smoking: Salmon, trout, mackerel. A quick brine (2–4 hours) seasons the fish and helps form the pellicle needed for smoking.
Side-by-Side Comparison
Here’s how the two methods stack up across the factors that matter most:
Texture: Dry curing produces firm, dense, sliceable meat. Wet brining produces juicy, tender meat that’s meant to be cooked.
Flavor intensity: Dry curing concentrates flavor by removing water. Wet brining adds seasoning but dilutes some natural meat flavor with absorbed water.
Time: Dry curing is slow—days to months. Wet brining is faster—hours to days. A beef bresaola needs 2–3 weeks of dry curing plus 4–6 weeks of drying. Corned beef needs 5–7 days in brine.
Precision required: Dry curing demands accurate salt measurement and consistent temperature and humidity. Wet brining is more forgiving—the brine concentration limits how much salt the meat absorbs.
Equipment: Dry curing needs a controlled environment (curing chamber or consistent fridge space). Wet brining needs a food-safe container big enough to submerge the meat and fridge space to hold it.
Shelf stability: Properly dry-cured meats can be stored without refrigeration (once fully dried). Wet-brined products must be refrigerated or cooked promptly.
Risk level: Dry curing has a higher skill floor—mistakes in salt ratio, humidity, or temperature can lead to spoilage or case hardening. Wet brining is beginner-friendly.
When to Use Dry Cure
Choose dry curing when you want:
- A shelf-stable product that doesn’t need refrigeration after drying
- Concentrated, intense meat flavor
- Firm, sliceable texture (charcuterie board meats)
- Traditional cured products: prosciutto, pancetta, coppa, bresaola, guanciale
- Products that will be air-dried or aged
- Bacon (dry-cured bacon has better texture and more concentrated pork flavor than wet-cured)
When to Use Wet Brine
Choose wet brining when you want:
- Juicy, moist meat after cooking
- Even seasoning on large or irregular cuts
- Complex spice flavors infused throughout the meat
- Faster curing times
- Products that will be cooked: corned beef, pastrami, holiday turkey, cured ham
- Fish preparation before smoking
- A more forgiving process (good for beginners)
Common Mistakes With Dry Curing
These are the errors I see most often:
- Not weighing salt. Eyeballing salt for dry curing is reckless. Use a kitchen scale. Every time. A 10% error in salt can mean the difference between perfectly cured and inedibly salty.
- Case hardening. If the exterior dries too fast, it forms a hard shell that traps moisture inside. The interior rots while the outside looks fine. Maintain 70–80% humidity in your curing chamber and start the drying process slowly.
- Skipping curing salt. For whole muscles that will be air-dried, curing salt is a safety requirement, not a suggestion. Botulism is rare but deadly.
- Wrong temperature. Dry curing should happen at 36–40°F (2–4°C) during the salt penetration phase. Too warm and bacteria grow. Too cold and the salt penetrates too slowly.
- Impatience. Pulling meat from the cure before salt has fully penetrated leaves an unseasoned core. Use the 1-week-per-inch rule and stick to it.
Common Mistakes With Wet Brining
- Using warm brine. Always cool your brine to below 40°F before adding meat. Submerging meat in warm liquid is inviting bacterial growth.
- Too much salt, too long. Over-brining makes meat mushy and unpleasantly salty. A medium brine (5%) for 5–7 days is the sweet spot for most beef and pork cuts. Don’t leave it longer “for extra flavor.”
- Not submerging completely. Any part of the meat above the brine line won’t cure evenly. Use a plate or zip-lock bag of brine to weigh the meat down.
- Reusing brine. Used brine contains meat juices and bacteria. Always make fresh brine for each batch.
- Forgetting to rinse. After brining, rinse the meat under cold water and pat dry. This removes surface salt and helps develop the pellicle if you’re planning to smoke.
Can You Combine Both Methods?
Yes, and some of the best charcuterie traditions do exactly that. A few examples:
Brine then dry cure: Some ham traditions start with a brine injection to get salt into the deep interior quickly, then follow with a dry salt pack on the exterior. This reduces the risk of spoilage in the center of very large cuts like whole pork legs.
Brine then air dry: Pastrami starts as a wet-brined brisket, then gets a pepper and coriander rub, and finally is smoked. Duck prosciutto can be brined briefly before the dry-cure and hanging phase.
Equilibrium “hybrid”: Some modern charcutiers vacuum-seal meat with the equilibrium salt amount plus a small amount of water. This combines the precision of equilibrium dry curing with the even distribution of wet brining. It’s an excellent technique for beginners.
Getting Started: Your First Project With Each Method
First dry cure project — Duck breast prosciutto: It’s small, cures in 24–36 hours, and dries in 7–10 days. Apply 2.5% salt and 0.25% Prague Powder #2, vacuum-seal or pack in a zip-lock bag, refrigerate for 36 hours, rinse, tie with butcher’s twine, and hang in your fridge for a week. Slice thin and serve. Read the full duck prosciutto guide for detailed instructions.
First wet brine project — Corned beef: Make a brine with 50 grams salt, 25 grams sugar, and 1 gram Prague Powder #1 per liter of water. Add pickling spices (mustard seed, coriander, bay leaves, black pepper, allspice). Submerge a beef brisket flat and refrigerate for 7 days, flipping once at the midpoint. Rinse, then simmer for 3–4 hours until fork-tender. That’s it—homemade corned beef that destroys anything from a store.
Master one technique at a time. Once you understand how salt, time, and temperature interact with meat, you’ll instinctively know which method fits your next project.
More Charcuterie Guides
What Is Pink Curing Salt? Sodium Nitrite Explained for Home Charcuterie
Pink curing salt is the most essential — and most misunderstood — ingredient in meat curing. This guide explains what it is, why it's pink, how sodium nitrite prevents botulism, proper usage rates, and whether you can cure meat without it.
10 min readHow Long Does Charcuterie Last? Storage Guide for Cured Meats & Cheese
Understanding proper charcuterie storage ensures you enjoy it at peak quality while avoiding food safety risks.
10 min read